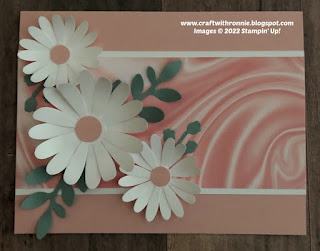
I saw this amazing YouTube Video where Mary Knabe was showcasing the Simply Marbleous Paper (today is the final day of Sale-a-bration so if you want this paper you need to earn it today) and she was doing one sheet wonders, in fact she was doing six at a time. She created thirteen cards and a gift tag out of just 6 sheets of 6 x 6” Designer Series Paper (here is the link to her YouTube: https://www.youtube.com/watch?v=mkt4ZkSjGAo I encourage you to watch it as it is a game changer when it comes to these neutral type Designer Series Paper. I used her measurements and a few of my cards are similar to hers but I just went crazy pulling out stamps, ink, punches and dies and I had a blast.
To start you need to make your first cut at 3 1/2". You will now have a 3 1/2 x 6" piece and a 2 1/2 x 6" piece of DSP. Next, turn the 3 1/2 x 6" piece to the horizontal position and cut at 4 3/4". Finally, you need to turn the 2 1/2 x 6" piece to the horizontal position and cut at 5 1/2".
For your first 12
cards you will need to cut 6 pieces each to 3 3/4" x 5" and 2
3/4" x 5 1/2" out of Basic White cardstock. Now cut 6 sheets of cardstock (Balmy Blue,
Basic Gray, Blushing Bride, Bumblebee, Costal Cabana and Highland Heather are
the colors I chose to use) in half to 5 ½ x 8 ½” scored at 4 ¼”, this will make
you all 12 of the card bases you need for these cards. Assemble as shown below and decorate anyway
you want.
You need to cut your
card base which is 7 x 8 ½” and scored at 3 ½” on the 7” side (Mary and I both
used Basic Black but you could choose any color you want). Now simply space your DSP pieces that measure
1 ¼ x 3” across the card leaving even spaces between the pieces. Here is how mine looks completed.
Now for the gift tag, cut a piece of cardstock (Again I choose to follow Mary’s lead and use Basic Black but any color is fine) to 2 x 4 ¼” and use one of the Tag Topper punches to make it into a tag (I used the Delightful Tags Topper Punch). Now using the DSP pieces that ½” you will do the same as you did on the slimline card and space them evenly across the tag (there will be some excess to trim off when you are done. Here is what that looks like.
I hope you enjoy this project; I am sure glad I stumbled onto the YouTube and I want to give credit again to Mary Knabe for this fun one sheet wonder design. I certainly enjoyed making it. As always you can find the supplies to create this card and much more on my website at https://craftwithronnie.stampinup.net or by click the shopping button at the top of this blog.
Happy Crafting!!!


.jpg)


Thank you Ronnie. I look forward to trying similar ideas with this "marbelous, marvelous" DSP.
ReplyDelete