I have been having some fun with the 3D Daffodils I am making using the Daffodil Dies. Today I decided it would be fun to use some black along with the yellow to really make my card pop.
Here is what I came up with…
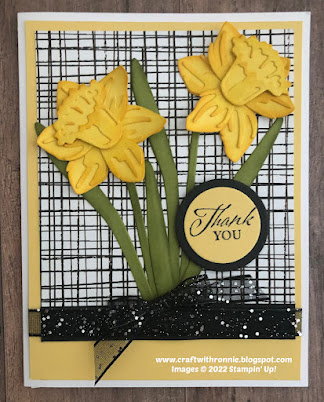
The card base is Basic White cardstock that is cut to 5 ½ x 8 ½”, scored at 4 ¼”. I then took a piece of So Saffron cardstock and cut it to 4 x 5 ¼”, to this I added a piece of the Patterned Party Designer Series Paper that is a black and white check (this paper is a hostess reward you can earn). I cut the Designer Series Paper to 3 ¾ x 4 ½”. I sat this aside while I built my flowers. To create my flowers, I used So Saffron cardstock and cut the layers out. I then used a dauber and added some So Saffron ink around the edges of the pieces to give the flowers depth. I then die cut my leaves and stems from Old Olive cardstock and again using a dauber I added some Old Olive ink around the edges of them.
To build your daffodils you can refer to my post on February 2nd on how to layer the die cut pieces. I finished layering everything and began adding the stems, leaves and flowers onto my Designer Series Paper layer. When that was done, I added a strip of Basic Black cardstock that measured ½ x 3 ¾” to the bottom of the Designer Series Paper piece (this serves two purposes, it covers the ends of the leaves and stems and makes a great backer for the ribbon so it really pops. I wrapped a piece of the Black Glittered Organdy Ribbon around this layer and then added the whole layer onto the card base. For my final additions I stamped “Thank You” from the Elegantly Said Stamp Set onto a scrap of the So Saffron using Tuxedo Black Memento ink and I die cut it using the Layering Circles Dies. I then cut the next largest circle from Basic Black cardstock and mounted the sentiment onto it. This was added to the front of the card using some Dimensionals. Finally, I created a bow from the Black Glittered Organdy Ribbon and adhered it to the card with a Mini Glue Dot.
I hope you enjoy this card I certainly enjoyed making it. As always you can find the supplies to create this card and much more on my website at https://craftwithronnie.stampinup.net or by click the shopping button at the top of this blog or the link to the supplies listed below.
Happy Crafting!!!
Product List


 Host Designer Series Paper")


 Glittered Organdy Ribbon")


No comments:
Post a Comment