Featured Post

MAGNOLIA MOOD JUST A NOTE

Today’s card features the Magnolia Mood Bundle which is a new online exclusive.  I knew the minute I saw this bundle I wanted it.  I could j...

Wednesday, December 8, 2021

Stepped Up

Yesterday I shared a pretty simple card using the Artistically Inked bundle and the Expressions in Ink Designer Series Paper.  So today I am stepping it us and making another card using those same things but adding some extra layers.    

Here is what I came up with…


The card base is Pear Pizzazz cardstock that is cut to 4 ¼ x 11” and scored at 5 ½”.  I then took a piece of Basic White cardstock and cut it to 3 7/8 x 5 1/8” and I embossed that layer using the Tasteful Textures 3D Embossing Folder.  I then cut a piece of Brushed Metallics to 2 ¾ x 4” and a piece of the Expressions in Ink DSP to 2 5/8 x 3 7/8” and adhered them together.  I centered that layer on my card.  I then used the die for the leaves from the Artistically Inked Bundle and cut it out using the Brushed Metallics as well.  To adhere this to the card the easiest thing to do with these little fine pieces is to take some of the Multipurpose Liquid Glue and pour it out on the Silicone Craft mat (the best part about this mat is that any adhesive, including hot glue will just peel off once it has dried, I think this is a must have in every craft room) and use a Dauber to daube the ink on and then just add it to the card as shown above.  For my sentiment I stamped “thanks” which is from the stamp set in the bundle onto Basic White cardstock using Just Jade Ink.  I die cut the sentiment out using one of the Stitched Rectangle dies (remember if you don’t have the die, you can always just cut it out).

I hope you enjoy this card I certainly enjoyed making it.  As always you can find the supplies to create this card and much more on my website at https://craftwithronnie.stampinup.net or by click the shopping button at the top of this blog or the link to the supplies listed below. 

Happy Crafting!!! 

Product List

Tuesday, December 7, 2021

Let the DSP Work for You

I hate to admit it but I too have that issue of finding beautiful Designer Series Paper and then just not wanting to cut it up.  I had this beautiful Expressions In Ink Specialty Designer Series Paper for months.  I would get it out and look at it and then lovingly tuck it back in its plastic and put it away carefully.  Here is what it looks like…


Well, I decided enough is enough and I started cutting and oh as soon as I cut it down, I had card ideas just exploding in my head.  I love the lines of gold that flow through the marbleized colors on the papers.  This one is super simple and it was a lot of fun.  


The card base is Bermuda Bay cardstock that is cut 5 ½ x 8 ½”, scored at 4 ¼”.  To that I added a piece of the DSP that measures 4 x 5 ¼”, it is so beautiful it does most of the work for you.  Then I stamped the sentiment from Biggest Wish Stamp Set, I stamped the large HELLO in Pear Pizzazz ink and then the work friend in Bermuda Bay ink right over top of it on a piece of Basic White cardstock.  I used one of the dies from the Tasteful Labels Dies to cut it out.  I also cut a second on out of Bermuda Bay cardstock.  To get the look I have here I simply took the Bermuda Bay die cut and cut it in half and then glued it behind the white leaving the same reveal on each side. 

I used the leaf die from the Artistic dies and cut it out of the one of the sheets of Gold from the Gold & Rose Gold Metallic Specialty Paper.  To adhere this to the card I used the Multipurpose Liquid Glue and poured some out onto my Silicone Craft Sheet.  Then I used a Dauber and added the glue to the back of the die cut.  This is a great way to handle those little tiny areas and be sure everything is well adhered.  Oh, and the best part is if you just let the glue dry on the silicone craft sheet it peels right off and it does that with hot glue and other adhesives.  So, once you have that adhered simply add your sentiment with some Dimensionals.  Simple, easy, clean and classic. 

I hope you enjoy this card I certainly enjoyed making it.  As always you can find the supplies to create this card and much more on my website at https://craftwithronnie.stampinup.net or by click the shopping button at the top of this blog or the link to the supplies listed below. 

Happy Crafting!!! 

Product List

Monday, December 6, 2021

Somebody’s Blessing

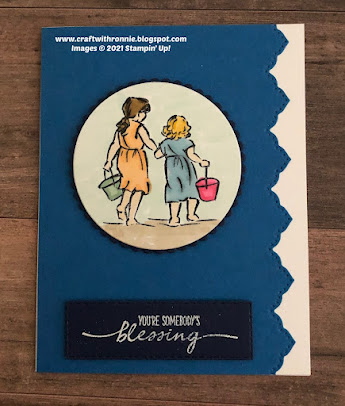
Sometimes there are products that I have looked at time and time again and I just can’t quite figure out what I want to do with them.  The Basic Border Dies were one of those for me.  I bought them some time ago and I just knew I really wanted them but I had not found the right project to use them.  Well, let me tell you once I made my first card using them I just can’t stop.  They add so much to your cards.  So, I was playing with them today and here is what I came up with…


When I saw this image from the Beautiful Moments stamp set, I knew I had to get the set.  This invoked some cherished memories of me playing with my little sister before I lost her (she was just 11).  I remember so many times when we would be at the lake and she would just want to build sand castles for hours.  I would love to say I was always patient but then I was a kid too and I just wanted to play in the water.  But I do remember as I got older and understood we would have a limited time with her I made time to make these memories and it is wonderful to share that love while designing cards (another of my great loves). 

The card base is Basic White cardstock that is cut 5 ½ x 8 ½”, scored at 4 ¼”.  The second layer is Pacific Point cardstock and it was cut to 4 ¼ x 5 ½” and the right side was cut off using one of the Basic Border Dies. 

I stamped the image onto a piece of Basic White cardstock and colored it in using Stampin’ Blends (I will list the colors below).  I then used the Layering Circles Dies and die cut it.  I selected the next largest circle, this time one with a scalloped edge and die cut it out of Night of Navy cardstock.  I stamped the sentiment “You’re Somebody’s Blessing” onto another piece of Night of Navy cardstock using Versamark ink and then I added White Stampin’ Emboss Powder and embossed it using my Heat Tool.  I then die cut it using one of the dies from the Stitched Rectangles dies.  I popped up both the image and the sentiment on the card using Dimensionals.  Super easy card to create. 

I just wanted to add something here.  I use a lot of die cuts for my cards because, well I have them.  I want to remind new card makers that you can simply cut squares out instead of circles, if you want to layer just make the layer a 1/4" smaller than the first layer.  Things like this sentiment can be cut using a trimmer or scissors.   If you love to color but don't have the blends why not invest in a pack of the water color pencils (be sure to get the blending pen because it will make your coloring look much smoother) until you gather up the Stampin' Blends you want.  We all start somewhere and you don't have to own everything to make a card.  

I hope you enjoy this card I certainly enjoyed making it.  As always you can find the supplies to create this card and much more on my website at https://craftwithronnie.stampinup.net or by click the shopping button at the top of this blog or the link to the supplies listed below. 

Happy Crafting!!!
 
Product List

Friday, December 3, 2021

Sending Hugs

I am still having so much fun playing with the new Eden’s Garden Collection.  Today I wanted to make a simple card that comes together in just minutes.      

Here is what I came up with…


The card base is Evening Evergreen cardstock that is cut 5 ½ x 8 ½”, scored at 4 ¼”. The second layer is Soft Succulent cardstock 4 1/8” x 5 ½”.  I used the edge die from the Eden’s Garden bundle and die cut off the left side and then adhered it to the card base.  Next I cut a strip of Gold Foil to 17/8” x 5 ½” and added a piece of the beautiful Ever Eden Specialty Designer Series Paper to that that measures 1 ½ x 5 ½” and then I added that to the card. 

For the final addition I stamped the sentiment from the stamp set in the bundle that reads “Sending Hugs” (because we all need those sometimes) onto Evening Evergreen cardstock using Versamark ink and I added Gold Stampin’ Emboss Powder and embossed it using my Heat Tool.  I then cut it out using one of the Layering Circles dies.  I took the next largest circle die (this one with scalloped edges) and I die cut it out of Gold Foil and I attached the two together.  I added this to the front of the card with Dimensionals. 

I hope you enjoy this card I certainly enjoyed making it.  As always you can find the supplies to create this card and much more on my website at https://craftwithronnie.stampinup.net or by click the shopping button at the top of this blog or the link to the supplies listed below. 

Happy Crafting!!!

Product List