Featured Post

MAGNOLIA MOOD JUST A NOTE

Today’s card features the Magnolia Mood Bundle which is a new online exclusive.  I knew the minute I saw this bundle I wanted it.  I could j...

Tuesday, April 30, 2019

Revisiting the Artistically Asian Stamp Set

So I am going to revisit the Artistically Asian stamp set but this time I am mixing it in with some items that are not retiring.  I have to credit Carol Ann Pendleton for this idea, I saw a card she had made on pinterest that inspired me to give this one a try.  I hope you like it:


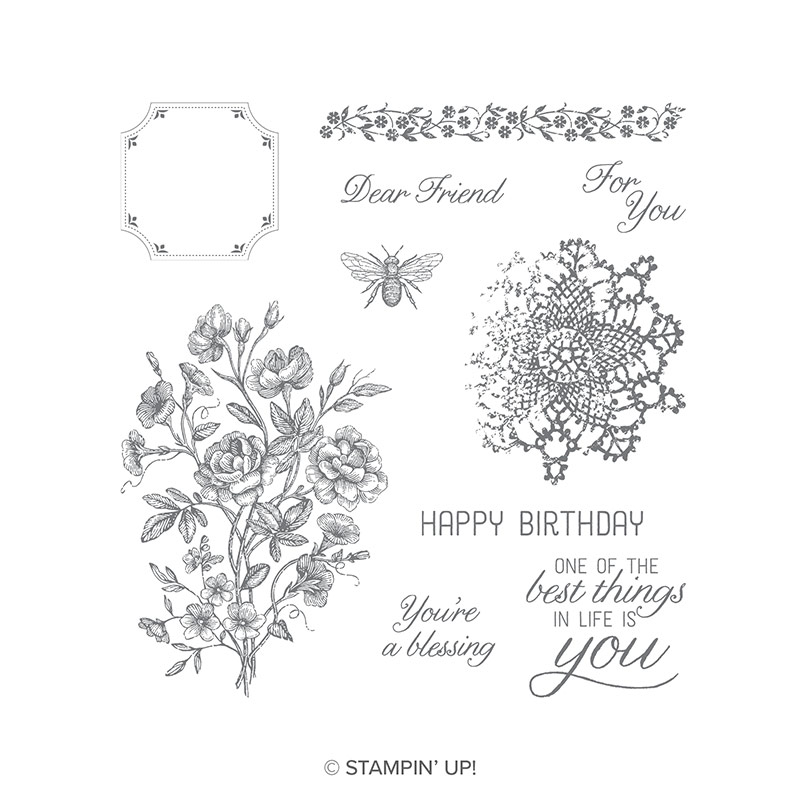
Here is the stamp set, it really has some nice stuff on it!


I started with my standard card base of whisper white (4 1/4 x 11" scored at 5 1/2').  I added a layer of blushing bride ( 4 x 5 1/4").  Then I took two pieces of whisper white that measured 2 x 3" and stamped them in blushing bride using the Bokeh Dots stamp set (I love this bokeh affect on cards, it makes some beautiful backgrounds).  Next I stamped the images twice on each piece with Melon Mambo and once with Versa Mark and used gold embossing powder on that third image.  I mounted those onto pieces of whisper white that were 2 1/4 x 3 1/4.  

I then mounted these two image pieces at angles for interest onto the blushing bride layer and wrapped them in whisper white sheer ribbon and tied a bow.  I stamped the sentiment using Melon Mambo ink and cut it out using the stitched shapes dies and a second piece was cut out of the blushing bride using one of the dies from the layered ovals.  I popped that up with dimensionals and added three leaves in pear pizzaz that I cut out of the Rose Trellis die set and inked with just a touch of the pear pizzaz ink.  

This card could be made with lots of cute changes, a different sentiment, a different ribbon, a simple embossing folder could really pop the blushing bride layer.  Of course it would be great in lots of colors, I was thinking it would be great in blushing bride and gray granite.  The options are endless.  I hope you enjoy this card.  I will list all the supplies at the bottom of this post and they can all be purchased on my website at www.craftwithronnie.stampinup.net or by clicking the shopping button at the top of this blog.  As always, Happy Crafting!!!

Supplies Used:
Stamp Sets: Artistically Asian (141781 / Retiring June 3), Bokeh Dots (148113)
Dies:  Rose Trellis (148549 / Retiring June 3), Layering Ovals (141706), Stitched Shapes (145372)
Inks: Blushing Bride (131172), Melon Mambo (126948), Pear Pizzaz (131180), VersaMark (102283)
Cardstock: Whisper White (100730), Blushing Bride (131189)
Miscellaneous: Whisper White Sheer Ribbon (144172), Dimensionals (104430), Gold Embossing Powder (109129)

Monday, April 29, 2019

Simple Stamping with Artistically Asian

Ok, so I have to admit I have had this set for a long time and have not even begun to use it to its potential and now it is retiring in June.  So here we go with a couple cards using the Artistically Asian stamp set (I have used this one numerous times for sympathy cards because of its simple clean look).  Here is the first card I created using this set:


I began with a black card base (something I don't often do but each time I do I wonder why I don't use more black in my cards because it really sets off the other colors).  My base is 4 1/4 x 11" scored at 5 1/2" to make an A-2 card.  I then added this beautiful designers series paper called Petal Promenade, while the one side is bright busy flowers I loved the simple clean look of grays and pinks in a marbled affect for this card (this piece is 4 x 5 1/4").  I then pulled out my trusty dies and die cut two squares using the stitched shapes dies one in black and one in petal pink.  I then stamped the image using smoky slate ink (love how it pulled the gray out of the designer series paper).  I also cut two rectangles using the rectangle stitched dies (one from black and one from whisper white), I stamped my sentiment on the white piece with Memento ink.  I off set the pieces and then popped both with dimensionals.  I really like the twist I used rather than those perfectly centered shapes (I just think it makes the card more interesting).

So there you have it, simple, clean and beautiful.  All the supplies can be found on my website at www.craftwithronnie.stampinup.net or by clicking the shopping button at the top of this post.  But don't wait too long or you will miss out as both this designer series paper and the stamp set are retiring.  As always, Happy Crafting!!!

Supplies Used:
Paper:  Petal Promenade DSP (146913), Petal Pink CS (146985), Black CS (121045), and Whisper White CS (100730)
Stamps: Artistically Asian (141781)
Dies: Rectangle Stitched (148551) and Stitched Shapes (145372)
Inks: Smokey Slate (131179) and Memento (132708)
Misc.: Dimensionals (104430)

Friday, April 26, 2019

Another Dragonfly Dreams and Petal Promenade Card

I really wanted to showcase these great products before they retire and are no longer available.  So here is today's card:


I started with a base made of whisper white cardstock (4 1/4 x 11", scored at 5 1/2").  I added a layer of blushing bride cardstock (4 x 5 1/4") and then I really wanted to use the petal promenade designer series paper but I wanted to soften it just a tad.  So to accomplish that I cut a piece of the paper at 3 3/4 x 5" and then took a piece of vellum that I had cut at 4 1/4 x 5" (which I scored at 1/4" and 4" on the 4 1/4 " side) I wrapped that vellum around the designer series paper and folded the scores over to the back side and glued it down.  I then attached that piece to the blushing bride layer and the whole thing to the card base.

I cut the box for the sentiment out of blushing bride cardstock using the Rectangle Stitched dies and then stamped the sentiment with Versa Mark ink and embossed it using the Cooper embossing powder.  I cut the small dragonflies (I used all five this time) out of the beautiful Cooper foil paper (it really did make them pop) and I adhered the dragonflies and the sentiment using the mini dimensionals.  I added a piece of the whisper white sheer ribbon to finish off the card.

Tip:  To keep the vellum closer to the paper and allow the design to show through just a bit more I added some glue dots under the dragonflies and the sentiment so it would pull the vellum closer to the designer series paper but they would not show.

I hope you enjoy this card, I know I sure like how it came out.  I will list the supplies I used below and they can be purchased through my website at www.craftwithronnie.stampinup.net or by clicking the shopping button at the top of this blog.  But do remember that these products are on the retiring list so don't wait and miss out.  As always, Happy Crafting!!!

Supplies Used:
Paper:  Petal Promenade DSP (146913), Copper Foil (142020), Whisper White CS (101650), Blushing Bride (131198), Vellum (101856)
Ink:  Versa Mark (132708)
Dies:  Detailed Dragonfly(142749) and Rectangle Stitched (148551)
Misc.:  Copper Embossing Powder (141636), Whisper White Sheer Ribbon (144172), Mini Dimensionals (144108)

Thursday, April 25, 2019

Dragonfly Dreams and Petal Promenade

I have vowed to use some of my amazing stash of products that will be retiring on June 3rd and wait to start sharing some of the new products until we get closer to the catalog going live to customers.  This is for two reasons, one I want to enjoy creating with current products so I can show you the possibilities so you too can get them before they retire and also because I need to clear my stash for some of the beautiful new products (not that these are not equally beautiful mind you).  So here is a card I made using one of my favorite stamp and die sets that will be retiring along with the beautiful paper I used.

This card just came to me, I have always loved these dragonflies but had never considered them in pink.  Well I had this beautiful variegated petal pink ribbon and when I saw it with the gorgeous bokeh paper which also featured the pink and white I just knew I needed to use it.


So I started with a basic whisper white card base (11 x 4 1/4", scored at 5 1/2") I added a layer of petal pink cardstock (4 x 5 1/4") and a layer of the petal promenade pink and white bokeh paper (3 3/4 x 5").  Hey remember my tip and cut the dragonflies out of the center of the pink layer (this saves paper and keeps the mailing weight down.

I stamped the underside of the dragonfly with Blushing Bride ink onto very vanilla cardstock and then cut the large dragonfly and the small ones out of the petal pink (I did cut off a couple of the small dragonflies because I liked the look of three verses five and I adhered the large petal pink dragonfly onto the very vanilla piece I had stamped but only down the center so the wings would look more 3-D).  I adhered the small dragonflies directly onto the paper but I did shape the wings of the large dragonfly (just used my bone folder) and popped it up with dimensionals.  I stamped the sentiment with Memento ink and simply assembled the card.

I love how soft this card looks, it will be perfect for that special friend.  I will list all the supplies I used below and they can all be found on my website (at least until they retire so don't wait) at www.craftwithronnie.stampinup.net  or by clicking the shopping button at the top of this post.  As always, Happy Crafting!!!

Supplies Used:
Paper: Petal Promenade DSP (146913), Petal Pink CS (146985), Very Vanilla CS (101650), Whisper White CS (100730)
Inks: Blushing Bride (131172), Memento Ink (132708)
Stamp Set: Dragonfly Dreams (142924)
Dies: Detailed Dragonflies (142749
Misc.: Petal Pink Variegated Ribbon (148776), Dimensionals (104430)

Monday, April 22, 2019

On Stage Charlotte 2019

So I received my notice that my Product Purchase Premiere (pre-order of new products from the new annual catalog) has been shipped and will be here sometime next Wednesday.  So in the mean time I thought it would be fun to post pictures of the amazing cards I received while swapping at the event.  As you know if you have been following me that past few weeks I went a little crazy making swap cards (because I am new to Stampin Up and I want as much inspiration as I can get) to swap with others attending the event.  I made a total of 125 cards and swapped about 115 of them for cards and even a few 3-D items.  Here are some pics of what I received:


Wow, now there is a bunch of talent right there.  I was thrilled with everything I received and can't wait to try a few of these myself.  I have posted the instructions for all the ones I made for the event here on my blog.  But this one is one of my favorites of the bunch:


I was sad to see that County Livin' the stamp with the boots (it also has a guitar and an adorable old pickup truck in it) is retiring.  I also will be seriously missing this Wood Textures 6 x 6" Designer Series Paper (I actually ordered a few packs of this to stash away for future projects).  If either of these catches your eye be sure to get your order in quick before they are retired and gone for good.  I will put the information for both of them below.  You can order at www.craftwithronnie.stampinup.net or by clicking the shopping button at the top of this blog.  As always, Happy Crafting!!!


Wood Textures 6" x 6" Designer Series Paper Item # 144177 ($11.00 / 48 sheets / 4 each of 12 double sided designs)

Country Livin' Stamp Set Item # 141925 (clear mount $15 / wood mount $20)


Friday, April 19, 2019

Make and takes from On Stage Charlotte 2019

As promised I am going to share a few more of the beautiful cards we got to make at the Stampin Up On Stage in Charlotte last Saturday.  Oh and I am thrilled my pre-order of new products is shipping now so I will be posting some great new projects using it next week along with some pretty items that are retiring that you will want to get ordered right away so you don't miss out. 

This one is so adorable, and I won the stamp set at the event so I am really thrilled.  It is from the Bird Ballad Suite which is totally adorable.  I loved coloring these beautiful little birds with my Stampin Blends and see lots more projects using this stamp and these papers in my future.  Oh and I love that ribbon as well, really easy to work with.

This card featured products from the Come Sail Away Suite.  I especially love the masculine look to the papers in this pack.  I also got to play with the aqua painter and the new watercolor paper (oh my is it nice paper) to create the sky which I was thrilled with.  I also ordered this set so you can be sure you will be seeing lots more made with it.


This card was created using the Follow Your Art Suite.  While it may not be exactly my style the more I look at it the more I like it.  It would certainly be the perfect paper stamps and accessories to use to create cards or scrapbook pages for that lover of all things arts and crafts.  I can already see this suite in the hands of at least one of my friends.

So there is a quick look at the in colors retiring in June.  Be sure to get your re-inkers and cardstock in these colors before they are gone.  Find them and more on my website at www.craftwithronnie.blogspot.com or by clicking the shopping button at the top of this blog.  As always, Happy Crafting.


Thursday, April 18, 2019

Great New Products Coming Your Way

I was so excited to have the opportunity to attend my very first Stampin Up On Stage event over in Charlotte, North Carolina this past weekend.  I have been looking forward to it since the day I joined Stampin Up and it certainly was not a disappointment.  I am going to share two cards today, one that was a make and take at the event and the second one that was made out of product I received to take home.


This one was the make and take and all I can say is that this paper is stunning, not just this piece but every single piece in the package.  I was so drawn by the colors and the Monet feel of the papers.  This is certainly the first paper I pre-ordered and I just can't wait to play with it some more.  Oh and it's name is Perennial Essence.  


This is a card I created when I arrived home (that top flap opens and there is an oval on the inside with a sentiment.  So this used a new paper pack that we were given at the event called Mosaic Mood (which has shiny accents including that hummingbird which I fussy cut out of the paper).  I sure wish you could see the dimension on this one it is beautiful.  That adorable fern was stamped using a new stamp set called Daisy Lane which also includes some adorable Daisies that have some coordinating punches (more about that one later I promise).

Don't forget though there are many things retiring at the end of this current catalog (June 3rd) so be sure if you want anything you get it before it is gone.  Lets not forget we have 5 In Colors leaving us:


If these are some of your favorites be sure to head over to my website at www.craftwithronnie.stampinup.net or click the shopping cart at the top of this blog and get your supplies ordered (don't forget those re-inkers). 

I will be sure to post more soon including the exciting new In Color 2019 - 2021 collection (oh I am loving them).  As always, Happy Crafting!!!

Wednesday, April 17, 2019

Stampin Up Charlotte On Stage 2019

So it has taken me a few days to recover, LOL.  I had an amazing time and was thrilled to get the opportunity to meet some amazing women and play with some exciting new products.  I even was lucky enough to win a few of them to bring home with me.  So let me first share a pic of my wonderful tablemates, what a great group of ladies, it was my first On Stage and I had never meet a single one of them before that day but by the end of the day they were like great old friends.


Here are a few pics of the event can you believe 1,100 attendees.  Wow, it was amazing!!


Tomorrow morning I will be posting pics of the amazing cards I made while at the event and talking a little bit about some of the new products I am excited to have won (maybe I will even have made something using some of them to show off).  Oh and don't forget there are lots of items retiring so if there is something you just can't live without in the current catalog be sure to get your order in soon.

As always, Happy Crafting!!!


Friday, April 12, 2019

This one is really the last one!!

Well of course I ended up making one final swap card for the event in Charlotte.  This is absolutely the last one as I am packed and ready to head out the door.  I think this one is simple but super sweet and it was inspired by my beautiful daughter in law who is that girly girl country girl who loves her boots, love you Heather!!


This is actually a pretty simple card.  I started with a very vanilla card base and then cut a piece of the very vanilla card stock with the Rectangle Stitched Framelits Dies (the one that is approximately       2 1/4 x 3 1/2").  I then stamped the bootsfirst.  I also stamped it on a piece of stamping mask paper and cut it out (I happen to like the stuff from Inkadindado).  I masked the boots and then I stamped the flowers to give it the appearance that they were behind the boots.  

I used the stampin blends to color the boots and the flowers, I love the way these markers work and they make me look way more talented than I actually am, LOL.  When everything was colored I matted that piece onto a piece of early espresso card stock that measured 2 1/2 x 3 3/4".  I added a strip of the Wood Textures 6 x 6" DSP that measured 2 x 5 1/4".  I glued that piece directly onto the card base and then just popped the boot piece up with some dimensionals.

I did not add a sentiment to the card so that it could be used for anything but I think this would make a great thinking of you card.

I will list all the supplies I used below and they can all be purchased from my website at www.craftwithronnie.stampinup.net or by clicking the shopping cart at the top of this post.  As always, Happy Crafting!!!

Supplies:
Card stock: Very Vanilla (101650) and Early Espresso (119686)
DSP:  Wood Textures 6 x 6" DSP (144177)
Stamps: Country Livin' (141925) and Country Home (147678)
Die:  Rectangle Stitched Framelits (148551) 
Ink:  Memento (132708)
Stampin Blends (I use the combos for most of the coloring): Bermuda Bay (144600), Granny Apple Green (147274), Petal Pink (147272), Soft Suede (147273), Mango Melody (147945) and Cherry Cobbler 144598)
Misc: Dimensionals (104430) and adhesive of choice

Not done yet!!

Ok, so it would appear I was wrong when I made the previous post and I am just not done making swap cards for the Stampin Up On Stage event taking place this weekend (I am attending the one in Charlotte, NC).  I just can't seem to stop as the ideas just keep rushing into my head.  Sometimes I spend days trying to figure out a card to make and yet this past week I can't stop creating.  So I got thinking about making my own DSP (Designer Series Paper) using just stamps and then I got thinking about this beautiful stamp set that is a hostess set and will be retiring in June so I knew I just wanted to do something special with it before then and this is what I ended up with. 


Simple and clean stamping is really in right now and this project takes that concept on in a big way.  So here is the Very Vintage Hostess stamp set I used, isn't it beautiful?


I have used this set on a few other projects and I really love it.  So lets get to it and talk about how this card was created.  I started with some whisper white card stock and rich razzleberry ink and I just randomly stamped the flowers all over the paper.  I then cut that into strips that were 2 x 5" and mounted them onto strips of rich razzleberry card stock that was 2 1/4 x 5 1/4".  I die cut a piece of whisper white using the largest oval from the stitched shapes dies and stamped the sentiment (I used one from another stamp set but there are some really adorable sentiments in this set as well) and the flowers using rich razzleberry ink.  I then die cut a piece of the rich razzleberry card stock using the largest of the scalloped ovals from the layering ovals framelits and layered the white oval on top of it.  

To assemble the card I cut the card base from whisper white card stock to 8 1/2 x 5 1/2" and scored at 4 1/4".  I placed the 2 1/4" wide strip on the left side of the paper directly onto the card base.  I then used some dimensionals and popped up the oval on the center of the card to the right.  I am pretty happy with how it turned out and the best part is it can be reproduced using colors you want.  All it takes is a little paper a stamp set and one color of ink, sure doesn't get any easier than that.

I will list all the supplies below and they can all be purchased from my website at www.craftwithronnie.stampinup.net or by clicking the shopping button at the top of this blog.  As always, Happy Crafting!!!

Supplies:
Cardstock:  Whisper White (100730) and Rich Razzleberry (115316)
Ink: Rich Razzleberry (147091)
Stamps: Very Vintage (146801) and Wonderful Romance (146801)
Dies: Stitched Shapes (145372) and  Layering Ovals (141706)
Misc: Dimensionals ( 104430) and adhesive of choice 

Thursday, April 11, 2019

Final Swap Card for On Stage

Well finally, I have completed my goal of 100 cards to swap with the other Stampin Up demonstrators attending the On Stage event in Charlotte, NC this weekend.  And here it is


While the stamp is quite simple it made for an exciting easel card (something I have been wanting to make for a while).  So here is how it was done:

I started with the base which is a piece of Whisper White card stock that measured 4 1/4 x 11" and was scored at 2 3/4" and 5 1/2" (there are tons of you tube videos on easel cards out there but this made a basic A-2 card).  I then made the layers for the front of the card.  I started with Lemon Lime Twist card stock which I cut out using the largest of the Rectangle Stitched Framelit dies (approx 4 x 5 1/4") I then used the second largest die (approx 3 1/2 x 4 3/4) to cut the Lemon Lime Twist Gingham Gala DSP, then the third largest die (approx 3 x 4 1/2") to cut out another Lemon Lime Twist card stock layer and finally the fourth largest die (approximately 2 3/4 x 4") to cut out a layer of Whisper White card stock.

I stamped the dandelions from the Dandelion Wishes stamp set to the Whisper White layer using Memento ink and then adhered it to the smallest of the Lemon Lime Twist layers.  Then I wrapped those pieces with Basic Black Bakers Twine and tied it in a little bow.  When I had that done I adhered it to the Gingham Gala layer and then that to the largest of the Lemon Lime Twist layers.  

To make the easel you simply glue your topper on to the bottom half of the fold (that part that was scored at 2 3/4").  I stamped the sentiment from the same stamp set onto a piece of Whisper White card stock that was 1 1/4 x 2 1/4" and mounted that onto a piece of Lemon Lime Twist card stock that measured 1 1/2 x 2 1/2".  I popped them up using a couple dimensionals (this is what allows your easel card to stand up) and added three little Clear Rhinestone Jewels to the dandelions and it was done.  I made a number of these cards using all the different colors in the Gingham Gala DSP paper pack and simply used the color of card stock that coordinated (so I ended up with some that were Lemon Lime Twist, Balmy Blue, Daffodil Delight, Grapefruit Grove, and Highland Heather).

I hope you enjoyed this card I know I enjoyed making it.  I will list all the supplies I used below (remember you can change up the colors and make lots of these), supplies are available for purchase on my website at www.craftwithronnie.stampinup.net or by clicking the shopping button at the top of this blog.  As always, Happy Crafting!!!

Supplies:
Stamps:  Dandelion Wishes (146747)
Ink: Memento (132708)
Card stock: Whisper White (100730), Lemon Lime Twist (144245)
DSP: Gingham Gala (148554)
Dies:  Rectangle Stitched Framelits (148551)
Misc.: Basic Black Bakers Twine (141682) and Jewels Basic Rhinestones (119246)

Wednesday, April 10, 2019

Best Catch

So my journey to make 100 (or more cards) for the card swap at the upcoming Stampin' Up On Stage in a few days over in Charlotte, NC continues.


Today I decided to work on some masculine cards (in honor of the men in my life who are all great fisherman).  I just fell in love with this bundle and I see many more cards using it in my future (actually I will be posting one I did for a swap group I belong to in a few days, once they have all seen it) because this set is too awesome not to use over and over.  


Once again I feel I need to apologize for my lack of photography skills.  I wish I could have captured the shine from the fish (it looks like it is wet, but I will explain that as I go).  So I started my card with a piece of Thick Very Vanilla for the base (5 1/2 x 8 1/2" scored at 4 1/2").  I then added a layer of Night of Navy card stock that measured 5 1/4 x 4" (a little hint here, I needed a piece of the Night of Navy for my sentiment layer so I cut out a piece from the center since it is going to be covered up by the next layer that is 1 1/4 x 3 1/4").  I cut a piece of Sahara Sand card stock to 3 3/4 x 5" and 1 x 3" (this one is for the sentiment and will be used later).  

To get the affect I was looking for I stamped the larger piece of the Sahara Sand card stock with Crumb Cake ink using the Cracked Paint background stamp.  I then used a distressing tool and roughed up the four sides.  Next I took a stamping sponge (I cut mine into four pieces so they go further and I also feel I have better control) and used it to rub a little Crumb Cake ink on the edges to further distress the piece.  

For the fish I stamped it onto a scrap of Very Vanilla card stock with Memento ink (as I have said before I use the Memento anytime I am using alcohol markers so I don't get smearing) and cut it out using the coordinating die.  When I had it all cut out I colored it in using Stampin Blends.  To give it that wet look (gosh I wish you could see how cool that actually looks), I placed my fish face down onto my Versamark ink pad and just pushed down.  I then lifted it off and covered it with Clear Embossing Powder and heat set it (thus making it shiny like you would expect a fish to be).  I cut the cattails from a piece of Pear Pizzazz card stock using that same coordinating die set.  I used a piece of my stamping sponge with Pear Pizzazz ink to distress it as well and give it a little dimension.  I colored the cattails themselves with Stampin Blends.  

For the sentiment I used the Dragonfly Dreams stamp set (you could use any sentiment you wanted I was just trying to stay a little neutral since this is a swap card).  I stamped it onto the smallest piece of the Sahara Sand card stock that I cut out using Night of Navy ink.  I then layered that piece onto the smallest piece of the Night of Navy card stock that I cut out and wrapped it with Linen Thread.

To assemble the card I simply layered it and added the sentiment on an angle at the bottom using dimensions, glued the cattails under the right side of it and added my fish (using dimensions as well) to the top left.  

There you have it.  I had a blast making this card and I hope you enjoy it as well.  I will list the supplies I used below and they can be purchased from my website at www.craftwithronnie.stampinup.net or by clicking the shopping button at the top of this blog.  As always, Happy Crafting!!!

Supplies:
Cardstock: Thick Very Vanilla (144237), Sahara Sand (121043), Very Vanilla (101650), Night of Navy (100867), and Pear Pizzazz (131201)
Inks: Night of Navy (147110), Memento (132708), Crumb Cake (147116), Versamark (102283) and Pear Pizzazz (147104)
Stampin Blends (combos): Soft Suede (147273), Bermuda Bay (144600), Granny Apple Green (147274), and Petal Pink (147272)
Stamp Sets: Dragongly Dreams (142924) and Cracked Paint (148752)
Bundle (this is a stamp and die set and you save 10% buying them as a bundle from now until June 3rd):  Best Catch (150605)
Misc.:  Stamping Sponge (141337), Clear Embossing Powder (109130), Heat Tool (129053), Linen Thread (104199) and Dimensionals (104430)
And as always the adhesive of your choice

Tuesday, April 9, 2019

Life looks beautiful on you!!

So it is back to cards for the swap for this upcoming On Stage Stampin' Up event I am attending over in Charlotte, NC this Saturday.  I am so super excited, this is my first event as a Stampin' Up demonstrator and I just can't wait.  So todays cards are more using the Beautiful You stamp set, I just can't seem to get enough of this set.


I made these in several different color combinations, not sure which is my favorite, how about you?

So lets talk about how simple this card was to make.  I started with a base that was made using a 5 1/4" x 8 1/2" piece of Whisper White card stock that was scored at 4 1/4" to make a perfect card.  I then cut a piece of card stock (as you can see I used Daffodil Delight on one, Highland Heather on another and finally Petal Pink on the last) to 4 x 5 1/4" to use as my first layer.  I then stamped this to turn it into a custom make piece of DSP using the Very Vintage hostess stamp set (I just love this lace stamp).  For the Daffodil Delight and Highland Heather I used the same color ink and made them tone on tone, however, for the Petal Pink I decided to give Crumb Cake ink a try and I am very pleased with how it turned out.

So for my ladies, I cut Whisper White card stock out using the second to the smallest rectangle from the Rectangle Stitched Framelits and for the sentiment I cut Whisper White card stock using the small square die in that same set.  I then stamped the lady and the sentiment (both from the Beautiful You stamp set) with Memento ink (again because I am using alcohol markers to color my lady and I don't want the black to bleed into my markers).  I colored each lady with the coordinating Stampin Blend Combo markers.  

Then I cut mats for the ladies and sentiments (I used Soft Sea Foam card stock for the yellow and Crumb Cake for the others), the mat for the lady was cut using the 3rd from the smallest rectangle from the Rectangle Stitched Framelits and the mat for the sentiment was cut at 1 7/8 x 1 3/8".  I did use dimensionals to pop up the sentiment in the bottom right corner.  

As a finishing touch I added a half of one of the Pearlized Doilies to the lady before I adhered her to the card front (yes you read that right, I cut the doily in half since it seemed a waste to high more than half of it under the paper).  

This is another of those simple and yet classy cards that can be made into sets by simply changing up the colors you use.  I will post a list of supplies I used below which are available for sale on my website at www.craftwithronnie.stampinup.net or by clicking the shopping button at the top of this post.  As always, Happy Crafting!!!

Supplies:
Cardstock:  Whisper White (100730), Daffodil Delight (119683), Highland Heather (146986), Petal Pink (146985), Crumb Cake (120953) and Soft Sea Foam (146988)
Inks:  Memento (132708), Daffodil Delight (147094), Highland Heather (147103) and Crumb Cake (147104)
Stampin Blend Markers:  Petal Pink 147272), Daffodil Delight (144603) and Highland Heather (147276)
Dies:  Rectangle Stitched  Framelits (148551)
Stamp Sets: Very Vintage (146801) and Beautiful You (143637)
Misc: Dimensionals (104430) and Pearlized Doilies (146936)

Monday, April 8, 2019

Gingham anyone?

Let me start with an apology about the photography, I am no photographer and I know I need to invest in a light box and a better camera than my phone but what I have is what I have at this point so this is about as good as I can get it.  LOL


Today's cards continue to be cards I prepared for the swap at the Stampin Up On Stage event in Charlotte, NC next weekend.  I am trying to make 100 cards so I am leaning towards simple and clean.  So as you can see these were make in four different colors but the directions are all the same so let me start with the basics.

I cut a piece of whisper white card stock in half at 5 1/2 x 8 1/2" (now here is my hint for time saving when making two card bases).  I started by scoring the card stock at 8 1/4" on the 8 1/2" side and then simply cut the piece in half at 5 1/2" (much faster than scoring each one separately).  I then cut my next layer (I used balmy blue, daffodil delight, lemon lime twist and highland heather) at 4 x 5 1/4" and adhered it to the card base.  Next I added the coordinating Gingham Gala DSP that I cut at 2 x 5" to the left side of the card.

For the focal point I used the Beautiful You stamp set.  Just look at all the wonderful stamps in this set:

I stamped the image onto a piece of whisper white card stock that I had cut out using the largest oval from the Stitched Shapes Framelits using Memento ink (so I can use the Stampin Blends and the ink doesn't smear).  I then selected a complimentary color (I used Daffodil Delight on the Balmy Blue and Highland Heather cards and Highland Heather on the Daffodil Delight and Lemon Lime Twist cards) and cut a piece of that cardstock out using the largest scalloped die from the Layered Ovals Framelits.  Next I colored in my beautiful lady using Stampin Blend Alcohol Markers in Daffodil Delight and Highland Heather (I love these because they do all the work for me).  I layered the stamped image on the scalloped oval and then popped the whole thing up on the center of the card using dimensions.  

While I decided not to stamp a sentiment on these cards (so they can be used for anything) I do believe any one of the sentiments in this set would be great on this card.  

As I said this is a pretty basic card and I will list the supplies I used to make all four below and they are available for purchase on my website at www.craftwithronnie.stampinup.net or by clicking the shopping button at the top of this post.  As always, Happy Crafting!!!

Supplies:

Card stock: Whisper White (100730), Balmy Blue (147105), Daffodil Delight (147094), Lemon Lime Twist (144245) and Highland Heather (146986)
DSP: Gingham Gala (148554)
Ink: Memento (132708)
Markers:  Stampin Blends Combos in Highland Heather (147276) and Daffodil Delight (144603)
Stamp Set: Beautiful You (143637)
Dies:  Layering Ovals (141706) and Stitched Shapes (145372)
Misc.: Dimensionals (104430) Adhesive of choice

Sunday, April 7, 2019

Daisies bring me smiles

Like most people flowers can bring a smile to my face pretty quickly, so when I was designing cards to swap at the Stampin Up On Stage event in Charlotte, North Carolina next week I could not resist making something with a flower.  So here they are, I made them with the cute Gingham Gala 6 x 6" DSP papers and my trusty Daisy punch.  I also decided to make them in more than one color just to add a twist.  So I made one featuring Daffodil Delight and the other featuring Highland Heather (ironic that both papers I chose to use have flower names as well isn't it).  


This is a very simple basic card that is easy to mass produce.  These would make great sets to give away as hostess gifts or neighbor gifts (going to have to work on making these with the other three colors featured in the Gingham Gala paper (those would be Balmy Blue, Grapefruit Grove and Lemon Lime Twist) I think little sets of five cards and envelopes all fit beautifully in Stampin Up Acetate Card Boxes, these little clear boxes make the card sets a perfect gift (they are item #144628) if you are interested.

So back to the card.  I started with my Daffodil Delight (or Highland Heather) card stock to make the card base.  On this one however I did alter it a bit and cut my card stock at 4 1/4 x 11" and then scored at 5 1/2" and folded it down to make a card that opens from the bottom to the top instead of from side to side (just something different).  I then added a piece of the Gingham Gala DSP that measured 2  x 5 1/4" on the left side of the card base (this paper has a small gingham on one side and a large gingham print on the other so you can use either side your choice, here is one I did with the larger print).


Next I stamped the sentiment from the Detailed with Love stamp set onto a scrap piece of Whisper White card stock using Balmy Blue (or Highland Heather) I then cut the sentiment out using the 4th largest scalloped oval from the Layering Ovals Framelit.  Next  I  stamped and three of the Daisies from the Daisy Delight stamp set using Daffodil Delight ink for one set and Highland Heather ink for the second set.  I  and I punched out the daisies using the Daisy Punch.  I stamped the center of top Daffodil Delight daisy with Crumb Cake ink (I used Daffodil Delight on the Highland Heather daisy).  I used my bone folder to curl up the petals on all the daisies and then layered the three of them off set from one another and glued them all together.  I put the sentiment on using dimensions just to add some depth.  

I am pretty happy with this plain and simple yet pretty card.  I hope you enjoyed it as well and as always Happy Crafting!!!  The supplies I used for this project are listed below and can be purchased from my website at www.craftwithronnie.stampinup.net or by clicking the shopping button at the top of this post.

Supplies:
Card stock:  Daffodil Delight (119683), Whisper White (100730), Highland Heather (146986)
DSP:  Gingham Gala 6 x 6" DSP (148554)
Inks:  Balmy Blue (147105), Daffodil Delight (147094) and Crumb Cake (147116)
Stamp sets:  Daisy Delight (142669) and Detailed with Love (146606)
Misc.:  Daisy Punch (143713), Layering Ovals Framelits (141706) and Dimensionals (104430)


Saturday, April 6, 2019

You are my sunshine

I so loved that song when I was young and as soon as I saw this sentiment stamp I knew I needed to use it.  I love the use of the velum specialty paper on this project.  I keep finding myself coming back to this Floral Romance Specialty DSP because it just makes me happy. 


This card was a bit of a departure from my normal cardmaking but I am really happy I took it on.  I always feel velum is beautiful but not that easy to work with as the adhesive shows through it so much.  So here is how I worked around that.  I started with a basic whisper white cardstock base that is 4 1/4 x 11" and scored at 5 1/2" to make a perfect A-2 card.  

I cut the first layered mat out of Fresh Fig cardstock (this one is retiring on June 3rd so order it now if you love it so you don't miss out if you love it) at 5 1/4 x 4", I then cut the center of it leaving about a 1" boarder on all four sides (this was done for two reasons, the first being that I wanted the white card base to show through my velum making it stand out more and the second was a trick a friend taught me (you save paper that you can use on another card and you save weight which can play into things when mailing cards that are multiple layers).  I then cut a piece of Petal Pink card stock at 3 3/4 x 5" and using the layering ovals framelits I cut the largest of the oval dies out of the center of this piece.  I cut my velum DSP at 3 1/4 x 4 1/4" and adhered it to the back of the oval (the Fine Tip Glue Pen works great for this).  

After I had those layers all mounted together I took a piece of the Floral Romance Specialty DSP cut at 1 x 4 1/2" and wrapped it around that layer and then played the whole card top on the whisper white base.  For my final element I used a 2" circle punch and punched out a Fresh Fig circle and then used the Stitched Labels framelits to cut the circle that I then stamped using Fresh Fig ink with the sentiment from the Stitched All Around stamp set (hint here, if you love this set think hard about ordering it as a bundle from now until June 3rd so you save 10% on the bundle, the order number for the bundle is 148374).  I added two little clear Jewels Basic Rhinestones and mounted it onto the Fresh Fig circle which I then popped up using dimensions.

I hope you enjoy this card and as always Happy Crafting!!!

The supplies used to make this card are listed below and can be purchased on my website at www.craftingwithronnie.stampinup.net or by clicking the shopping button at the top of this blog.

Supplies Used:

Cardstock:  Whisper White (100730), Petal Pink (146985) and Fresh Fig (146945)
DSP: Floral Romance Speciality (148586)
Stamp Set: Stitched all Around (146629)
Die Set:  Stitched Labels Framelits (146828) and Layering Ovals Framelits (141706)
Punch: 2" Circle punch (133782)
Ink:  Fresh Fig (147144)
Misc.: Jewels Basic Rhinestones (144220),  Fine Tip Glue Pen (138309) and Dimensionals (104430)


Friday, April 5, 2019

Seeing Dragonflies

I loved the center step card I made for my mother in laws birthday but I really like cards that fit into standard envelopes (don't like having to pay that extra postage for square cards) so here is one that is a perfect A-2 card (finished size is 4 1/4 x 5 1/2") that fits nicely into an A-2 envelope and can be mailed with a regular first class stamp.


So for the base I cut a piece of Mossy Meadow cardstock to 4 1/4 x 11".  I then placed the cardstock in my trimmer (with the 4 1/4" going across and the 11" going down) at the 1" mark and cut it from 1" to 6 1/2" (there are lots of you tubes out there you can watch for center step cards to get a better idea of how this is done).  I then moved it over to the 3 1/4" mark and cut the other side the same way.  I scored those 1" sides at 1", 2" and 6 1/2" and the center was scored at 5 1/2" and then they were folded just like yesterdays card (the only difference here is the width of this finished card).  

I then made the layers for my card by cutting Pear Pizzazz cardstock to 17/8 x 4 1/4", 7/8 x 4 1/8" and two at 7/8 x 4 1/4".  The Floral Romance Specialty DSP was cut at 1 3/4 x 4 1/8" and two at 3/4 x 4 1/8".  I stamped a cute sentiment from the Beauty Abounds stamp set onto the base of the card on the piece that measured 7/8 x 4 1/8" using Mossy Meadow ink and then simply layered everything as shown in the photo.  

The cute dragonfly is from the Detailed Dragonfly Thinlits and the first layer was cut from Soft Sea Foam cardstock and the top layer was cut from Pear Pizzazz cardstock.  I then used my bone folder and curled his wings up just a little to give him the look of flying and popped him up in the center of the card with a couple dimensions.  

I hope you enjoy this card.  And as always Happy Crafting!!!

Below is a list of the supplies used to make this card.  These supplies and lots more are available on my website at www.craftwithronnie.stampinup.net or by clicking on the shopping button at the top of this blog.

Supplies:  
Cardstock: Mossy Meadow (133676), Pear Pizzazz(131201), Soft Sea Foam(146988)
DSP:  Floral Romance Specialty (148586)
Dies: Detailed Dragonfly Thinlits (142749)
Stamp Set:  (148726)
Ink: Mossy Meadow (147111)
Misc.: Multipurpose Liquid Glue (110755), Dimensionsl (104430), Stampin' Trimmer (126889) and Bone Folder (102300)

Thursday, April 4, 2019

Beauty Abounds Center Step Card

I had posted a picture of this cute card that I made my mother in law just a few days ago for her birthday on my Facebook page and promised to post the full instructions here on my blog so here goes.


The finished card measures 5 1/2" x 5 1/2" and is just adorable.  I started with the base which is made with a piece of crumb cake card stock that measured 11 x 5 1/2".  I placed the piece in my trimmer    1 1/4" in from the left hand side and cut from 1" to 6 1/2".  I then moved the piece over to 4 1/4" from the left side (or 1 1/4" from the right side) and again cut from 1" to 6 1/2".  I then started at the 1" mark and scored just the outside pieces (both left and right) at 1", 2" and 6 1/2" and the center piece at 5 1/2".  Starting at the 1" score make a mountain fold, at the 2" make a valley fold and then mountain folds at the 5 1/2" center score line and the two outer 6 1/2" score lines.  This makes the cards structure.

I then cut pieces of Blushing Bride cardstock at 3 1/4 x 4 1/4", 7/8 x 4 1/4" and two pieces at 7/8 x    4 1/4".  I stamped the two 7/8 x 4 1/4" pieces with the stamp from the Very Vintage Hostess Set using versa mark ink and then embossed with white embossing powder.  I stamped the sentiment, Enjoy your special day! from the Dragonfly Dreams stamp set also with versa mark ink and used white embossing powder.  For the little butterflies I used a technique that is new to me (but something I will definitely be doing again) it is reverse stamping.  So to get my cute little butterflies which are from the Beauty Abounds stamp set, to face one another I stamped the one on the left onto my silicone craft sheet with versa mark and then laid my crumb cake cardstock onto it and rubbed (which moved the ink onto the paper) and then I went ahead and used my white embossing powder on it as well (this required I fussy cut it out but that was a small price to pay to get these mirror images).   

Finally for the center of my card I cut a piece of whisper white cardstock to 3 x 4" which I stamped the beautiful lace looking stamp from the Very Vintage stamp set using Crumb cake ink.  Then I got busy with the Butterfly Beauty Thinlits Dies.  I cut the first layer out of Crumb Cake cardstock and the second layer out of Blushing Bride cardstock.  Due to the size of the butterflies I needed to cut the top butterfly off (but I did re-position it on the card just a little lower, so it would fit in the envelope, which I made using my envelope punch board).  I attached the two layers of the butterflies along with all my other pieces using the fine-tip glue pen (I love the fine line of glue I can get using it).

I hope you enjoy this project I know I did.  As always Happy Crafting!!


The supplies used for this project are listed below and can be purchased from my website at www.craftingwithronnie.stampinup.net or by clicking the shopping button at the top of this blog.

Supplies Used:
Cardstock: Crumb Cake (120953), Blushing Bride (131198), Whisper White (100730)
Stamps: Very Vintage (146801), Dragonfly Dreams (142924) , Beauty Abounds (148726)
Inks: Versa Mark (102283), Crumb Cake (147116)
Misc.: White Embossing Powder (109132), Heat Tool 129053, Silicone Craft Sheet (127853), Fine-Tip Glue Pen (138309)