Featured Post

MAGNOLIA MOOD JUST A NOTE

Today’s card features the Magnolia Mood Bundle which is a new online exclusive.  I knew the minute I saw this bundle I wanted it.  I could j...

Monday, February 28, 2022

Simply Marbleous One Sheet Wonders

I saw this amazing YouTube Video where Mary Knabe was showcasing the Simply Marbleous Paper (today is the final day of Sale-a-bration so if you want this paper you need to earn it today) and she was doing one sheet wonders, in fact she was doing six at a time.  She created thirteen cards and a gift tag out of just 6 sheets of 6 x 6” Designer Series Paper (here is the link to her YouTube: https://www.youtube.com/watch?v=mkt4ZkSjGAo I encourage you to watch it as it is a game changer when it comes to these neutral type Designer Series Paper.  I used her measurements and a few of my cards are similar to hers but I just went crazy pulling out stamps, ink, punches and dies and I had a blast.   

To start you need to make your first cut at 3 1/2".  You will now have a 3 1/2 x 6" piece and a 2 1/2 x 6" piece of DSP.  Next, turn the 3 1/2 x 6" piece to the horizontal position and cut at 4 3/4".  Finally, you need to turn the 2 1/2 x 6" piece to the horizontal position and cut at 5 1/2".

For your first 12 cards you will need to cut 6 pieces each to 3 3/4" x 5" and 2 3/4" x 5 1/2" out of Basic White cardstock.  Now cut 6 sheets of cardstock (Balmy Blue, Basic Gray, Blushing Bride, Bumblebee, Costal Cabana and Highland Heather are the colors I chose to use) in half to 5 ½ x 8 ½” scored at 4 ¼”, this will make 
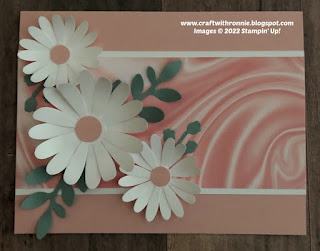
you all 12 of the card bases you need for these cards.  Assemble as shown below and decorate anyway you want.


These next cards are all assembled the same way as the one on top.  I have not added sentiments to the other five yet as I intend to do them as I need a card.  I love having a stash of cards on hand.


Next, I started on the Slimline card that Mary showed, mine looks just like hers except I chose to add my sentiment using the Amazing Thanks Dies. 

You need to cut your card base which is 7 x 8 ½” and scored at 3 ½” on the 7” side (Mary and I both used Basic Black but you could choose any color you want).  Now simply space your DSP pieces that measure 1 ¼ x 3” across the card leaving even spaces between the pieces.  Here is how mine looks completed.


Now for the gift tag, cut a piece of cardstock (Again I choose to follow Mary’s lead and use Basic Black but any color is fine) to 2 x 4 ¼” and use one of the Tag Topper punches to make it into a tag (I used the Delightful Tags Topper Punch).  Now using the DSP pieces that ½” you will do the same as you did on the slimline card and space them evenly across the tag (there will be some excess to trim off when you are done.  Here is what that looks like.


I hope you enjoy this project; I am sure glad I stumbled onto the YouTube and I want to give credit again to Mary Knabe for this fun one sheet wonder design.  I certainly enjoyed making it.  As always you can find the supplies to create this card and much more on my website at https://craftwithronnie.stampinup.net or by click the shopping button at the top of this blog. 

Happy Crafting!!!


Saturday, February 26, 2022

Simple Stamping

What is simple stamping?  It is ink, stamps and paper and that is what we are going to be doing today.  Today’s card was created using one of the free Sale-a-bration stamp sets I have earned, Island Vibes.  I used this set yesterday but I wanted today’s card to show how you don’t have to have a ton of supplies to make a cute card.      

Here is what I came up with…


The card base is Garden Green cardstock that is cut to 5 ½ x 8 ½”, scored at 4 ¼”.  I added a layer of the Regals Designer Series Paper (garden green) that I cut to 4 x 5 ¼”.  I then cut a piece of Very Vanilla cardstock to 3 1/8 x 4 ¼”.  I stamped the sentiment “hello” from the Biggest Wish stamp set right in the center using Garden Green Ink.  I then stamped the images from the Island Vibes stamp set on the two sides again using Garden Green ink.  I attached that to the card and that is it the card is done.

I hope you enjoy this simple easy card that was made with ink, stamps and paper.  As always you can find the supplies to create this card and much more on my website at https://craftwithronnie.stampinup.net or by click the shopping button at the top of this blog or the link to the supplies listed below. 

Happy Crafting!!!

Product List

Friday, February 25, 2022

Pineapple Sunshine

Today I was looking at a new stamp set called Island Vibes that I earned free during Sale-a-bration but that I had not yet used (reminder just 3 more days to earn free products during Sale-a-bration).  I just could not think where to start with the set so I headed over to Pinterest to look around.  I found a card created by Kim Quade and I just knew I wanted to CASE it.  What does CASE mean?  Well CASE is to copy and share everywhere and that is one of the things I love about Stampin’ Up! that is highly encouraged and is a wonderful opportunity to take the basic idea of someone’s card and make subtle changes to the design and make it yours.      

Here is what I came up with…


The card base is Bumblebee cardstock (just a reminder if this color is a favorite, it will be retiring in May so stock up now) that is cut to 5 ½ x 8 ½”, scored at 4 ¼”.  I cut a piece of Garden Green cardstock to 4 x 5 ¼” and I added a piece of Regals Designer Series Paper (the color is crushed curry) that measured 1 ¾ x 5” and I attached that to the left side of my garden green cardstock.  I then cut a piece of Basic White cardstock to that same 1 ¾ x 5” and I stamped my sentiment “thinking of you” from the Expressions of Friendship stamp set (this is a hostess set you can earn) in Garden Green Ink.  I then inked up my pineapple being careful to only ink the top with Garden Green Ink and the pineapple bottom with Crushed Curry Ink and I stamped that.  I attached that to the right side of my garden green layer.  I took some Linen Thread and wrapped it around the center between the DSP and the Basic White cardstock twice and tied a bow.  Then I added some Dimensionals and popped that up on my card base.  For the final touch I added 3 green gems from the Holiday Rhinestone Basic Jewels. 

This was a very quick and simple card and I hope you enjoy it I certainly enjoyed making it.  As always you can find the supplies to create this card and much more on my website at https://craftwithronnie.stampinup.net or by click the shopping button at the top of this blog or the link to the supplies listed below. 

Happy Crafting!!!

Product List

Thursday, February 24, 2022

Just Buzzing Around

I think the Honeybee Home Bundle and the Heart & Home Designer Series Paper from the January – June mini catalog are great together.  I love that there are so many coordinating products including the Hive 3D Embossing Folder, the Heart & Home Doilies from the mini catalog and the adorable little Bumblebee Trinkets from the Annual catalog.  So, I had some fun mixing and matching things from both the catalogs, the coordinating of the products between catalogs and across the paper, ink and embellishments is one of the things that I love most about Stampin' Up!      

Here is what I came up with…


The card base is Cinnamon Cider cardstock that is cut to 5 ½ x 8 ½”, scored at 4 ¼”, set this aside we will come back to it.  Then I cut a piece of Pale Papaya cardstock to 4 x 5 ¼” and I attached a piece of the Pale Papaya Shimmer Vellum that measured 2 x 5 ¼” that I had embossed using the Hive 3D Embossing Folder (the best way to adhere vellum so you don’t see the adhesive is to put some of the Mulitpurpose Liquid Glue on your Silicone Craft Mat and use a dauber to add it lightly to the back of the vellum, best part is the glue left on the mat will just peel off once it has dried) to the bottom of the piece.  Then I added a piece of the Heart & Home Designer Series Paper that measured 2 x 5 ¼” to the top.  This left a gap but that was fine because I wanted to add a piece of the Frayed Ribbon to the center of the card anyway.  So I wrapped my ribbon around the card and attached it to the back using Tear & Tape (this stuff is good and strong so it is my go to adhesive for this kind of thing). 

Now it is time to go ahead and embellish.  I added one of the Cinnamon Cider Heart & Home Doilies to the center using Dimensionals (just add two at the top and two at the bottom because they won’t stick to the ribbon).  Then I die cut some of the flowers from the dies in the bundle out of some scraps of the Pale Papaya Shimmer Vellum and adhered them directly to the doily. I stamped the floral image from the bundle onto a scrap of Very Vanilla cardstock using Cinnamon Cider ink.  Now here is a tip, since the ink is water based if you add a little Wink of Stella while the ink is still wet you can move a little of that color around and onto the flowers.  I added this using Dimensionals right to the center of the card.  For my final embellishments I added three of the cute little Bumblebee Trinkets and a bow that was made from the Pale Papaya 3/8” Open Weave Ribbon using Mini Glue Dots.

I hope you enjoy this card I certainly enjoyed making it.  As always you can find the supplies to create this card and much more on my website at https://craftwithronnie.stampinup.net or by click the shopping button at the top of this blog or the link to the supplies listed below. 

Happy Crafting!!! 

Product List

Wednesday, February 23, 2022

More Fun with New Horizon DSP

I have been doing some serious playing with the New Horizons 6 x6” Designer Series Paper from the January – June Mini Catalog.  I love how easy it is to use the paper with just a little stamping to create beautiful cards.  I have made several cards and todays is another variation of the 3 x 3” Designer Series Papers. 

Here is what I came up with…


The card base is Evening Evergreen cardstock that is cut to 4 ¼ x 11 ½”, scored at 5 ½”.  I then added a simple Basic White cardstock layer that measures 4 x 5 ¼”.  I stamped my sentiment Thinking of you from the On the Horizon stamp set on the bottom right using Evening Evergreen ink.  I then embossed it using the Tasteful Textures 3D Embossing Folder and added it to my card base.  Next, I took a piece of the Designer Series Paper and cut it into fourths, 3 x 3” and I stamped the little grove of trees from the On the Horizon stamp set onto it using Evening Evergreen ink.  I mounted this onto a piece of Evening Evergreen cardstock that measured 3 ¼ x 3 ¼” and popped that up on the top left of the card base (as shown in the photo) using Dimensionals.  I took three of the Rhinestone Basic Jewels and colored them with the Dark Evening Evergreen Stampin’ Blends and added them to the card (this is a great way to color the basic jewels to match your project)

For the inside of the card, I cut a piece of Basic White cardstock to 4 x 5 ¼” and I stamped that same grove of trees onto the bottom of it using the Evening Evergreen ink yet again.  I stamped the same thing onto the envelope as well (see below). 

I hope you enjoy this card I certainly enjoyed making it.  As always you can find the supplies to create this card and much more on my website at https://craftwithronnie.stampinup.net or by click the shopping button at the top of this blog or the link to the supplies listed below. 

Happy Crafting!!! 

Product List