Featured Post

MAGNOLIA MOOD JUST A NOTE

Today’s card features the Magnolia Mood Bundle which is a new online exclusive.  I knew the minute I saw this bundle I wanted it.  I could j...

Saturday, September 30, 2023

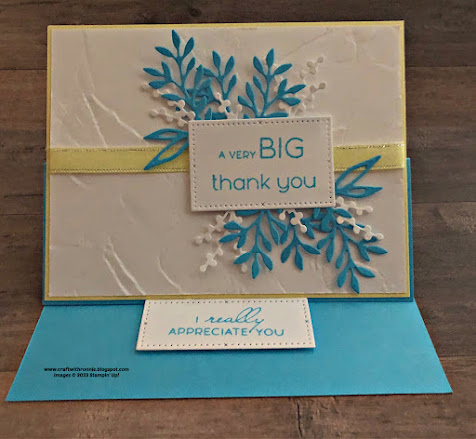
A Very Big Thank You

Today’s card features the Timeless Arrangements Bundle and it is another fun fold, this time it is an easel card.  This bundle has been a lot of fun to play around with because there are 26 different stamps and 16 different dies in the bundle which makes it super versatile.  Here is what I came up with…


The card base is Tahitian Tide cardstock cut to 5 ½ x 8 ½” and scored at 2 1/8” and 4 ¼”.  The card is folded in half just like any other card but then the score at 2 ¼” is folded as a mountain fold (fold pointed up) this will be the base of our easel.  Next, I cut a piece of Lemon Lolly cardstock to 4 1/8 x 5 3/8” and a piece of Basic White cardstock to 4 x 5 ¼”.  I embossed the Basic White piece using the Painted Texture 3D Embossing Folder and then put a piece of Lemon Lolly Ribbon from the Sheer Ribbon Combo Pack (it has lemon lolly, bubble bath and azure afternoon ribbon in it) around the center of it and secured it in the back.  I added this layer to my Lemon Lolly layer and then added that whole thing to the card base being sure to only adhere the bottom half up to the score line.

With the base all finished I started on all my sentiments and embellishments.  I cut the two larger stitched rectangles from the bundle out of Basic White cardstock and stamped them with the sentiments “A very BIG thank you” and “I really APPRECIATE YOU” also from the bundle using Tahitian Tide Ink.  I die cut two of each of the shapes circled in red below out of scraps of Tahitian Tide cardstock and two of the shape circled in blue out of scraps of Basic White cardstock.  I arranged these the way I wanted them and adhered them to the back of my sentiment.  Once everything was attached to the sentiment, I used Dimensionals to pop it up on the right-side center of my card. 

For the inside of the card, I added a piece of Basic White cardstock that measured 2 ¼ x 5 ¼” to the top inside for me to write my message.  I added the sentiment “I really APPRECIATE YOU” about ¾” above the bottom inside and centered using Dimensionals (this becomes the place to tuck our easel into). 

I hope you enjoy this card I certainly enjoyed making it.  As always you can find the supplies to create this card and more on my website at https://www.stampinup.com?demoid=2206796 or by clicking the shopping button at the top of this blog or the link to the supplies listed below.

Happy Crafting!!!

Product List

Thursday, September 28, 2023

GILDED GOLD ANYONE

So this card is a great example of how even a mistake can turn out great.  I decided I wanted to try a card that included some gold heat embossing, a little watercoloring and some Gilded Leafing.

Here is what I came up with…


But before we start let me tell you a little story.  Well, it is one of those things. I had hubby visiting in the craft room and I wanted to show him some different products and hear his thoughts about a project I was working on (I actually bounce things off him often) plus he is willing to die cut for my classes so he is always welcome. I know I have said it before but here we go. When I say how do I know that there is a reason. I have been telling my classes for a long time to be sure their ceiling fans are off when they use embossing powder because it is so fine it will go everywhere. But when I grabbed the Gilded Leafing I sure never thought about how thin and light it was. I had it all trapped in a plastic shoe box to keep it from going all over the table but never considered the ceiling fan kicking it up all over me, my chair, the table, well everywhere but where I was trying to actually put it. It might not have been as bad if he would have shut off the fan when I yelled instead of grabbing the camera and having a little fun. Oh well, things happen and I am really happy with the finished card and sometimes you just have to laugh at yourself.  So, onto how the card was made.

The card base is Basic White cardstock cut to 5 ½ x 8 ½” and scored at 4 ¼”.  I cut a piece of Pretty Peacock cardstock to 4 x 5 ¼” and embossed it using the Distressed Tile 3D Embossing Folder (hint, if you spritz your cardstock lightly you get an even deeper emboss), for my card I chose to use the debossed side, meaning the side that was indented rather than raised.  I wanted a single stripe of gold down the panel so to create that I added a strip of Tear & Tape down the left side (and after my accident) I added the Gilded Leafing.  The key to the leafing is to add it and rub it in good with your fingers and then brush off the excess using a stiff brush (I use a stencil brush). 

For my focal point I stamped the floral arrangement from the Fruitful Blessings Bundle onto Fluid 100 Watercolor Paper using VersaMark ink.  I added Gold Stampin’ Emboss Powder and heat set it.  I then began to paint my image using my Water Painters and the inks listed below in the supplies.  Once that was all done and dry, I used the coordinating die from the bundle to cut it out and I popped it up on my card using Dimensionals.  I stamped the sentiment “Hello friend” onto a scrap of Basic White cardstock again using VersaMark Ink and Gold Stampin’ Emboss Powder and heat set it.  I cut it out using the All That Dies (this sentiment could be a simply a rectangle you cut or any other punch or die you have that would work).  I added some of the gold trim from the Simply Elegant Trim and popped that up with Dimensionals.

I hope you enjoy this card I certainly enjoyed making it even it I did have a rough start on it, LOL.  As always you can find the supplies to create this card and more on my website at https://www.stampinup.com?demoid=2206796 or by clicking the shopping button at the top of this blog or the link to the supplies listed below.

Happy Crafting!!!

Product List

Tuesday, September 26, 2023

TECHNIQUE TUESDAY - ABUNDANT BEAUTY DECORATIVE MASKS

Today’s card features the new Abundant Beauty Decorative Masks.  I love these masks because they allow me to be creative and make cards my own.  I can change the position of the sunflowers, the color, the layout, you name it.  And the background masks that are also included are leaves, snowflakes and houndstooth and they are just amazing as well and super versatile.  Today I focused on the sunflower masks.  Here is what I came up with…


The card base is Bubble Bath cut to 5 ½ x 8 ½” and scored at 4 ¼”.   For my masking layer I started with a piece of Basic White cardstock that measured 4 x 5 ¼”.  I used the masks, blending brushes and six different colors of ink to create my card.  The video below shows exactly how I used the masks.

 Technique Tuesday - Abundant Beauty Decorative Masks 

I will list all the supplies I used below.  NOTE: In the video I called the lighter yellow color Lemon Lime Lolly and that is incorrect it is Lemon Lolly. 

I hope you enjoy this technique I certainly enjoyed showing it to you.  As always you can find the supplies to create the card I featured this week and more on my website at https://www.stampinup.com?demoid=2206796 or by clicking the shopping button at the top of this blog or the link to the supplies listed below.

Happy Crafting!!!

Product List