Featured Post

MAGNOLIA MOOD JUST A NOTE

Today’s card features the Magnolia Mood Bundle which is a new online exclusive.  I knew the minute I saw this bundle I wanted it.  I could j...

Monday, July 31, 2023

Layering Leaves Technique Tuesday

Today’s card features the beautiful Layering Leaves stamp set that was inspired by Million Sales Achiever Rachel Tessman.  I have followed Rachel for a long time and I am always blown away by her creations.  So for this weeks Technique Tuesday I shared three ways to ink up stamps from the Layering Leaves stamp set. 

Here is what I came up with… 


 The card base is Garden Green cardstock cut to 5 ½ x 8 ½” and scored at 4 ¼”.   I stamped one of the leaf images all over the front of the base using Garden Green ink.  To get the light look I wanted I stamped off on scrap paper once before stamping onto the cardstock.  Then I went to work creating my leaves.  To see the techniques, I used just click on the link below…

https://youtu.be/VSTgnE5sSSw

After coloring my leaves and rose buds using the techniques featured in the video as well as stamping others using Lemon Lime Twist and Garden Green ink, I punched them all out using the Bough Punch.  I also punched out 5 sets of the leaves from the Distressed Gold Specialty Paper.  I die cut one of the circles from the Stylish Shapes Dies out of Basic White cardstock and stamped the sentiment “hello” from the Layering Leaves stamp set onto it using Lemon Lime ink.  I layered my leaves to the back of the sentiment and added that to the center of my card base using Dimensionals. 

To complete the front of my card I added three of the Lemon Lime Gems from the Tinsel Gems Four-Pack.  For the inside I cut a piece of Basic White cardstock to 4 x 5 ¼” and stamped the little rose bud just like I did for the front onto one corner.  I added that same rose bud to the corner of my envelope and there you have it.  Quick, easy and beautiful!

I hope you enjoy this card I certainly enjoyed making it.  As always you can find the supplies to create this card and more on my website at https://www.stampinup.com?demoid=2206796 or by clicking the shopping button at the top of this blog or the link to the supplies listed below.

Happy Crafting!!!

Product List

Earthen Textures Thank You

Today’s card features the beautiful Earthen Treasures Bundle and the Earthen Elegance Designer Series Paper.  I loved this set as soon as I saw it in the new Annual Catalog and believe me when I say it is even more impressive in person.  The Designer Series Paper is based off of actual pottery that one of the Stampin’ Up! Designers created.  I couldn’t wait to break it out and created with it.   

Here is what I came up with…


The card base is Pretty Peacock cardstock cut to 5 ½ x 8 ½” and scored at 4 ¼” (I am so happy Stampin’ Up! decided to bring this color back it is one of my all-time favorites).  Then I made a layer of Very Vanilla cardstock cut to 4 x 5 ¼” and embossed it using the Twisted Rope 3D Embossing Folder.  To this I added a piece of the beautiful Designer Series Paper that measured 3 x 5 ¼”.  

To decorate the front of my card I stamped the wheat from the stamp set onto Basic White cardstock using Wild Wheat ink and die cut it using the coordinating dies from the bundle.  I used the dies to do all of the other pieces as well.  I started with the big leaf/plant and die cut it out of Pretty Peacock cardstock, I then snipped the little bit that attached the leaves to one another.  There is a natural score line in the die so I just pinched the two sides up to create a 3D affect.  I die cut the other two pieces (a fern and some sticks) out of Wild Wheat and Copper Clay cardstock.  With those pieces done I moved onto the clay pots.  I die cut the larger of the two out of the designer series paper and added the trim piece which was cut out of Gold Foil.  Next, I die cut the top of the smaller pot out of the designer series paper and the bottom out of Copper Clay cardstock.  On the smaller pot I used one of the dies that does not cut but embosses lines and embossed the pot.  Once that was done, I just sponged some Copper Clay ink over it using a dauber.  Now to assemble.

I decided where I wanted my pots and starting with the smaller, I adhered the two pieces to the back side of the pot so I could attach it as one piece to my card.  For the larger of the two pots, I added Dimensionals so it stood up in front of the smaller pot.  I stuck my wheat and sticks down inside it and adhered them to the card front. 

To finish the card, I added my sentiment “Your thoughtfulness is much appreciated” which is also from the stamp set which was stamped onto a scrap of Very Vanilla cardstock using Pretty Peacock Ink and then die cut using the Stylish Shapes Dies (I don’t know what I would do without this die set I use it all the time).  I adhered that to the top of the larger pot and added a dimensional on the right side to keep it even across the card.  I added three of the Copper Clay dots from the 2023 – 2025 In Color Dots.  Finally, for the inside of the card I added a piece of Very Vanilla cardstock and stamped the sentiment “You always know just what to say and do” onto it using Pretty Peacock ink. 

I hope you enjoy this card I certainly enjoyed making it.  As always you can find the supplies to create this card and more on my website at https://www.stampinup.com?demoid=2206796 or by clicking the shopping button at the top of this blog or the link to the supplies listed below.

Happy Crafting!!!

Product List

Tuesday, July 25, 2023

Technique Tuesday – Water coloring with Ink

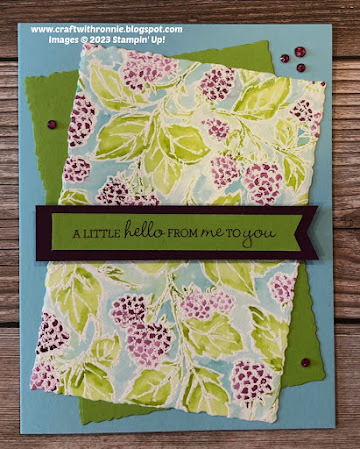
Today’s card features the Berry Harvest stamp set and a water coloring technique that I shared on my YouTube Channel for Technique Tuesday. 

Here is what I came up with…


Here is the link to the video on the technique.


The card base is Balmy Blue cardstock cut to 5 ½ x 8 ½” and scored at 4 ¼”.  I stamped my image onto Fluid 100 Watercolor Paper that measured 4 ¼ x 5 ½” using VersaMark ink and then used the White Stampin’ Emboss Powder and heat set the image.  (HINT:  for these large background stamps I have found that if I simply put them down on my work table upside down and take the ink pad to them it is easier, I also lay my paper on top of the stamp and use a piece of bond paper over top of that and run my hands over it to transfer the ink.  It is really hard to use an acrylic block that is large enough for these stamps and get that crisp image you need.)  Then I water colored the image and let it dry thoroughly (see the video for how I did this and what supplies I used).  Once it was completely dry, I used the second largest of the Deckled Rectangle Dies and cut it out.  I also cut out a piece of Granny Apple Green cardstock using that same die.  I added them to my card base turning each one a little for interest.

To finish off the card I took a piece of Granny Apple Green cardstock that measured ½ x 3 ¼” and stamped the sentiment “A little hello from me to you” from the Pansy Patch stamp set onto it using Blackberry Bliss Ink.  I also cut a piece of Blackberry Bliss cardstock to ¾ x 3 ¾” and then I cut a little flag on one end of each and adhered them together.  I popped this up using Dimensionals.  For my embellishments I took five of the Rhinestone Basic Jewels and colored them with the Blackberry Bliss Stampin’ Blends.  I used the remaining strip of the water color image and cut it to 5/8 x 5 ¼” and attached it to a piece of Basic White cardstock that measured 4 x 5 ¼” for the inside of the card. 


I hope you enjoy this card I certainly enjoyed making it.  As always you can find the supplies to create this card and more on my website at https://www.stampinup.com?demoid=2206796 or by clicking the shopping button at the top of this blog or the link to the supplies listed below.

Happy Crafting!!!

Product List

Monday, July 24, 2023

Sending Hugs

Today’s card features the new Layering Leaves Stamp Set which was inspired by Rachel Tessman a Million Dollar Sales Achiever and someone I have followed for years.  Rachels cards are always beautiful and I am not surprised that she inspired this beautiful stamp set that also happens to coordinate with the existing Bough Punch that many of us have had for years.  As soon as I saw this set I knew I wanted to create with it.

Here is what I came up with…


The card base is Pretty Peacock (another favorite returning color) cardstock cut to 5 ½ x 8 ½” and scored at 4 ¼”.  I added a layer of Basic White cardstock that measures 3 5/8 x 4 7/8” and adhered that directly to the card base.  I cut another piece of the Pretty Peacock cardstock to 3 ½ x 4 ¾”. 

I started the decorating of this card by first stamping two of the boughs onto the top right and bottom left of my cardstock using Pretty Peacock ink for that tone-on-tone look.  Next, I sprinkled the little ink splotches from the stamp set all over again using the Pretty Peacock ink.  I stamped two of the boughs onto Basic White cardstock using Pretty Peacock ink and used the punch to punch them out.  Next, I punched out two large and one small bough from the Distressed Gold 12 x 12” Specialty Designer Series Paper and from Basic White cardstock. 

I began my layering by adding the larger gold boughs first one in the top left and one in the bottom right.  I then layered on my larger white boughs as shown in the photo.  I added in my stamped boughs and finally tucked in my small gold and white bough (this arrangement can be done in lots of different ways this is just what I thought looked good).  I stamped the sentiment “Sending HUGS” onto a piece of Basic White cardstock using Pretty Peacock ink and die cut it using one of the dies from the Something Fancy Dies and popped it up on my card using Dimensionals. 

For my final addition I added three of the gold pearls from the Festive Pearls and added this to the Basic White layer and then added the two of them to the card base popping them up with Dimensionals as well. 

I hope you enjoy this card I certainly enjoyed making it.  As always you can find the supplies to create this card and more on my website at https://www.stampinup.com?demoid=2206796 or by clicking the shopping button at the top of this blog or the link to the supplies listed below.

Happy Crafting!!!

Product List