Featured Post

MAGNOLIA MOOD JUST A NOTE

Today’s card features the Magnolia Mood Bundle which is a new online exclusive.  I knew the minute I saw this bundle I wanted it.  I could j...

Saturday, October 24, 2020

Accordion Fun Fold Card

I was inspired by a card that Lisa Curcio made using this cut fold.  Since I had not done one of these fun folds previously, I knew I had to give it a whir.  I used her cutting directions but added my own spin on parts of it.  I am pretty happy with the results.

Here is what the card looks like all folded up and with its belly band in place…


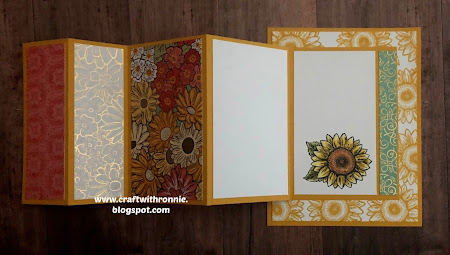
And here is what it looks like all opened up…


The card base is Bumble Bee card stock that is cut to 4 ¼ x 5 ½”.  There is a layer of Whisper White card stock on top of that that measures 4 x 5 ¼” which I stamped using the smaller of the Sunflowers stamp from the Celebrate Sunflowers bundle (I stamped it all around the perimeter of the Whisper White layer with Bumble Bee ink (creating my own DSP).  I attached this to the Bumble Bee layer.

For the accordion I cut a piece of Bumble Bee card stock to 4 ¼ x 11” and scored it at 3”, 5 ½”, 8” and 9 ½”.  I then added my Ornate Garden Specialty Designer Series Paper to the panels.  I cut one from the pink paper that measured 1 ¼ x 4”, one from the white and gold paper that measured 1 ¼ x 4”, one from the floral paper that measured 2 ¼ x4” and one small strip of the mint macaroon paper with gold foil that measured ½ x 4” (this is added to the far right of the bottom panel).  I also added two Whisper White panels where I could add a greeting or write my message.  On one of them I did stamp the small sunflower from the stamp set with Tuxedo Black Memento ink and colored it using my Daffodil Delight, Cinnamon Cider and Old Olive Stampin’ Blend markers.  This layer is attached to the center of the card base. 

To keep my accordion all in place I created a belly band.  It was cut from Bumble Bee card stock and measures 1 ½ x 9 ½”.  Just fold it around your card and attach it to itself in the back of the card (be sure to keep it loose enough so you can slide it on and off).  To decorate my belly band, I stamped the sentiment “know that you are loved” also from the stamp set onto a scrap piece of Whisper White card stock using Bumble Bee ink.  I die cut this out using the 2nd smallest of the circles from the Layering Ovals dies.  I also cut a scrap of Mint Macaroon card stock out using the 2nd smallest of the scalloped ovals from the same set and layered it with the sentiment.  To finish off I stamped the small sunflower onto a scrap of Whisper White card stock and colored it the same as the one inside the card.  I then die cut it with the coordinating die from the bundle and popped it up on my card with Dimensionals.

I also stamped my envelope with the small sunflower with Bumble Bee ink, because no one wants a naked envelope, LOL.

I hope you enjoy this card I certainly enjoyed making it.  As always you can find the supplies to create this card and much more on my website at https://craftwithronnie.stampinup.net or by click the shopping button at the top of this blog or the link to the supplies listed below. 

Happy Crafting!!!

Product List 

Thursday, October 22, 2020

Beautiful World Gift Card Holder

From time to time we all need to get off that quick gift whether it is a birthday, a graduation or some other special event.  I often find myself sending gift cards because my recipients can get what they really want, in the right size and I am not spending a fortune on shipping.  So, with that said we need to have a nice way to present our gift cards and I love this idea.  I don’t know who originally came up with it, I have seen it all over Pinterest and Facebook for years but it is certainly worth a share yet again.

The front of the card all closed up

The card opened up along with the coordinating envelope

The card base is Cinnamon Cider cardstock that is cut to 4 ¼ x 11” and scored at 2 ½” and 5 ½”.  The 2 ½” score line gets folded under to create a pocket for the gift card and the 5 ½ score gets folded so that you have a perfect 4 ¼ x 5 ½” card.

The designer series paper I chose for this project is from the World of Good Specialty Designer Series Paper and I just love the maps that are all in this beautiful rich Brass Foil.  I cut two pieces of it to 2 ¾ x 4” and one piece to 2 ¼ x 4”.  The smaller one goes inside the card and covers the pocket for the gift card and the other two are adhered to the front left and the bottom right sides.  Once my paper was adhered, I cut a little semi-circle out of the center of my pocket (I used my ½” punch which has retired).  Then I adhered the two ends down (be sure to keep your adhesive close to the edges so your card can go in and out freely. 

For the front of my card I die cut one of the globe pieces from the Beautiful World Bundle (I used North America but there is also a die of South America as well) out of Copper Foil Sheet and I cut the circle from the same set out of Night of Navy cardstock and adhered my foil globe to it.  I then die cut a piece of Cinnamon Cider cardstock (about 3 ¾ x 3 ½”) out using one of the dies from the Stitched So Sweetly Dies.  I glued this piece onto just the left side of my card (so my card can open) and then I added my globe with Dimensionals.

For the inside of the card I cut a piece of Very Vanilla cardstock to 2 3/8 x 4” and stamped my sentiment “Adventure Awaits” from the Beautiful World bundle onto it using Cinnamon Cider ink.  I also added the little compass from the bundle onto the envelope also stamping it with Cinnamon Cider ink. 

And there you have it, a card and gift all in one.  I hope you enjoy this gift card holder and it is something you will enjoy making as well.  As always you can find the supplies to create this card and much more on my website at https://craftwithronnie.stampinup.net or by click the shopping button at the top of this blog or the link to the supplies listed below. 

Happy Crafting!!!

Product List
Wednesday, October 21, 2020

Cherished Friend

Here we go another cute simple card made using the Lovely You bundle.  It uses the stamps just like we did a few days ago to create our very own Designer Series Paper.  I did add a layer that was embossed and some ribbon so let’s see how it was created.


The card base is one of the new 2020 – 2022 In Colors, this one is called Misty Moonlight and it was cut 5 ½ x 8 ½”, scored at 4 ¼”.  I then cut a layer out of Smokey Slate cardstock that measured 4 x 5 ¼” and I ran it through my new Stampin’ Cut & Emboss Machine (oh how I am loving this new tool, lighter than previous ones I had and it folds for easier storage as well and it cuts and embosses like a dream) using the Ornate Floral 3D Embossing Folder (love all the tiny flowers).  Don’t adhere this to the card base until all the other layers and ribbon are added to this layer.

I then cut a piece of the Misty Moonlight cardstock that measured 2 ½ x 5 ½” and a piece of Whisper White cardstock that measured 2 ¼ x 5 ½”.  I used the stamps from the Lovey You stamp set and stamped the images randomly as we did previously using; Bumblebee, Misty Moonlight, Magenta Madness, Pear Pizzazz, Garden Green and Flirty Flamingo inks.  Once I had it all stamped, I adhered it to the Misty Moonlight mat and centered that on the Smoky Slate layer. 

I wrapped this whole layer with Bumble Bee ¼” Ribbon and tied a bow.  Now you can adhere this to the card base.  For my sentiment I stamped “cherished friend onto a piece of Whisper White cardstock that measured ¾ x 3 ½” using Misty Moonlight ink.  I then punched decorative edges on it using the coordinating punch from the bundle.  To make a mat for this I cut a piece of Misty Moonlight cardstock that measured 1 x 4” that was also punched with a coordinating decorative edge.  I added this to the card with a few Dimensionals and to finish it off I added two 2020 – 2022 In Color Enamel Dots. 

I hope you enjoy this card I certainly enjoyed making it.  As always you can find the supplies to create this card and much more on my website at https://craftwithronnie.stampinup.net or by click the shopping button at the top of this blog or the link to the supplies listed below. 

Happy Crafting!!!

Product List

Monday, October 19, 2020

Just Because

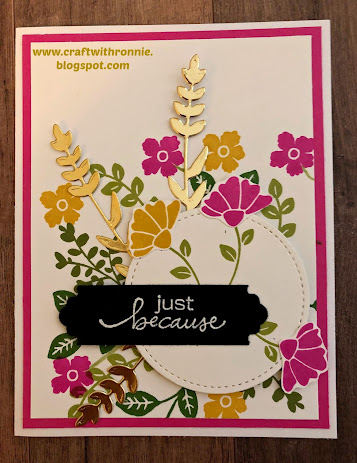
Continuing on with our Lovey You bundle I decided todays card would be a simple “just because” card.  Everyone deserves a card now and then “just because” and this is a fast and easy one to create. 


The card base is Whisper White cardstock that is cut 5 ½ x 8 ½”, scored at 4 ¼”.  I added a layer of Magenta Madness cardstock that measures 4 x 5 ¼”.  I then cut a piece of Whisper White cardstock to 3 ¾ x 5”.  I began by stamping on this Whisper White layer.  I selected a number of stamps from the Lovely You bundle and stamped them using Garden Green, Bumble Bee, Old Olive and Magenta Madness inks.  I just started in the bottom right corner and worked my way out and up until I had the look I wanted.

Next, I cut a circle using the Stitched Shapes dies (these are great as they have stitched circles, ovals and squares and can be used on lots of different projects).  I stamped three stems using Old Olive ink.  I then stamped one of the flowers from the set onto scraps of Whisper White, two in Magenta Madness and one in Bumble Bee and fussy cut them with my Paper Snips and attached them onto the ends of the stems.  I adhered my circle to the card using Dimensionals.  I cut three pieces of foliage from the Sunflower dies out of Gold Foil paper and just tucked them in under the circle to add some additional shine and interest. 

My final step was my sentiment.  I cut a piece of Basic Black cardstock to ¾ x 3 ¾” and I stamped my sentiment with Versamark ink and heat embossed it with my Heat Tool using White Stampin Emboss Powder.  I attached it right to the top of my circle and where it hangs off, I added another dimensional to keep it nice and level. 

I told you this was a simple card and it comes together really fast.  I hope you enjoy it.  As always you can find the supplies to create this card and much more on my website at https://craftwithronnie.stampinup.net or by click the shopping button at the top of this blog or the link to the supplies listed below. 

Happy Crafting!!! 

Product List