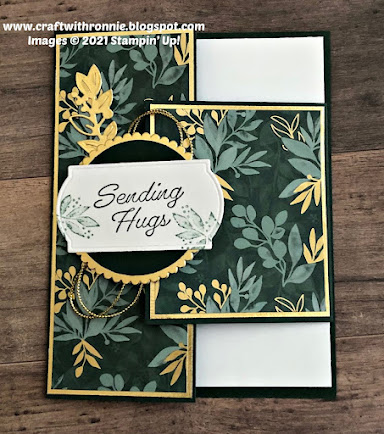
Over the years I have made or watched made so many fun fold cards that half the time I can’t remember the name of the fold. I actually remember this one, it is a latch fold and it is a simple and fun card to create…
Let’s start by creating our card base. It is Evening Evergreen cardstock cut to 6 ½ x
5 ½” and is scored at 4 ¼” on the 6 ½” side.
To that we are going to add a piece of Gold Foil that measures 2 1/8 x 5
3/8”. Then we are going to add a piece
of the beautiful Ever Eden Specialty Designer Series paper that measures 2 x 5 ¼”. To create the piece that will be caught up in
the latch, we are going to cut a piece of Evening Evergreen cardstock to 3 ½ x
3 ¼” and score it at ¾” on the 3 ½” side.
The ¾” scored piece is adhered to the inside of the card right in the
center and then the 4 x 5 ¼” Basic White cardstock card center is adhered right
over that. To the front of this piece,
we are going to add Gold Foil that measures 2 5/8 x 3 1/8” and on top of that a
piece of our DSP that measures 2 ½ x 3”.
Now to decorate and create our “latch”. I started by stamping the sentiment “Sending
Hugs” from the Eden’s Garden Bundle (I love this font) to a label cut from
Basic White cardstock using one of the dies from the Painted Labels Dies (there
are some great labels in this set that can be used with many of the sentiments
Stampin’ Up! has) using Evening Evergreen Ink.
I also added two of the little leaf branches from the set on either side
of the label using Soft Succulent Ink. I
then die cut two of the circles from the Layering Circles Dies out of Evening
Evergreen cardstock and one the next side larger and scalloped out of Gold
Foil. I took a piece of the Simply Elegant
Trim that was about 20” long and wrapped it around a couple times and attached
it to the back of the Gold Foil scalloped circle (see photo). I then added one of my Evening Evergreen
circles to the back to cover the trim. I
added the other circle to the front of the Gold Foil scalloped Circle and
centered my label with my sentiment on that.
This becomes our latch when we attach it using Dimensionals on the left
side only so the little flap can slip under it and latch. I did add one more element which is the
little leaves which are one of the dies in the bundle that I die cut from Gold
Foil and tucked up under my latch.
For my final addition I did add a single stripe of
Gold Foil to the inside of the card that measured ½ x 5 ¼” just to add a little
interest.
I hope you enjoy this card I certainly enjoyed making
it. As always you can find the supplies
to create this card and much more on my website at https://craftwithronnie.stampinup.net
or by click the shopping button at the top of this blog or the link to the
supplies listed below.
Happy Crafting!!!


.jpg)

No comments:
Post a Comment