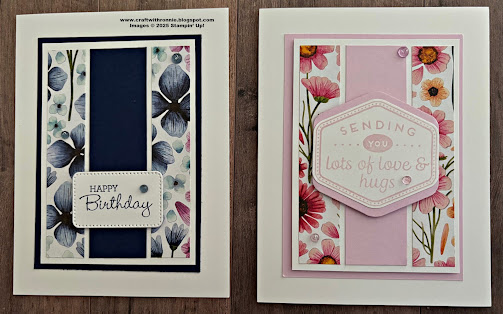
Today’s post features the Floral Impressions Designer Series Paper. I created a layout of one sheet wonder cards created with this beautiful paper. I was having a hard time deciding how to use this specific sheet of the DSP because of the way the design was laid out on it. Then I saw a video on YouTube where Cheryl’s Stampin’ Squad had used this paper. I got to thinking about how she had cut the sheet of paper and realized with a little tweaking of the cutting measurements I could turn this into the perfect one sheet wonder by changing up the dimensions of the DSP and adding an additional layer of cardstock. I was able to get 21 cards out of one sheet of this DSP with a few scraps to spare.
Here is what I came up
with…
Here is the sheet of the Floral
Impressions DSP I used for this project.
Just think there are two sheets of this in the pack and that means 42
simple and quick cards with 10 sheets of beautiful Designer Series Paper left
for other projects.
So, I started by cutting my DSP into three
pieces of 4 x 12” going across it at the 4” mark so that I would have all seven
of the different patterns showing. Once
that was done, I followed what Cheryl had done on her video and cut that piece
down into 3” wide strips (NOTE: Here is
where the secret comes in. As you are
cutting be sure the pieces are going to all be one color. There is a point where one of the pieces will
have blue and green both in it. When I
got to that point, I turned my paper around and started cutting 3” strips from
the Petunia Pop side and cut that and the Misty Moonlight pieces out. That left me with that piece that I was
talking about which had both the green and blue in it, I just set it aside to
use on another project). With these 3 x
4” strips all cut I then went back and cut each one to ¾ x 4” and started
selecting the cardstock I wanted to use with them.
The card bases are Thick Basic White cardstock
cut to 5 ½ x 8 ½” and scored at 4 ¼”.
Then I cut a piece of cardstock (I just chose coordinating cardstock to
match the pieces of DSP I was using) to 3 ¼ x 4 ½” and a piece that was 1 1/8 x
4”. Next, I cut a piece of Basic White
cardstock to 3 x 4 ½”.
With everything cut out I started to
assemble. I took the 3 x 4 ¼” Basic
White layer and added my two pieces of DSP (one on each side) and my 1 1/8 x 4”
piece of cardstock to the center. I made
sure I had equal margins on one four sides and between each of the pieces and
adhered them. For the cards in photo 1 I
simply adhered that directly onto my card base.
This is the simplest of the cards.
For the cards in photo 2 I added the white layer to the cardstock layer
using Dimensionals and then added that to the card base. For
the cards in photo 3 I added my white layer to my cardstock layer and then
popped that up on my card base with Dimensionals.
I used a mixture of punches, dies, stamps
and embellishments to finish of the cards (some are retired) but that doesn’t
really matter because you can use whatever you want to add sentiments to these
cards.
I hope you enjoy these cards I certainly
enjoyed figuring out how to make them. As always you can find the supplies to create
this card and more on my website at https://www.stampinup.com?demoid=2206796 or by clicking the
shopping button at the top of this blog. Be sure to follow me at:
Facebook
at: https://www.facebook.com/craftwithronnie.stampinup.net
YouTube
at: https://www.youtube.com/@ronniejohnsonstampinup
Instagram: https://www.instagram.com/craft_with_ronnie/
Happy Crafting!!!


.jpg)


.jpg)


No comments:
Post a Comment