Featured Post

MAGNOLIA MOOD JUST A NOTE

Today’s card features the Magnolia Mood Bundle which is a new online exclusive.  I knew the minute I saw this bundle I wanted it.  I could j...

Monday, November 29, 2021

Fast and Simple

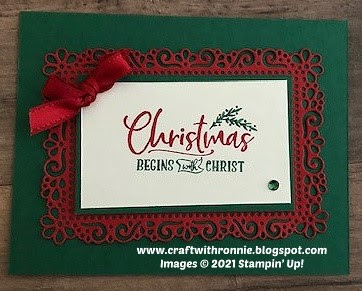
I needed a few more Christmas cards so I decided to think outside the box and make something unexpected and yet simple.  I grabbed my Ornate Layers Dies and a stamp set and had some fun.      

Here is what I came up with…


The card base is Shaded Spruce cardstock that is cut 5 ½ x 8 ½”, scored at 4 ¼”.  I then die cut my Real Red Layer using the Ornate Layers Dies from the Annual Catalog and added it to the center of my card base.  I cut a piece of Basic White cardstock that measured 3 3/8 x 2” and I used a technique I have not done in a while.  I used my Real Red and Shaded Spruce Stampin’ Write Markers (be sure you are not using the Stampin’ Blends because they are alcohol and will ruin your stamps) and I selected the stamp you see here from the For Unto Us stamp set.  I used my markers and colored in each of the areas with the color I wanted (so basically, I colored everything with the Shaded Spruce except for the word Christmas) I then huffed on my stamp (to simply release your breath out close to your stamp to add moisture back to the ink).  Once it was stamped, I took the small pointed end of my marker and added my red berries. 

Now I layered that stamped piece onto a piece of Shaded Spruce cardstock that measured 3 5/8 x 2 ¼” and then I centered that on my Ornate Layers piece and popped it up using Dimensionals.  For my final addition I added a bow made from the Real Red Satin Ribbon and one of the green gems from the Holiday Rhinestone Basic Jewels. 

I hope you enjoy this card I certainly enjoyed making it.  As always you can find the supplies to create this card and much more on my website at https://craftwithronnie.stampinup.net or by click the shopping button at the top of this blog or the link to the supplies listed below. 

Happy Crafting!!! 

Product List

Saturday, November 27, 2021

Giving Back

I have been working as a member of the Congregational Care Team at my church since I arrived here in North Carolina.  I am more of a behind the scenes kind of person but I love what I do.  Today I wanted to share what I created for our shut-in church community (we currently have nine folks in this category but it goes up and down all the time).  For each of the holidays the team puts together these great gift bags that are loved by the recipient’s (I know because one of them is my Mother-In-Law).  For Thanksgiving I created the paper pumpkin projects that made the little paper pumpkins and filled them with candy.  I also created a box set of 5 Christmas cards for each of them (the church added stamps) so that they too could send out cards (especially to their caregivers). 

I want to give a huge shout out to my amazing hubby who spent hours up in the craft room and did all the die cutting for the Thanksgiving cards, Christmas cards and even a ton of die cutting for cards for an upcoming swap I am participating in.  Here he is hard at work…


So, for Christmas I went kind of crazy and here is what I came up with…


With hubbies help we made each person a card from the church.  We also made them a box set of cards that contained one each, Sympathy, Thinking of You, Get Well, Thank You and one each masculine, feminine and Childs Birthday Cards.  The little box in the center contains 5 Hershey Nuggets (I posted directions for this project here on my blog back on August 16th).  The angel is from Laurie Furnell Designs (she is on Etsy) you download it and print it onto Basic White cardstock and fussy cut it.  You wrap the main piece around a Hershey Bar and add the other pieces like the winds, bow and heart to make it more 3D (simple project and she has tons of different wrappers, I loved the turkey I made them for Thanksgiving).  And finally the candy cane holder which I am going to explain below.

I started with Real Red Cardstock that I cut to 2 x 8 ½” and scored at 6 ¾ and 7 1/4".  Then used the Delightful Tag Topper punch to punch the top.  To this I add a layer of Old Olive cardstock that measured 1 ¾ x 5 ½” and on top of that I added a piece of the Heartwarming Hugs Designer Series Paper that measured 1 ½ x 5 ¼”.  See below.  


Now it is time to add the candy cane.  Before actually adhering, it I laid it in and decided where I wanted to punch my two little holes for the ribbon (I used a simple hole punch for that).  I turn the candy cane as shown below and add a piece of Tear & Tape to it to keep it firmly in place.


Then I added it to the base as shown below.

Once it is in place, I add another little piece of Tear & Tape to the bottom of the cane to hold the little flap where I put the sentiment in place.


Closed up…


Now all that was left was to add some ribbons and my sentiment.  The sentiment is from the For Unto Us stamp set (which I used for their Christmas cards as well).  I stamped the sentiment GLORY TO THE NEWBORN KING onto Basic White cardstock using Real Red Ink.  Then I die cut it using the Stitched So Sweetly Dies.


For my final addition I printed the following poem and put it on the back (I have no idea who the author is but I love it).


What’s in a Candy Cane?

The letter “J” for Jesus

The shape of a Shepherd’s Staff

Red, his blood he shed for us

White, he washed our sins away and made us white as snow

Stripes, by his stripes we are healed

Candy, His love grows sweeter each Day


I hope you enjoy these projects and I would certainly encourage everyone to find a way to reach out in your community and make a difference even if it is just a card.  I have found such joy in doing this.    

Happy Crafting!!!
Evergreen Elegance Bundle

Do you want to create some Christmas cards the fast and easy way?  Well, I have just the bundle for you.  The best part is that all these products are from the Annual Catalog so if you ran out of time this year to make those handmade cards you have always wanted to make you are in luck because all these products will be available until the new catalog is launched in May.  So that means you can start on next year’s cards right away and be well ahead of the game.  

Here is what I came up with using these products…


The card base is Real Red cardstock that is cut 5 ½ x 8 ½”, scored at 4 ¼”.  I cut a piece of Basic White cardstock to 4 x 5 ¼” and stamped my Sentiment “It’s friends like you that make this season so wonderful” which is from the stamp set in the Evergreen Elegance Bundle, along the bottom using Evening Evergreen ink.  I then added a piece of the Tidings of Christmas Designer Series Paper that measures 3 ¾ x 4” to the top center of the card (leaving a 1/8” border at the top and sides). 

Now the magic happens!  I took a piece of Evening Evergreen cardstock and using the line of tree’s punch that is part of the bundle I punched out a line of trees.  I added this (cutting down to the size I wanted) along the bottom of my DSP and above me sentiment.  To really make this pop I took a piece of the Gold Metallic Specialty Paper and punched another row of trees.  I overlayed these on the green trees just moving them a little to the left so you saw the others in the back (almost like a shadow).  And that is all there is to this card, I wasn’t kidding when I said it was simple.  It took me less than 5 minutes to make the whole thing.

I hope you enjoy this card I certainly enjoyed making it.  As always you can find the supplies to create this card and much more on my website at https://craftwithronnie.stampinup.net or by click the shopping button at the top of this blog or the link to the supplies listed below. 

Happy Crafting!!!

Product List

Friday, November 26, 2021

An Elegant Card

I am really loving this Ever Eden Specialty Designer Series paper from the Eden’s Garden Collection.  Today I wanted to use it with some other stamps and dies I have instead of the ones from the collection just to make it interesting.      

Here is what I came up with…


The card base is Soft Succulent cardstock that is cut 5 ½ x 8 ½”, scored at 4 ¼”.  The first thing I did was to add my sentiment to the bottom right of the card front.  I selected the “Merry Christmas” sentiment from the Poinsettia Petals Stamp set and stamped it on using VersaMark ink.  I added Gold Stampin’ Emboss Powder and heat set it with my Heat Tool.

Next, I selected two of the Ever Eden DSP designs that work well together.  I added the first which was cut to 2 x 5 ½” across the card front.  I then cut a piece of Gold Foil that is 1 6/8 x 5 ½” and added that to the center of the previous DSP.  Next, I took the other DSP pattern and cut a piece to 1 ½ x 5 ½” and centered that on the gold.

I constructed my Poinsettia but die cutting Basic White cardstock (this is a good place to use up scrap pieces from other projects), I cut all three to the layers from the Poinsettia Dies and shaped them just a bit with my bone folder.  I added a bit of the Old Olive Pretty Peacock Ribbon to the back of the Poinsettia and then used some Dimensionals to add this to my card front.  I then cut two of the branches from the dies from scraps of Gold Foil and tucked them up under my Poinsettia.  I cut two of the leaves from the dies out of more scraps, this time Evening Evergreen, again I shaped these with my bone folder and tucked them up under the flower.  For the center of the Pointsettia I die cut the center from the dies out of Gold Foil and added 7 little Pearl Basic Jewels to finish it off. 

I hope you enjoy this card I certainly enjoyed making it.  As always you can find the supplies to create this card and much more on my website at https://craftwithronnie.stampinup.net or by click the shopping button at the top of this blog or the link to the supplies listed below. 

Happy Crafting!!! 

Product List

Wednesday, November 24, 2021

Pillow Boxes

I wanted to have something little at each of my Thanksgiving place settings and of course anything chocolate is always welcome.  So, I decided to use the Pretty Pillow Box Die set to create something fun.    

Here is what I came up with…


The first one I used some of the Simply Elegant Trim to hold it closed but then I got thinking that it would be nice if they could be opened and re-closed over and over.  Well I had ordered these tiny little magnets from Amazon for another project and I realized that was the perfect solution.  This die set is adorable and it can be used with tons of other papers and for lots of occasions.  The little pillow boxes each hold exactly three Hershy Nuggets. 

These were created using the Ever Eden Specialty DSP, Evening Evergreen Cardstock, Gold Foil and some of the Soft Succulent Ribbon and some of the Simply Elegant Trim.  Here is what the die set looks like…


They are actually quite easy to assemble and as I said before very versatile.  I hope you enjoy this project they sure were fun to make.  As always you can find the supplies to create this project and much more on my website at https://craftwithronnie.stampinup.net or by click the shopping button at the top of this blog or the link to the supplies listed below. 

Happy Crafting!!!


Product List

Tuesday, November 23, 2021

Beautiful Moments

I just love this Beautiful Moments stamp set.  This set was inspired by Jacque Williams one of the Million Sales Achievers in Stampin’ Up!  I purchased this stamp set during the recent sale on Cling Stamps that was held.  So today I decided to pair it with the Basic Border Dies and have some fun.      

Here is what I came up with…


The card base is Blackberry Bliss cardstock that is cut 5 ½ x 8 ½”, scored at 4 ¼”.  I embossed the right front of the card base using the Greenery Embossing Folder.  I then took a piece of Basic Gray cardstock and cut it to 3 ¼ x 5 ½”.  I measured to the center at 2 ¾” and up 1” on each side to mark where I wanted to place the Border Die so I got everything centered (I did the same thing on the Basic White Layer) and die cut it.  I added this to my card base.  Next, I cut a piece of the Basic White cardstock to 3 x 5 ½” and did that same measuring and die cut it. 

Before I adhered my Basic White layer, I did my stamping and coloring.  I stamped the image, sentiment and birds (all from the Beautiful Moments stamp set) onto my layer with Tuxedo Black Memento Ink.  I then colored my image in with the Stampin’ Blends Alcohol Markers listed below.  Then I attached this layer to my Basic Gray layer.  I added three of the Pearl Basic Jewels to finish off the front of the card. 

For the inside and envelope, I added another of the stamps from the set stamped in the Tuxedo Black Memento Ink and colored with the Blends.  

I hope you enjoy this card I certainly enjoyed making it.  As always you can find the supplies to create this card and much more on my website at https://craftwithronnie.stampinup.net or by click the shopping button at the top of this blog or the link to the supplies listed below. 

Happy Crafting!!!

Product List