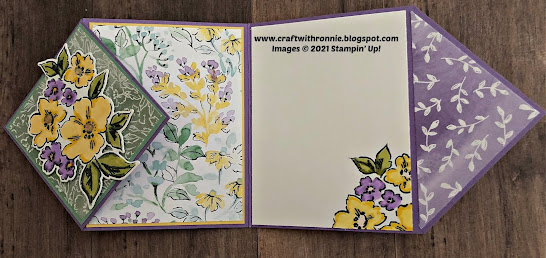
I learned how to make this card from my awesome upline Karen. I have previously shared this using another Designer Series Paper and Stamp Set but I have been wanting to share it again because it can be used with tons of different papers, stamps, embellishments, etc. I decided I wanted to use it with the have been having some more fun with the Hand-Penned Suite of Products including the Hand-Penned Petals bundle and the Hand-Penned Designer Series Paper.
Here is what it looks like completed…
The card is not hard but explaining it can be so I am
going to share some some visual instructions that I created for my last post
about this design and I hope they help.
So here is how the card base is created…
The above layer is cut out of Highland Heather cardstock. Now once you have that you can start on the other
elements of the card. I cut a piece of Daffodil
Delight cardstock to 3 1/8 x 4 1/8”, to this I added a piece of the Hand-Penned
Designer Series Paper that measures 3 x 4” and I attached that to the front of
the card. I
repeated this and made another panel exactly the same and attached it to the inside
left of the card. Now to work on our
square that gets turned on it’s side to make our diamond (it is important to
consider what DSP you use on this and always remember that you must consider
the direction your paper will end up in).
For my diamond I cut a piece of Highland Heather
cardstock to 3 x 3”. I adhered the Highland
Heather cardstock to the front of the card (only the left half is glued down). The second square is cut from Mint Macaron cardstock
and is 2 7/8 x 2 7/8” to this I added a piece of DSP that measured 2 ¾ x 2 ¾”. Once these layers are all together just
attach them to the Highland Heather diamond (square) you previously
attached. To finish off the basic card I
cut a piece of Basic White cardstock to 3 1/8 x 4 1/8” and stamped the corner
with the flower stamp from the bundle using Tuxedo Black Memento Ink. I also colored it using Stampin’ Blends
(colors listed below). For the far-right
corner the triangle piece shown is created by cutting a 2 7/8” square and then
cutting it in half from corner to corner (you will have a piece left for
another card).
To finish my card, I stamped the flowers from the
bundle using Tuxedo Black Memento Ink and die cut them with the coordinating
dies. I colored them using Stampin’
Blends (colors listed below) and then popped them up on my diamond using Dimensionals. I added three of the Genial Gems.
I had a lot of fun making this card and I hope you
enjoy it as well, let me know what you think. As always you can find the supplies to create
this card and much more on my website at https://craftwithronnie.stampinup.net
or by click the shopping button at the top of this blog or the link to the
supplies listed below.
Happy Crafting!!!


.jpg)

No comments:
Post a Comment