The Hey Chick stamp set used here today was originally released as a Sale-A-Bration item several years ago. Like many I hung on to mine when it retired because I just loved those crazy chickens. Well, many folks must have felt the same way because Stampin’ Up! has re-released the set along with some coordinating dies. So of course, I wanted to have some fun with some of them. I checked out tons of stuff on You Tube and Pinterest and used a little of this and a little of that and here is what I ended up with…

The card base is Real Red cardstock that is cut 4 ¼ x 11” and scored at 5 ½”. I used my Simply Scored Scoring Tool to create my score lines to create the peaked roof on the barn. I laid my card base in the tool with the 11” side against the top. I marked 3 3/8” and 7 5/8” (twisted and did the same on the other side) then I placed my card base diagonally on my Simply Scored Scoring Tool and scored from the 3 3/8” to the 7 5/8” marks across from one another (see photo). Once everything was scored, I folded my card in half at the 5 ½” score line and then pressed my two little triangle pieces in to the center of the card.

This is what it will look like once it is folded
in. Remember to reenforce those score
lines well with your Bone Folder.

Now comes the fun part, decorating our barnyard. The first thing we need to do is emboss our
barn. To do this I placed the front half
of the card into the Wood Panel Embossing Folder and just tucked the back of
the card around the folder so it would go through and embossed. To create the eves of the barn I used Early
Espresso cardstock that measured ¼ x 3 ½” (it is longer than needed but it is easier
to cut the excess off than to try to get a perfect size).
Next, I did all my die cutting. I cut the circles that create the window
frame out of Early Espresso cardstock using the smallest and the third smallest
circle dies from the Layering Circles Dies.
I just put the smaller right in the center of the larger one and cut it
all at one time. I then die cut my
little sign out of Crumb Cake cardstock and my corn stalk out of Old Olive
cardstock, I used Daffodil Delight cardstock for the ears of corn.
I then started to stamp. I stamped the chicken with the crazy hair (just
the upper body) and the larger chicken onto Basic White cardstock using Memento
ink. I stamped the sentiment “hey, chick!”
onto my little sign using Early Espresso ink.
I also stamped the little cracked egg on the inside of the card (I will
show that in a later photo) and also on the envelope. I used my Stampin’ Blends to color in my
chickens, the colors I used were, Light Poppy Parade, Light Cherry Cobbler,
Dark Daffodil Delight, Dark Calypso Coral and both shades of the Mango Melody.
I used my 1 ½” circle punch to punch out Daffodil
Delight cardstock and used that as the back of my window. Once it was punched, I adhered the chicken
with the crazy hair onto it and trimmed anything that hung over. I then attached this to the back of the Early
Espresso window that I had created and adhered the whole piece to the top
center of my barn. Next, I built my corn
stalk. I adhered the greenery around the
ears of corn and then adhered the stalk to the far-left bottom side of my card
and then attached the ears of corn. Then
I added my little sign to the far-right bottom side of my card. Once that was all done, I just centered my
bigger chicken and popped her up using Dimensionals.
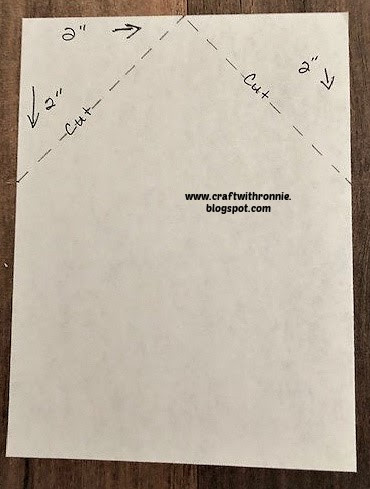
Now it was time to create the inside of my card. I cut a piece of Basic White cardstock to 4 x
5 ¼”. I marked the center top at 2” and
2” down on each side and again cut diagonally to create the peek of the
roof. I stamped the little cracked egg on
the inside (I also stamped it on my envelope), see photos below…

I hope you enjoy this card I certainly enjoyed making
it. As always you can find the supplies
to create this card and much more on my website at https://craftwithronnie.stampinup.net
or by click the shopping button at the top of this blog or the link to the
supplies listed below.
Happy Crafting!!!
")


 Circle Punch")


No comments:
Post a Comment