Featured Post

Season of Green & Gold Project Sheet

Hello there fellow crafters, I found so much inspiration for these products from all over the crafting community so I wanted to see what I c...

Friday, June 28, 2024

Thoughtful Journey Sympathy Card

Today’s card features the Thoughtful Journey Designer Series Paper along with the Unbounded Love Stamps.  These papers are beautiful but this stamp set is really amazing, such nice sentiments.  Unfortunately as of late I have needed a number of Sympathy cards so I decided to create some to have on hand.  Here is what I came up with…

The card base is Old Olive cardstock cut to 5 ½ x 8 ½” and scored at 4 ¼”.  I then cut a piece of Pretty Peacock cardstock to 4 x 5 ¼” and then using the Deckled Rectangles Dies I cut rectangle #4 out of the center of it (so, I mark my sets that nest like the rectangles from 1 to whatever, 1 being the smallest so I can tell my customers which one I used and the reason for cutting this out of this layer is that I was covering it up with Designer Series Paper so no reason to waste any paper, I do this all the time).  I then cut a piece of the Thoughtful Journey Designer Series Paper (I liked this because I thought it looked kind of masculine) to 3 ¾ x 5”.  I took #3 of the Deckled Rectangles Dies and decided what part of the Designer Series Paper I wanted to pop and I die cut it from this piece.  With that all done I adhered the Designer Series Paper to the Pretty Peacock cardstock, the deckle cut paper to the deckled cut Pretty Peacock and then using Dimensionals I popped that framed piece up on top of the card right where I had cut the Designer Series Paper from.  I wrapped Linen Thread around the two layers and added a bow on the left side. 

To finish off the card I stamped “WITH sympathy” onto a scrap of Old Olive cardstock using Pretty Peacock ink and die cut that using one of the dies from the Stylish Shapes Dies (these dies are great for sentiments) and adhered it to the front of the card again using Dimensionals (on the right side I had to stack two to keep it level since that area was not popped up previously like the left was).  For the inside I did a simple 4 x 5 ¼” Basic White layer that I stamped the sentiment “MY heart GOES OUT TO you” also from the set onto it using Pretty Peacock Ink. 

I hope you like this card I certainly enjoyed making it.  As always you can find the supplies to create this card and more on my website at https://www.stampinup.com?demoid=2206796 or by clicking the shopping button at the top of this blog or the link to the supplies listed below.  Be sure to follow me at: 

Facebook at:  https://www.facebook.com/craftwithronnie.stampinup.net

YouTube at: https://www.youtube.com/@ronniejohnsonstampinup

Instagram: https://www.instagram.com/craft_with_ronnie/


Happy Crafting!!! 

Product List

Wednesday, June 26, 2024

BRIGHT WITH MEDITERRANEAN BLOOMS

Today’s card features the new Mediterranean Blooms Designer Series Paper and the Citrus Blooms Bundle.  I wanted to make a card that was bright and happy and this one sure fit the bill.  I am really enjoying the dies that come with this bundle as they make some great backgrounds and have the added bonus of cutting out some of the images on the Designer Series Paper like this group of oranges.  Here is what I came up with…


The card base is Pumpkin Pie cardstock cut to 5 ½ x 8 ½” and scored at 4 ¼”.  I then took a piece of Lemon Lolly cardstock and die cut it using one of the dies from the bundle and adhered it to the center of my card base as my background for my group of oranges.  I die cut the oranges out of the Designer Series Paper using one of the dies from the bundle (super easy) and I adhered it to the card using Dimensionals.  However, before adhering it I added some of the new Peach Pie Bordered Ribbon (just two little loops sticking out each of two corners).  I stamped my sentiment “JUST CHECKING IN” also from the bundle onto a piece of Pumpkin Pie cardstock that measured ½ x 3 ½” using Tuxedo Black Memento Ink.  Before attaching the sentiment, I did a little angle cut on the left side just for some added interest.  I didn’t have the color of gems I wanted so I created them using the Rhinestone Basic Jewels and coloring them with the dark Pumpkin Pie Stampin’ Blend marker.  Super simple and easy because the Designer Series Paper and dies do all the work for you.

I hope you enjoy this card I certainly enjoyed making it.  As always you can find the supplies to create this card and more on my website at https://www.stampinup.com?demoid=2206796 or by clicking the shopping button at the top of this blog or the link to the supplies listed below.  Be sure to follow me at: 

Facebook at:  https://www.facebook.com/craftwithronnie.stampinup.net

YouTube at: https://www.youtube.com/@ronniejohnsonstampinup

Instagram: https://www.instagram.com/craft_with_ronnie/


Happy Crafting!!!

Product List

Monday, June 24, 2024

HAVE A BLESSED DAY (6-24-24)

Today’s card features the beautiful new Thoughtful Journey Designer Series Paper.  This paper is stunning and because of that I wanted to work on cards where I could maximize the paper and this card fit the bill since you only need a piece of it that measures 3 x 3 3/8”.  I actually case’ed this card layout (copy and share everywhere) from a card on page 61 of the Annual Catalog (I did adjust some of the sizes but the overall layout is the same). 

Here is what I came up with…


The card base is Fresh Freesia cardstock cut to 5 ½ x 8 ½” and scored at 4 ¼”.  I then cut three pieces of the Fresh Freesia to ½ x 2 ¼” and embossed them using the new So Swirly Embossing Folder (you can do them all three at one time and you can use any embossing folder you would like) and adhered them to my card base spaced evenly apart.  I cut a piece of Highland Heather cardstock to 3 ¼ x 3 5/8” and attached my 3 x 3 3/8” piece of the Thoughtful Journey Designer Series Paper to it.  I added Dimensionals to the back and popped it up centered about ¼” from the top.  I cut a little scrap of Fresh Freesia cardstock to ½ x 2 ¼” and stamped the sentiment “HAVE A blessed DAY” from the Unbounded Love Stamp Set onto it using Highland Heather Ink.  I mounted this onto a scrap of the Highland Heather cardstock that measured 5/8 x 2 3/8” and popped it up centered at the bottom using Dimensionals.  Finally, I added one of the birds from the Adhesive-Backed Dragonflies & Birds Embellishments.  I love how simple and quick this card was to create. 

I hope you enjoy this card I certainly enjoyed making it.  As always you can find the supplies to create this card and more on my website at https://www.stampinup.com?demoid=2206796 or by clicking the shopping button at the top of this blog or the link to the supplies listed below.  Be sure to follow me at: 

Facebook at:  https://www.facebook.com/craftwithronnie.stampinup.net

YouTube at: https://www.youtube.com/@ronniejohnsonstampinup

Instagram: https://www.instagram.com/craft_with_ronnie/


Happy Crafting!!! 

Product List

Friday, June 21, 2024

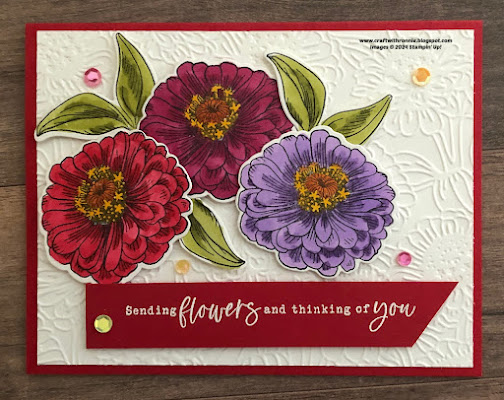
SENDING FLOWERS

Today’s card features products from the Simply Zinnia Collection an Online Exclusive group of products.  I really love this set and after stamping and die cutting a bunch of flowers and leaves I sat down and colored all of them and now I am making some really quick and cute cards using them.  I love to color so I used Stampin’ Blends alcohol markers on these but I also stamped some onto watercolor paper and painted them with ink and my water painters (watch for those to be used on upcoming cards they are really pretty).  Here is what I came up with…

The card base is Real Red cardstock cut to 5 ½ x 8 ½” and scored at 4 ¼”.  I then cut a piece of Basic White cardstock to 4 x 5 ¼” and embossed it using the Zinnia 3D Embossing Folder (love how it adds so much dimension to the layer).  I then stamped my sentiment “Sending flowers and thinking of you” onto a piece of Real Red cardstock that measured ¾ x 4 ½” using VersaMark Ink and White Embossing Powder.  I cut a little angle on the right side and added it to the bottom right side of my card.  Next, I stamped three sets of leaves (I like uneven numbers so I cut one in half for a single leaf) from the stamp set in the bundle onto some scraps of Basic White cardstock using Tuxedo Black Memento Ink.  I die cut these and colored them with the Old Olive set of Stampin’ Blends.  Next, I stamped three of the zinnias onto scraps of Basic White cardstock, again using that Tuxedo Black Memento Ink (which is the ink you want to use with the markers) and die cut them.  To color the flowers, I started with the Dark Pumpkin Pie marker for the center, added the Dark Daffodil Delight for the stamin’s and then colored one with the Real Red, one with the Berry Burst and one with the Highland Heather Stampin’ Blends.  I popped the three flowers and three leaves up using Dimensionals.  For my final addition I added five of the Adhesive-Backed Shiny Sequins that coordinate with the collection.  This card was very easy and lots of fun to create.

I hope you enjoy this card I certainly enjoyed making it.  As always you can find the supplies to create this card and more on my website at https://www.stampinup.com?demoid=2206796 or by clicking the shopping button at the top of this blog or the link to the supplies listed below.  Be sure to follow me at: 

Facebook at:  https://www.facebook.com/craftwithronnie.stampinup.net

YouTube at: https://www.youtube.com/@ronniejohnsonstampinup

Instagram: https://www.instagram.com/craft_with_ronnie/


Happy Crafting!!! 

Product List

Wednesday, June 19, 2024

Layers of Beauty (6-19-24)

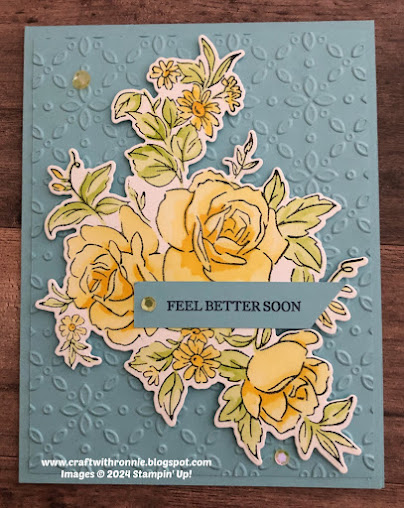
Today’s card features the new Layers of Beauty Bundle.  This bundle includes a stamp set, a die set and a set of five masks and it can be used in many ways to create many different looks.  Today I decided to use all three items in the bundle. 

Here is what I came up with… 

The card base is Balmy Blue cardstock cut to 5 ½ x 8 ½” and scored at 4 ¼”.  I cut a second piece of the Balmy Blue cardstock to 4 x 5 ¼” and embossed it with the Eyelet 3D Embossing Folder and adhered it to my card.  Next, I stamped the large floral image onto a piece of Basic White cardstock that measured about 4 x 5 ¼” using Tuxedo Black Memento Ink.  I then used the masks to color in my image (see my YouTube video on using masks at:  https://www.youtube.com/watch?v=huJ4Np5dEpU it will show you how to use the masks to color in the image.  I used Granny Apple Green, Daffodil Delight and Lemon Lolly with my Blending Brushes to achieve the layers of color.  I did add some Wink of Stella Glitter (it is hard to see in photos but here is a close-up that shows some of the beautiful shimmer you get from these brushes). 


Once my image was colored, I used the coordinating die from the bundle and cut it out and adhered it to the front of my card with Dimensionals.  I stamped the sentiment “FEEL BETTER SOON” from the bundle onto a little ½ x 2 ½” piece of Balmy Blue cardstock using Night of Navy Ink (I did a little angled cut on the end for some added interest) and attached it to the card.  To finish off the card I added three of the Adhesive-Backed Shiny Sequins that are an online exclusive product (this just means you won’t see them in a catalog). 
I hope you enjoy this card I certainly enjoyed making it.  As always you can find the supplies to create this card and more on my website at https://www.stampinup.com?demoid=2206796 or by clicking the shopping button at the top of this blog or the link to the supplies listed below.  Be sure to follow me at: 

Facebook at:  https://www.facebook.com/craftwithronnie.stampinup.net

YouTube at: https://www.youtube.com/@ronniejohnsonstampinup

Instagram: https://www.instagram.com/craft_with_ronnie/


Happy Crafting!!! 

Product List