Featured Post

FUN WITH TEMPLATES

Today’s card features the Fern & Flora Bundle and the Moonlit Flora Designer Series Paper.  I fell in love with this suite the first tim...

Thursday, January 7, 2021

Darling Donkey

I have been having some fun with some of the free product I have earned with purchases during Sale-A-Bration.  It is simple, spend $50 or $100 and you will earn free products.  Today I am showcasing two of the products you can earn with a $50 purchase, they are the Darling Donkey stamp set and the Flower & Field Designer Series Paper.  If you want to learn more about Sale-A-Bration earnings don’t hesitate to contact me). 

Here is what I came up with…


The card base is Basic Black cardstock that is cut to 4 ¼ x 11” and scored at 2 ¾ and 5 ½”.  The base is folded in half at the center which is the 5 ½” score line and the 2 ¾” score line is then folded up to the top of the card creating a cute fun fold as shown below. 


Once I had my base all created, I added my two pieces of Designer Series Paper from the Flowers & Field each was cut to 4 x 2 ½” and I added a piece of Basic White cardstock that also measured 4 x 2 ½”, for my sentiment.  For my Donkey I stamped him onto a piece of Basic White cardstock using Memento ink and colored him in using the Stampin’ Blends listed below.  Once I had him all colored, I cut him out using one of the Tasteful Labels dies.  I then cut out a piece of Melon Mambo cardstock using one of the Stitched So Sweetly dies.  I stamped the sentiment “HEE HAW!” onto a piece of Basic White cardstock and fussy cut it out.  I added the Melon Mambo layer right onto the top of the card base (attaching only the top half to the top half of the card).  I added my Donkey layer with a few Dimensionals and I also used Dimensionals to pop up my sentiment at the bottom of the card.

I thought this card turned out really cute and even better it was made with mostly free products so that makes it even better.  I hope you enjoy this card I certainly enjoyed making it.  As always you can find the supplies to create this card and much more on my website at https://craftwithronnie.stampinup.net or by click the shopping button at the top of this blog or the link to the supplies listed below. 

Happy Crafting!!! 

Product List

Wednesday, January 6, 2021

Sweet Strawberries

When I first saw the Sweet Strawberry bundle during On Stage at Home last November, I knew it was a set I would have to have.  Well, when I received my January – June 2021 Mini Catalog it was a must order, but then to my even greater surprise the Sale-A-Bration catalog contained another stamp set and a package of Designer Series Paper that were prefect to use with it.  The Berry Blessings Stamp Set + Berry Delight Designer Series Paper Pack are free with a qualifying $100 purchase during January and February.  So, it stood to reason that since I loved the bundle and the free bundle, I would have to design a card for my customers as a make and take during my open house where I am previewing the new catalogs with them.

Here is what I came up with…


I wish the sparkle on the berries from the Wink of Stella Glitter Brush would show up in photos but no matter how hard I try I just can’t capture it (too bad since it is such a nice shimmer).  So here is how the card was made.

The card base is Basic White cardstock that is cut 5 ½ x 8 ½”, scored at 4 ¼”.  I cut a piece of Flirty Flamingo that measured 2 ½ x 5 ½” and then I embossed it using one of the Greenery Embossing Folders.  I added a piece of the Designer Series Paper that was free with my $100 purchase to the front that measured 3 x 4”.  Before adhering it to the card I wrapped a piece of Just Jade ribbon around it and tied a square knot.  Next, I stamped my greeting from the Sweet Strawberry bundle onto Basic White cardstock using Tuxedo Black Memento Ink and I die cut it out using the little label die from Potted Succulents Dies (you could use any label die or punch you have on hand).  I also cut the larger label from the set out of Flirty Flamingo cardstock and layered them.  I popped this sentiment up on dimensionals in the upper right corner of my card. 

I moved onto my strawberries at this point.  I stamped three berries, three berry toppers and two leaves from the stamp set onto a scrap of Basic White cardstock and used the coordinating punch to punch them out.  I colored the berries with Real Red and Flirty Flamingo Stampin’ Blends and the leaves were colored with Granny Apple Green Stampin’ Blends (love these markers).  I did use my bonefolder to shape my strawberries and my leaves a little to give them a little more dimension.  Then I added the berries to the bottom left using dimensionals.  I adhered the leaves tucked in behind my strawberries right onto the card.  

I hope you enjoy this card I certainly enjoyed making it.  As always you can find the supplies to create this card and much more on my website at https://craftwithronnie.stampinup.net or by click the shopping button at the top of this blog or the link to the supplies listed below. 

Happy Crafting!!!

Product List

Tuesday, January 5, 2021

Starting The Year Out Right

I held my Open House this past Saturday to introduce the new January – June 2021 Mini Catalog and the Sale-A-Bration Freebie catalog as well.  I wanted to offer a make and take that could be enjoyed throughout the upcoming year and this cute project was just what I was looking for.  I was given one of these several years ago at an event and I have had one sitting on my desk each year since then (using new Designer Series Papers and Stamps) for inspiration.     


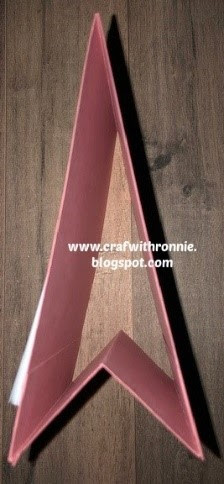
So, to create the base for this desk calendar you start with a piece of cardstock that coordinates with your Designer Series Paper (I used Rococo Rose) that is 4 ¼ x 11”.  This piece is then scored at 5 ½”.  Next you cut another piece of the cardstock, this one measures 4 ¼ x 5” and it is scored along the 5” side at 1”, 2 ½” and 4”.  This is folded into a W shape (see below),


and the two 1” tabs are glued to the inside of the base right at the bottom creating a stable base for the calendar card to stand up with, it looks like a tent (see below).


Once you have the basic structure down it is simply a matter of decorating your calendar stand.  I choose to use this beautiful new paper from the Fine Art Floral Designer Series paper.  I cut a piece to 4 x 5 ¼” and attached it to the front of my calendar base.  I then cut a piece of cardstock to match my base (again mine is Rococo Rose) that was just ¼” larger than my calendar (the little calendars I found measured 2 ¼ x 3”) and I mounted my calendar onto the cardstock and then attached that to the front of the stand. 

To decorate I stamped one of the beautiful images from the Art Gallery Bundle (this one is a two-step stamp, meaning one stamp is stamped on top of the other for a two-tone look) I used Rococo Rose ink for my first stamp and Poppy Parade for my second and stamped onto a piece of Basic White cardstock.  I then cut this out using the coordinating die from the bundle.  My final touch was to add three little Pearl Basic Jewels to finish off my project. 

I hope you enjoy this project; I am certainly going to enjoy having it sit on my desk each day.  As always you can find the supplies to create this project and much more on my website at https://craftwithronnie.stampinup.net or by click the shopping button at the top of this blog or the link to the supplies listed below. 

Happy Crafting!!!

Product List

Sale-A-Bration Kick Off

Sale-A-Bration Kick Off That’s right it is that time of the year again, Sale-A-Bration time.  What is Sale-A-Bration, well it is an amazing opportunity to earns some fun FREE products.  Sale-A-Bration will run from January 5th through February 28th and during that time you can choose a FREE Sale-A-Bration product with every $50 or $100 you spend (before taxes and shipping).  There are three different Designer Series Paper Packs and four different stamp sets you can earn with a $50 order, there is one very detailed stamp set (it has 17 stamps in it) and one stamp set that includes a coordinating package of Designer Series Paper that you can earn with a $100 order.  Additionally, for hosts there is a beautiful stamp set that coordinates with a number of punches that can be earned for free with a $300 party.  

Have you ever considered joining Stampin' Up! Well let me tell you joining during Sale-A-Bration is the best deal around, give me a call and we can discuss it in detail.  I have had many ladies tell me they are concerned about the commitment but I want you to know there is no obligation to make a single purchase after you join if the products in the kit are all you want. And I want to point out that if running a business is NOT for you that is fine, you can still enjoy the great deal and future discounts on your own purchases (You will get a minimum of 20% on your Stampin’ Up! purchases as long that you stay active).  Join in January and you can order and enjoy the discount until the end of June 2021 without having to make any minimum purchases. 

This means you will also get to see the new Annual catalog on June 1st and the new July – December catalog (holiday stuff) a month before customers and you can actually pre-purchase some of the items a month before anyone else gets a chance.  If you are still not sure about joining here is another great reason to take the plunge during Sale-A-Bration.  You will get to select $125 worth of products for just $99 plus as a signing bonus during Sale-A-Bration you will receive 5 packages of 6 x 6” Designer Series Paper that include the 2020 – 2022 in-color groups and the four-color families, that is 200 sheets of paper that will be in the new design for the 2021 – 2022 Annual Catalog.  That’s right 5 paper packs which is a value of $57.50.  So, for $99 you will receive $182.50 worth of products (plus free business supplies) all with free shipping. 


Sunday, January 3, 2021

Introducing the January - June 2021 Mini Catalog

That's right just what we have all been waiting for, the new January - June 2021 Mini Catalog.  This may be a mini catalog but let me tell you it is packed full of fun and exciting new products.   The catalog goes live on Tuesday, January 5th so don't wait head over that morning to my website to check it out at   https://craftwithronnie.stampinup.net  


I have been busy at work making some great samples using many of the products in this catalog and let me tell you there are some beautiful things to work with in it.  Here are the two make and take projects I did with my customers during my open house yesterday.  


I will be posting full information and instructions for both the desk top calendar as well as the card in the next couple days.  I hope you enjoy both.  Happy Crafting!!!


Saturday, December 5, 2020

An Elegant Christmas

I just love this Brightly Gleaming Specialty Designer Series Paper and I wanted to make a few simple but elegant cards that made a bit of a statement.  I knew this paper and this stamp set were perfect for that.   

Here is what I came up with…


The card base is cut from Night of Navy cardstock that is cut 5 ½ x 8 ½”, scored at 4 ¼”.  I then cut a piece of Pretty Peacock cardstock to 4 x 5 ¼” and added a piece of the Brightly Gleaming Specialty DSP that measured 3 ¾ x 5” on top of that (I love this one with the ornaments but they are all beautiful).  Once I had my DSP adhered to my Pretty Peacock layer, I wrapped a piece of the copper colored ribbon from the Basket Weave & Metallic Ribbon Combo Pack around this layer and tied a simple square knot.

I used my Layered Ovals dies (I use these all the time) to cut out a circle from Night of Navy cardstock which I stamped with a beautiful sentiment from the For Unto Us stamp set using Versamark ink.  I did heat emboss this using some retired copper embossing powder but gold or silver would be pretty as well.  I then cut out the next larger scalloped circle from the die set from Copper Foil.  I attached the two together and then placed them on the card using Dimensionals.  As you can see this was a fast and simple card.

I hope you enjoy this card I certainly enjoyed making it.  As always you can find the supplies to create this card and much more on my website at https://craftwithronnie.stampinup.net or by click the shopping button at the top of this blog or the link to the supplies listed below. 

Happy Crafting!!! 

Product List