Featured Post

FUN WITH TEMPLATES

Today’s card features the Fern & Flora Bundle and the Moonlit Flora Designer Series Paper.  I fell in love with this suite the first tim...

Monday, March 16, 2020

Come With Me To The Garden


I fell in love with the Grace’s Garden bundle in the new Mini Catalog and I am so excited to use it to teach a class this month.  I had posted a card similar to this earlier but I added a few techniques that help give the set even more dimension and interest.  So, here is my card…


The card base is Daffodil Delight cardstock cut to 4 ¼ x 11” and scored at 5 ½”.  I decided I wanted this card to open from the bottom up just for a change. 

I cut two more layers, the first was Whisper White at 3 7/8 x 5 1/8” and the second was Crumb Cake at 4 x 5 ¼”.  Using the arch die from the bundle I cut the Brick and Mortar 3D Embossing Folder to give it that brick wall look.  To add to that affect, I took a drop of Whisper White re-inker and put it on one of my acrylic blocks and then took my Aqua Painter and added just a tiny bit of water and color washed some of the bricks that stand up ever so lightly.  I was pretty pleased with the outcome. 
For my Whisper White layer, I stamped my sentiment into the center of where the gate opening would be using Tuxedo Black Memento ink.  I added a few of the flowers from the stamp set and then began my coloring.  I first used a Sponge and sponged on just a touch of Highland Heather ink all over the layer to give it some interest.  Then I used my Stampin’ Blend markers (colors listed below) to color in all my flowers. 

When this was all done, I added the white layer directly onto the card base.  I then attached the Crumb Cake layer using dimensionals.  Once everything was adhered, I grabbed some pieces of Whisper White cardstock and got to work decorating the card.  I first cut out the arch and gate using the coordinating dies and attach to the layer.  I did cut the center of the gate open on the score line so it would open up some.  I stamped the “Hello” sentiment onto a scrap of Whisper White cardstock using the Tuxedo Black Memento ink and then die cut it with the smallest of the dies from the Stitched So Sweetly die set (I love the look of the little sign) I adhered it to the gate on the left side only so my gate would continue to open.  I stamped the flowers from the set onto scraps of Whisper White using Tuxedo Black Memento ink and cut them out using the coordinating dies and colored them with my Stampin’ Blend markers.  The little kitty was stamped using Daffodil Delight ink and then I used my Wink of Stella Glitter Brush to pull some of the yellow into his body area and cut him out using the coordinating dies (yes, this bundle has a bunch of dies).  I attached the flowers on the left and the climbing roses directly onto the card.  I used dimensionals to attach the flowers on the right and little mister kitty. 

For the inside of the card I just stamped the taller of the flowers using Tuxedo Black Memento ink and colored them using the same Stampin’ Blends I used on the front in the bottom left of a piece of Whisper White that measures 4 x 5 ¼”.

I hope you enjoy this card.  I will list the supplies I used below and you can find the supplies for this card and many more on my website at www.craftwithronnie.stampinup.net or by clicking the shopping button at the top of this blog.

Happy Crafting!!!

Supplies Used:


Friday, March 13, 2020

Healing Hugs


I decided today I would create a card that was very basic and would be an excellent beginners’ card or a fabulous card to create when you need to mass produce some cards.  So, since we all need get well cards once in a while that’s what I created.


The card base is Seaside Spray cardstock cut to 5 ½ x 8 ½” and scored at 4 ¼”.  The next layer is Basic Gray cardstock and measures 3 ¾ x 5” and was adhered to the base using dimensionals.  I then cut a piece of Whisper White cardstock out using the largest stitched scallop rectangle from the Stitched So Sweetly dies and stamped the sentiment “Sending healing hugs” from the coordinating So Sentimental stamp set into the bottom right corner of this layer using Seaside Spray ink.  Next, I stamped the greenery for my flower from the Thoughtful Blooms stamp set (a Sale-A-Bration freebie set, got to love free) onto this layer using Pear Pizzazz ink I then added three little flowers (also from that stamp set) in Daffodil Delight ink.  I stamped my flower using Seaside Spray onto a scrap of Whisper White cardstock and punched it out using another of the Sale-A-Bration freebie items (it appears this one will become a for sale item once Sale-A-Bration is over so you may want to grab the stamp set now and purchase the punch later) the Small Bloom Punch.  I placed that flower on a dimensional and put it right in the middle of the greenery.  I added some of the Pearl Basic Jewels to each of the flowers.

For the inside of the card I simply stamped “get well soon” from the Timeless Tulip stamp set with Seaside Spray ink. 

I hope you enjoy this card.  I will list the supplies I used below and you can find the supplies for this card and many more on my website at www.craftwithronnie.stampinup.net or by clicking the shopping button at the top of this blog.

Happy Crafting!!!

Supplies Used:

Tuesday, March 10, 2020

Drapery Fold Card


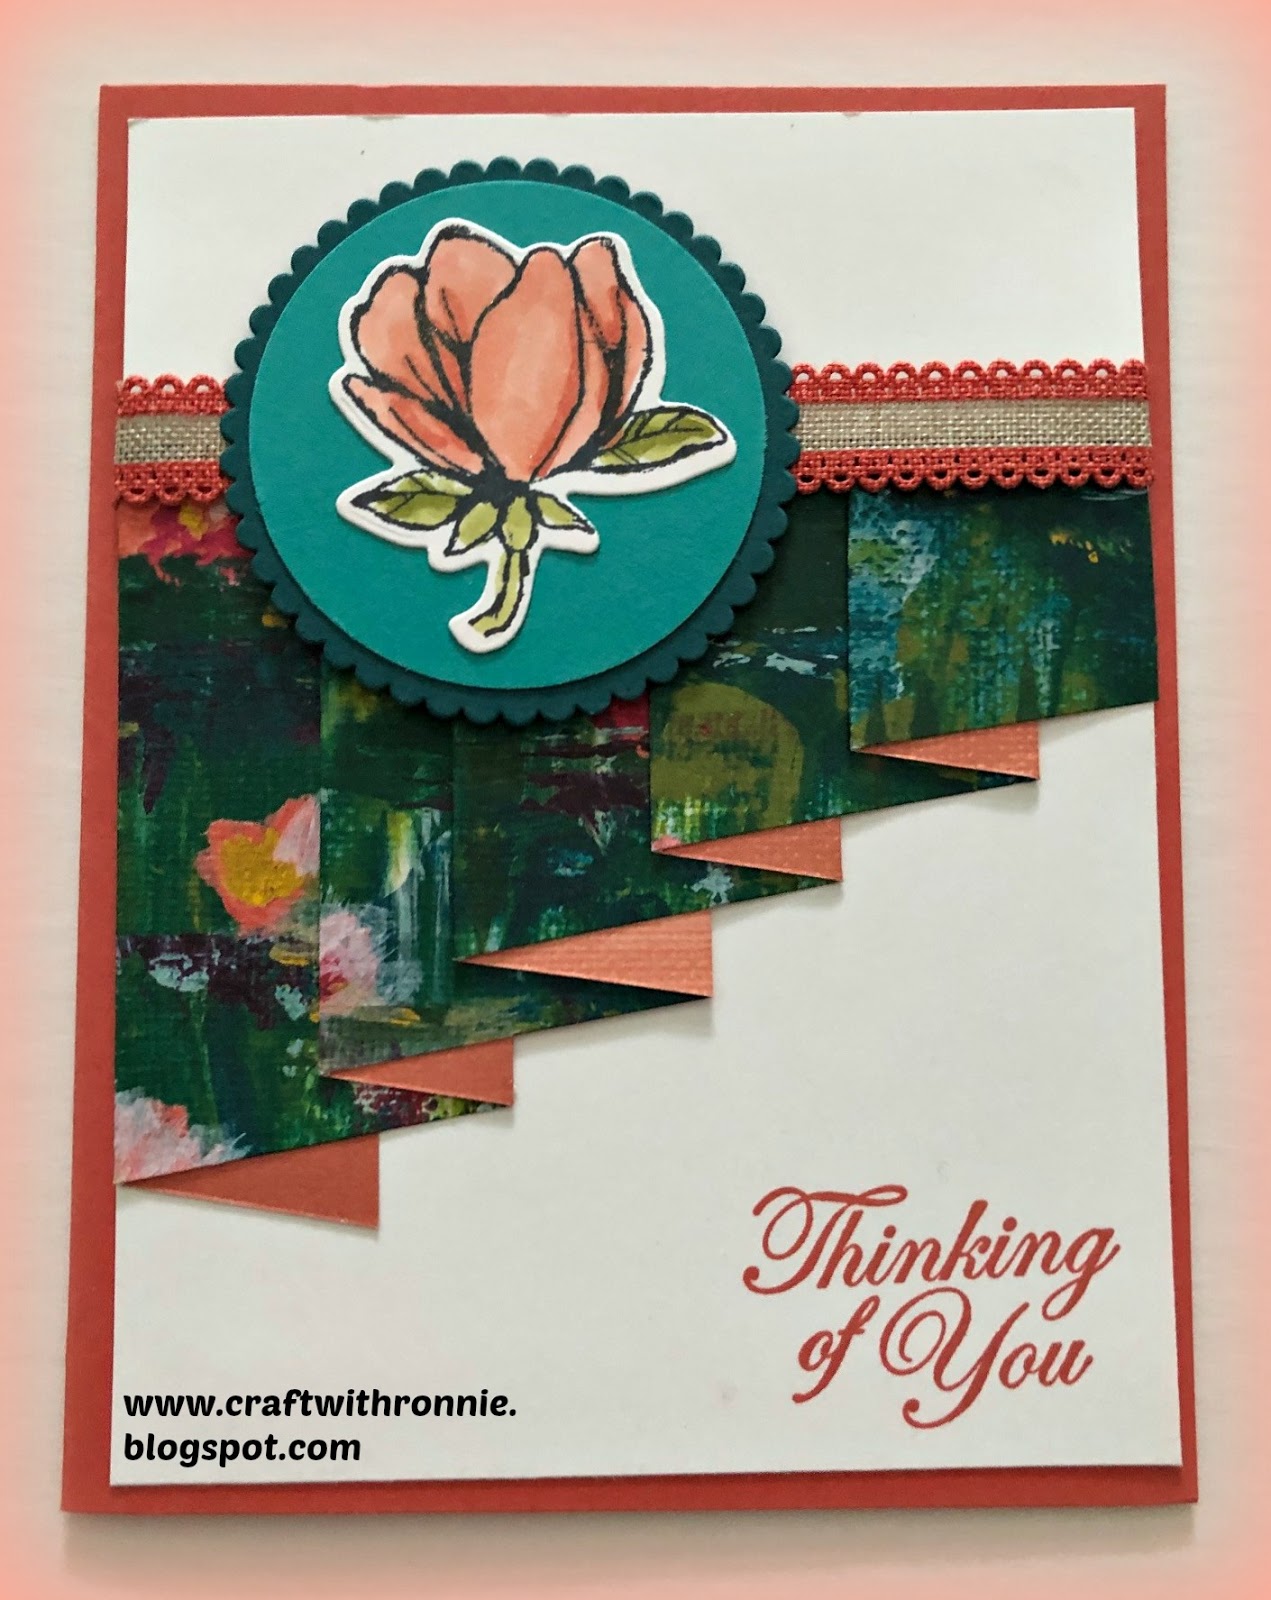
Today’s fun fold card was created using the drapery fold.  This is a fun design and you can add a great deal of interest to your card without using a ton of products.  This technique works best with two side Designer Series Paper. 


The card base is Terracotta Tile cardstock cut to 5 ½ x 8 ½” and scored at 4 ¼”.  The next layer is Whisper White cardstock cut to 4 x 5 ¼” and the Designer Series Paper I used here is a freebie paper from the Sale-A-Brations catalog and it is called Lily Impressions.  I cut the DSP to 4 x 11 ½” (this will make drapery folds for two cards). 

To make the drapery fold you measure up on the 4” side 1” from the bottom left and 1” from the top right and cut it diagonally (this will give you what you need to make two of the drapery folds).  With the widest edge on the left corner of your Simply Scored Scoring Tool you score at 1”, 2 .5”, 3.25”, 4.75”, 5.75”, 7.25”, 8”, 9.5” and 10.25”.  To make your fold you start with the 1” score line and fold down then the next up and so on until you are across the paper and have your drape.  I stamped my sentiment from the Good Morning Magnolia stamp set in the bottom right corner of the Whisper White layer using Terracotta Tile ink and then attached the drape to the layer and wrapped a piece of the Terracotta Tile ½” Scalloped Linen Ribbon around it and then adhered this layer to the cardbase. 
I stamped the magnolia bloom, also from the Good Morning Magnolia stamp set onto a piece of Whisper White cardstock using Tuxedo Black Memento ink and colored it using my Stampin’ Blends (colors used listed below).  I then used the coordinating Magnolia Memories dies to cut my flower out.  I attached that to a circle of Bermuda Bay cardstock that I punched out using my 2” Circle Punch.  I placed this on another circle that was cut out of Pretty Peacock cardstock using the 4th largest of the scalloped circles from the Layering Circles dies.  I popped the whole thing up using dimensionals and placed it on my card. 

For the inside of my card I simply cut a piece of Whisper White cardstock to 4 x 5 ¼” and stamped the same flower on the bottom right corner and colored it with the same Stampin’ Blends I used for the other flower.  

I hope you enjoy this card.  I will list the supplies I used below and you can find the supplies for this card and many more on my website at www.craftwithronnie.stampinup.net or by clicking the shopping button at the top of this blog.

Happy Crafting!!!

Supplies Used:

Sunday, March 8, 2020

Easter Crocus


I needed to get started on some Easter cards, I know it is a ways away but I need to make 57 cards for the church so I figured I better get going.  I saw this stamp set in the new Mini Catalog and thought it would work well for me.


The card base is Purple Posy cardstock cut to 5 ½ x 8 ½” and scored at 4 ¼”.  The next layer is Whisper White cardstock cut to 4 x 5 ¼” and embossed using the Parisian Flourish 3D Embossing Folder, I always love the beautiful affects you get with embossing and it is one of my most favorite techniques to incorporate into cards.  I cut a scalloped oval out of a piece of Purple Posy cardstock that measured about 3 x 4” using the largest of the scalloped ovals from the Layering Ovals dies.  I used a scrap of the Purple Posy cardstock and punched out a label for me sentiment using the Everyday Label punch.  I stamped my sentiment using Versamark ink and then heat embossed it using White Stampin’ Emboss Powder and my Heat Tool.  I stamped my crocus from the Easter Promise stamp set onto a piece of Whisper White cardstock using Tuxedo Black Memento Ink and then cut it out using the third largest of the Layering Oval dies.  I colored it using Stampin’ Blends (colors listed below).  I attached the sentiment and the crocus element using dimensionals, this really helps the card to pop.  Finally, I did use my Wink of Stella Glitter Brush to add some glitter to the flowers, I know you can’t see it in photo but let me tell you it looks awesome in person and is really a pretty cheap way to add some bling to any card. 

For the inside of the card I simply cut a piece of Whisper White cardstock to 4 x 5 ¼” and stamped the sentiment “Happy Easter” from that same stamp set the crocus is from using Highland Heather ink. 

I hope you enjoy this card.  I will list the supplies I used below and you can find the supplies for this card and many more on my website at www.craftwithronnie.stampinup.net or by clicking the shopping button at the top of this blog.

Happy Crafting!!!

Supplies Used: