Featured Post

FUN WITH TEMPLATES

Today’s card features the Fern & Flora Bundle and the Moonlit Flora Designer Series Paper.  I fell in love with this suite the first tim...

Saturday, June 21, 2014

Let's take a Ride, with the CTMH Balloon Ride Paper Pack

These cute cards were inspired by some I saw on Pinterst which were created by Michelle Johns.  They are quick and easy cards that make cute little card sets which can be used as gifts.


The bases are 5 ½ x 4 ¼” colonial white card bases.  Then I cut pieces of various papers from the Balloon Ride paper pack to 5 ¼ x 4” and distressed them using saddle ink and my trusty dauber.  I then cut mats (here I used Saddle cardstock but I also made some using Crystal Blue cardstock which went nicely with the Balloon Ride papers) to 3 x 3”.  I then cut various B&T (Background and Texture) papers from the paper pack into 2 ¾ x 2 ¾” squares that I then stamped using various stamp sets.  I made over a dozen different cards just changing around the papers within this paper pack and had a blast doing it.

Supplies Used:

Colonial White Card bases and envelopes (X1410)

Papers:  Saddle (X5928), Crystal Blue (1292) and the Balloon Ride Paper Pack (X7180B)

Inks: Crystal Blue (Z2117) and Saddle (Z2171)

Stamp sets: Casual Expressions (D1525), Lifting Spirits (C1570), Happy Autumn (D1550) and Give a Lift (D1581)


All of these supplies can be purchased from my website at www.craftwithronnie.ctmh.com or by clicking the shopping cart at the top of this blog.  Happy Crafting!!

Friday, June 13, 2014

Believe In Yourself

What a beautiful sentiment, so here it is on a card.


Here are two variations of the same card, I just attached the pieces differently for a new look.  I started with a colonial white card base of 4 ¼ x 5 ½” and added a piece of the Skylark paper (the quatrefoil side) cut at 4 ¼ x 5 ½ which was distressed using Lagoon Ink.  I then added a strip of the Skylark paper that was the blue semi-floral cut to 2 x 5 ½”.  The base of the sentiment is a piece of kraft cardstock cut to 3 ½ x 2 1/8” topped with a piece of colonial white cut to 1 ¾ x 3 ¼” that has been stamped with stamp set C1574 Believe in Yourself in Lagoon and Sweet leaf ink and mounted using 3-D foam tape.  The flags are cut from the green chevron paper in the Skylark paper pack and are 1 ½ x ¾”’.

Supplies Used:

Colonial White Card bases and envelopes (X1410)

Papers: Colonial White Cardstock (Z2168), Craft Cardstock (Z1375), Skylark Paper Pack(X7177B)

Stamp Set: Believe in Yourself (C1574)

Inks: Lagoon (Z2195) and Sweet Leaf (Z2153)

3-D Foam Tape (Z1151)


You can order these supplies from my website at www.craftwithronnie.ctmh.com or by clicking the shopping cart at the top of this blog.  Happy Crafting!!

Friday, June 6, 2014

Ivy Lane WOTG and More

The Close to My Heart Workshops on the Go are a great way to get inspiration and they come with lots of products that coordinate (including a stamp set) as well as cutting and layout instructions so that your pages will turn out great, however, I did take some liberties and changed some of the embellishments around.  That is the great part of this, there is no right or wrong, just what you like.


When I was done I still had some papers left and I wanted to make more pages so I hit Pinterest to see what else was out there and I found this idea that Susan Williams had posted and I used it (with a few changes to make it my own).


The base is created with two sheets of 12 x 12” Hollyhock cardstock.
The honeycomb accents were made using the Artbooking cricut cartridge.  Page 67, Shift, Overlay cut at 11” (cut 2 of these, one for each page). Individual honeycombs were also made using the Artbooking cricut cartridge.  Page 66, Shift, Border cut at 1 ¼” – cut as many B&T pieces and White Daisy pieces as you will need.  

The White Daisy pieces are stamped with the Honeycomb stamp set using Hollyhock, Desert Sand and Blush inks. Piece these into the honeycomb overlay and then mount onto the Hollyhock base.
Cut B&T to 6 x 12 (if there is a pattern make sure paper is turned correctly before cutting since this piece will be mounted horizontally), mount horizontally in center of each page and over the top of the honeycomb overlay.

Add Zip Strips of choice to sides (these are those cute little ½” strips added to the sides of each of the three B&T (background and texture) papers included in the kit.

Cut and mount the following mats, Ivy Lane Green 4 ½ x 6 ½” (cut 2), Ivy Lane Purple 3 ½ x 5 ½” (cut 2), Bamboo 4 x 6” (cut 2), Bamboo 3 x 5” (cut 2)

Stamp “Pure Joy” from the Ivy Lane WOTG stamp set in Smokey Plum onto White Daisy cardstock, cut out and mount.

Flowers are created using the Art Philosophy cricut cartridge.  Page 50, Shift, Layer, green is cut at 1”, hollyhock at 1 ½” and floral at 1 ¾” they are then layered, glued together using Liquid Glass and a Purple Glitter Gem is added to the center of each.

Supplies Used:

Papers, Purple Glitter Gems, the Stamp Set and more are all in the Workshops on the Go Ivy Lane (G1073)

Cricut cartridges: Art Philosophy (Z1686), Artbooking (Z1906) and Artiste (Z1790) – shapes can be hand cut if you do not have the cartridges.

Inks: Bamboo (Z2103), Desert Sand (Z2118), Hollyhock (Z2128) and Blush (Z2106)

All these supplies can be purchased on my website at www.craftwithronnie.ctmh.com or by clicking on the shopping cart at the top of this blog.  Happy crafting!!!

Sunday, June 1, 2014

May Workshop Scrapbook pages

We had some fun with our May scrapbook workshop, here are the two layouts we completed. They were made using a retired paper from Close to My Heart called Avonlea.  However, we used the Ivy Lane Cardmaking Workshop stamp set and the Sweet and Lovely stamp set from the Artbooking Cricut bundle (both available through my website or by clicking the shopping cart at the top of this blog).  The idea was to show how you could take things that were meant to be used for something else, like the stamp set from the card workshop and be creative with it.  Rule number 1 in crafting is have fun, rule number 2 is there are no rules.


Have fun and remember keep crafting!!!

Saturday, May 31, 2014

June Specials to be announced

Hello all my crafty friends.  Close to My Heart turns 30 in June and there will be some great special deals available for everyone.  I will be posting all those tomorrow so don't miss it.  But right now I want to remind everyone that it is easy to get started making cards and scrapbook pages.  This card was made using a simple mini stamp.  There are currently 16 of these mini stamps available for just $2.95 each so they are the perfect way to get started stamping.


This is a simple project using the lollydoodle paper pack, one of the mini stamps and some              markers.  It looks great and was fast and easy to make.  Happy Crafting!!!                                            


Wednesday, May 21, 2014

Father's Day or Masculine Birthday Card

I always struggle with masculine cards so I am really trying to create more of them so I become more at ease when making them.  Here are a couple I did, first I was planning for Father's Day and then I realized this card would also be great for a birthday so here they are:


And here is how they are made:

Cut Kraft cardstock to 9x6” and fold in half to make a card that measures 4 ½ x 6”.  

Cut Timberline paper to 4 ½ x 6” and stamp with the tools from the You’re the Best stamp set alternating with Cocoa and Chocolate ink and mount to front of card.

Cut Balloon Ride paper to 1 x 4 ¼” and stamp with sentiment of choice (I made one with You’re the Best and one with Joyful Birthday) using Twilight ink, then dove tail paper.

Cut Twilight cardstock to 1 ¾ x 4” and mount sentiment stamped on Balloon Ride paper to it.  Wrap twine around this a few times and tie.  Add a Durable Triangle Stud and then mount this whole piece onto the front of the card using 3-D Foam Tape

Supplies Used:
Timberline Paper Packet (X7182B) (this included the B&T and the Twilight cardstock used in the project, also the base of the card could be made using the Chocolate cardstock included in this paper pack)
Balloon Ride Paper Packet (X7180B)
Craft Cardstock (Z1375) and Twilight Cardstock (X5666)
Cocoa Ink (Z2114), Chocolate Ink (Z2111), Twilight Ink (Z2160)
You’re the Best Stamp Set (C1571)
Durables Triangle Studs (Z1928)
3-D Foam Tape (Z1151)
Baker’s Twine – Neutral Metallic Asst.  (Z1921)

Tri-Shutter Card with the beautiful Ariana Paper Pack


Select three patterned papers and two solid colors to use.  I chose to use the beautiful Adriana Paper Pack from Close to My Heart, along with their solid cardstock in Hollyhock and Colonial White.  I cut the card base from the Hollyhock to 5 ½ x 12”, score at 2”, 4”, 8” and 10”.  Go 1 ½” into card base and cut from 2” to 10” and then move card over to 4” in and cut from 2” to 10” again.  Now fold card up and down and up and down on each of the score marks.  Push the middle score lines in the opposite direction.  The card can then be finished by adding your choice of patterned papers cut 3/16 inch smaller than the card base. 

Now I used my Close to My Heart Art Philosophy Cricut cartridge and cut several butterflies (page 55) out of the same paper I was adorning the inside of the card with and cut a tag for the sentiment (pg 62) as well as a blank tag for a message inside of the card from Colonial White cardstock.  I stamped the sentiment tag with the Frame Flair stamp set and the Joyful Birthday stamp set using Lagoon and Hollyhock inks.  As a final embellishment I added a pink acrylic rose from the Ivy Lane Assortment pack. 

And here is what the card looks like opened up and all finished.


Supplies Used: 
Paper:  Ariana paper packet (X7179B)
Cardstock: Hollyhock (1246) and Colonia White (1388)
Inks: Hollyhock (Z2128) and Lagoon (Z2195)
Stamp Sets: Frame Flair (D1546) and Joyful Birthday (B1419)
Ivy Lane Assortment (Z3001)
Cricut Art Philosophy Collection (Z1686)

All the supplies for this project can be purchased from my website at www.craftingwithronnie.blogspot.com   or by clicking the shopping cart at the top of this blog.  Happy Crafting!!!

Tuesday, May 20, 2014

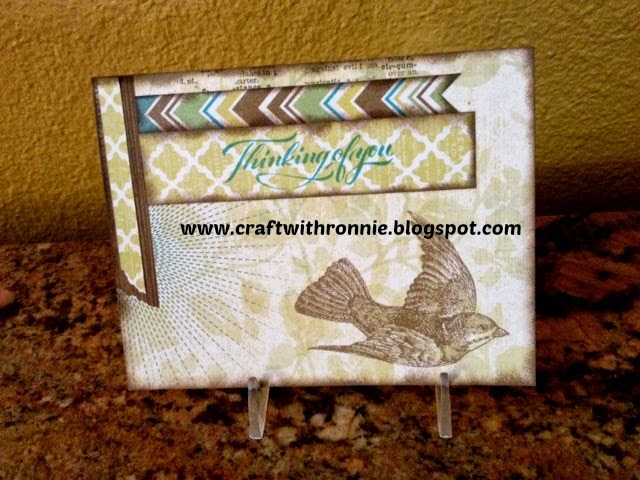
Another Masculine Card Using Skylark Paper Pack

Masculine Birthday Card Using the Skylark Paper Pack
To continue on with a previous post concerning making of masculine cards I still had three quarters of a sheet of the Skylark B&T paper and I wanted to do something else with it. 


So I cut a 4 ¼ x 5 ½ piece from the bottom left side that included the starburst and flying bird.  I then inked all the edges using Chocolate ink and my sponge dauber.  I cut a strip of the scrap Skylark paper to ¼ x 2 ¾” and ripped it and adhered it onto the printed ribbon on the left of the page.  I then cut the little decorative strip (called the zip strip) that comes on all the Close to My Heart B&T papers to 4” and cut a little flag end on the right side.  I then inked all the edges with the Chocolate ink using the dauber.  I cut another piece of the scrap B&T paper to 1 x 4 ¼” and inked the edges of it as well.  I then stamped my sentiment (I used Thinking of You but it could be Happy Birthday, Get Well or anyone of a number of sentiments) using Lagoon Ink. 
I assembled the card as shown in the above photo, it was quick, easy and not a frilly, girly card.

Supplies Used:
4 ¼ x 5 ½ Colonial White Card base and Envelope (X1410)
Skylark Paper (X7177B)
Inks – Chocolate (Z2111) and Lagoon  (Z2195)
Stamp Sets – Sincere Expressions (A1146)
Dauber (Z726)

All the supplies used in this project are available from my website at www.craftwithronnie.ctmh.com   or by clicking the shopping cart at the top of this blog.  Happy Crafting!!


Tuesday, May 6, 2014

Masculine Cards

I find that masculine cards are always the hardest cards for me to create.  Most supplies just don't scream male or masculine.  However, this new Skylark paper pack is very versatile and I have challenged myself to try to make at least four cards during the month of May that can be used for male birthdays, graduations or of course Father's Day.  Here is card one...............


I started with a sheet of the B&T papers that had the birds etc on it (the whole base of his card, ribbons, printing and bird are already printed on the paper) I cut the top left corner of the 12 x 12 sheet to 4 1/4 x 5 1/2 and mounted it onto a colonial white card base the same size.  I used my trusty dauber and daubed the edges of the card with lagoon ink to add dimension.  I then cut a strip of the same B&T paper (a scrap spot) to 1 x 2 1/2" and used the flip side (love these two sided papers) and a piece of the kraft cardstock (included in the paper pack) to 1 1/4 x 3 1/2".  I cut each of these two to look like a flag and then used the dauber on them as well.  I then stamped the vine using stamp set Love This (this is a go to stamp set for me, I use it all the time) using Lagoon ink again and finally I stamped Happy Birthday again with Lagoon ink using the Joyful Birthday stamp Set (you could stamp it with any sentiment, congratulations, get well, happy father's day).

As I said this card is very versatile and it was super quick and easy and I see the potential for three more cards from the scraps of just this one sheet of B&T paper, so I hope you will check back here to see what else I can come up with.  Happy Crafting!!!!!!!!!!!!!

Supplies Used:
X7177B - Skylark Paper Packet
X1410 - Colonial White Cards and Envelopes Value Pack
Z2195 - Lagoon Ink Pad
Z726 - Sponge Daubers
B1439 - Love This stamp set
B1419 - Joyful Birthday stamp set

All supplies can be purchased from my website at www.craftwithronnie.ctmh.com or by clicking on the shopping cart at the beginning of this blog.


Sunday, May 4, 2014

May Specials make Special Cards

So I challenged myself to make some cute cards using this months specials.  I used the Free to be Me paper pack and this months Stamp of the Month to create these cards (I have plenty of supplies to make at least 15 more cards also).  Here are some photo's of the cards I created.


This first picture shows the three cards I made using examples I got from the Close to My Heart Corporation.  They are just beautiful!!


I love the blue and green combined here and the feather vellum is a great addition.  This one I just thought up, the paper is so pretty it makes creating simple.


More vellum here, I love these bright gold polka dots and the arrows are great too.  One of my favorite sayings as well.


This one was just plain fun.  Who doesn't want a card that says they are the apple of your eye?


Love the bright colors here.  Orange and red and a little lagoon blue.


Of all the cards I made this was my favorite.  Love the little folded over corner (just add a little scrap behind to add some additional interest) and the colors are so vibrant.

These cards were a lot of fun to make.  I hope to make a bunch more out of these great papers and what a deal at just $5 for the paper pack.  This months stamp of the month set is perfect for the card maker, so many great sentiments to choose from.

All these supplies are available from my website at  www.craftwithronnie.ctmh.com   or just click on the shopping cart at the top of this blog.  Happy Crafting!!!!