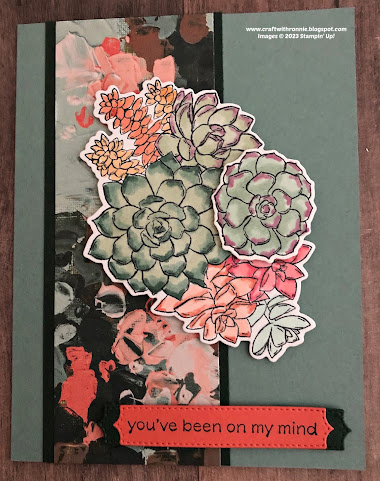
Today I am sharing another example of the one sheet wonder cards. I used the template I created and shared with you last Thursday with one exception. Instead of cutting the one piece of Designer Series Paper to 2 x 5 ¼” I decided to cut it to 2 x 5 ½” so it would run from top to bottom on my card. These cards also highlight one of the sheets of 6 x 6” Designer Series Paper from the Fancy Flora Designer Series Paper Pack paired with Soft Succulent, Evening Evergreen and Calypso Coral Cardstock and three different stamp and die sets.
First we need to cut our Designer
Series Paper and the updated template for that is below:
I want to point out that on these
cards I used a different stamp set and dies on each card but you can use
whatever stamps, dies, embossing folders, etc. you have to create your own
cards. Using this simple template just
gives you are starting point so the sky is the limit.
CARD 1 (uses the 2 x 5 ½” piece of DSP)
The card base is Soft Succulent cut to 5 ½
x 8 1/2” and scored at 4 ¼”. Next, I cut
a piece of Evening Evergreen cardstock to 2 ¼ x 5 ½” and layered my Designer
Series Paper onto it. I added this piece
about 3/8” in on the edge of the card base on the left side. I stamped my sentiment “you’ve been on my
mind” in Evening Evergreen Ink (the stamp is from the Simply Succulents Stamp
Set) onto a piece of Calypso Coral cardstock that I die cut using one of the
cute sentiment dies from the Potted Succulent Dies. I also cut a second one of these sentiment
dies out of Evening Evergreen cardstock, cut it in half and adhered it behind
my sentiment one allowing a little to stick out of each end. I added this to the bottom right of my card
using Dimensionals. For my focal point I
stamped the large image of succulents and the single image of a succulent from
the Simply Succulents Stamp Set onto a piece of Basic White cardstock using
Tuxedo Black Memento Ink. I then colored them in using Stampin’ Blends Markers
(I am not going to list them because succulents come in all colors and you
should experiment to see what you like).
Once everything was colored, I painted some Wink of Stella all over my succulents
(sure wish that the shimmer would show in pics but take my word it really adds
to the card) then used the coordinating dies from the Potted Succulents Dies
and die cut them. I added the largest to
my card first using Dimensionals and then added the single one on top of it
using more Dimensionals. I liked the multi
layered affect.
CARD 2 (uses one of the 3 x 4” pieces of
DSP)
CARD 3 (uses the second of the 3 x 4”
pieces of DSP).
The card base is Evening Evergreen
cardstock cut to 5 ½ x 8 1/2” and scored at 4 ¼”. I then cut a piece of the Soft Succulent
cardstock 3 ¼ x 4 ¼” and attached my 3 x 4” piece of Designer Series Paper to
it. Now did you notice that this paper
looks totally different? That is because
I used the other side of the DSP. I
forget to remind everyone that DSP has two sides so use them both. Because the back side of this paper is so beautifully
soft and neutral it worked great for stamping directly onto it. So that is what I did, I stamped my sentiment
“hello YOU” from the Shaded Summer Stamp set to the bottom right side of the
DSP layer using Evening Evergreen Ink. I
them stamped my image (also from the Shaded Summer Stamp Set) onto a piece of
Basic White cardstock using Calypso Coral Ink.
I then die cut the image using the coordinating Summer Shadow Dies and
adhered it onto my card. I added a bow
made from the Soft Succulent Open Weave Ribbon onto the card using a Mini Glue
Dot. For my final embellishment I added
three of the Festive Pearls onto this layer.
Once this layer was completed, I added it to my card base using Dimensionals
I hope you enjoy these cards I certainly creating
them and using this additional template for a 6 x 6” One Sheet Wonder and you
can be sure you will be seeing some more of these. As always you can find the supplies to create
these cards and much more on my website at https://craftwithronnie.stampinup.net or by click the
shopping button at the top of this blog or the link to the supplies listed
below.
Happy Crafting!!!


.jpg)


No comments:
Post a Comment