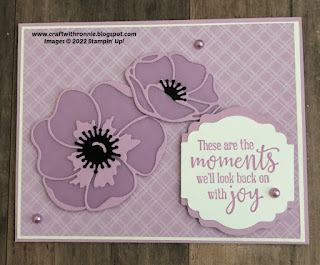
Today I wanted to feature some of the products that will be retiring on May 3rd so you can check them out before they are gone for good. The best part, many of the products I used for today’s cards are on sale while supplies last so it is the perfect time to get some great products at a great deal. I created five different cards and each feature one of the five in-colors from 2021 – 2023. While the colors will not be retiring for another year the pattern of the DSP will be and so will the shimmer vellum (oh, the camera doesn’t do this justice it is just beautiful, I so wish I could capture that beautiful shimmer in the photos).
Here’s what I ended up with…
So here is how they were created. The card bases were cut from Pale Papaya,
Fresh Freesia, Polished Pink, Soft Succulent and Evening Evergreen and each one
is cut to 5 ½ x 8 ½” and scored at 4 ¼”.
Three of the cards will be
created in landscape and two will be created in portrait. So, lets start with the basics on all five
cards. Once I had the card bases, I
added a layer of Basic White that measured 4 1/8 x 5 3/8” and a layer of the
coordinating Designer Series Paper (this is on sale now, was $11.50 a package
now just $6.90 that’s a 40% savings) that measured 4 x 5 ¼”. For my three cards that are landscape I die
cut the bases of both of the poppies from the Poppy Moments Dies out of the coordinating
Shimmer Vellum (this is on sale now as well, it was $12 and is now $9.60, which
is a 20% savings). I then die cut the top
layer of the poppies from its coordinating cardstock and layered them together. I die cut the flower centers from Basic Black
cardstock. I added these to my card
fronts using Dimensionals and Mini-Dimensionals (remember to hide the dimensionals
behind the cardstock so they don’t show through the vellum.
I stamped sentiments from the coordinating
stamp set called Peaceful Moments onto Basic White cardstock, again using the
coordinating color ink. I used several
different punches (I will list them below, the Tailored Tag and Everyday Label
are both on sale as well) to create my sentiments and added them using Dimensionals
as well. I used the Pastel Pearls to finish
off the Polished Pink and Fresh Freesia cards and the Genial Gems to finish off
the Pale Papaya card.
For my portrait cards (soft succulent and
evening evergreen) I felt these colors were not right for the poppies but would
be great for ferns so that is what I did.
I die cut the fern from the Meadows Dies out of both Soft Succulent and
Evening Evergreen Shimmer Vellum. I then
die cut two of the scalloped and stitched rectangles from the Scalloped Contours
dies and adhered my ferns to them. I
then added these to the appropriate card front.
I stamped the sentiment “Thinking of You” from the Quiet Meadow stamp
set again using the coordinating color of ink.
I die cut these sentiments using a die from the Meadows Dies and popped
it up on the card using Dimensionals. I
finished these cards of using Genial Gems (these are also on sale right now
they were $8 and are now $4.80 that is 40% off).
I hope you enjoy this card I certainly
enjoyed making it. As always you can
find the supplies to create this card and much more on my website at https://craftwithronnie.stampinup.net or by click the
shopping button at the top of this blog or the link to the supplies listed
below.
Happy Crafting!!!
Product List


.jpg)


No comments:
Post a Comment