Featured Post

Season of Green & Gold Project Sheet

Hello there fellow crafters, I found so much inspiration for these products from all over the crafting community so I wanted to see what I c...

Tuesday, August 31, 2021

Brilliant Wings Dies

I am trying to play with some of the fun stuff from the annual catalog instead of just the holiday stuff from the July – December Mini.  So today I decided to revisit the Brilliant Wings Dies.  My intent was to make a simple card using a few basic items and a single die set that could be adapted to any occasion by simply adding a sentiment when you need the card (thus being sure you have an appropriate card when you need one quick).      

Here is what I came up with… 


The card base is Basic Black cardstock that is cut 5 ½ x 8 ½”, scored at 4 ¼”.  The second layer is Basic White cardstock cut to 5 ¼ x 4” and embossed using the Painted Textures 3D Embossing Folder.  Next I took a piece of Basic White cardstock that measured 2 ¼ x 5 ¼” and I colored it using my Blending Brushes and Blushing Bride and Balmy Blue ink.  I used a gentle touch (you can always add more but once it is on it is on to stay).  When I achieved the look, I was going for I used the die that looks like little dots to cut away three spots one in the middle on the left and one at the top and bottom of the right.  I then added this to a piece of Basic Black cardstock that measured 2 ½ x 5 ¼”.  I then mounted this onto the center of my white layer.

To create my butterflies, I took some scrap Basic White cardstock and using the Blending Brushes I added Blushing Bride and Balmy Blue ink.  I then used the dies to cut four of the butterflies.  Three were added to the front of the card and the fourth was added to the bottom right of the 4 x 5 ¼” Basic White cardstock insert on the inside. 

Now I have a card that I can simply stamp a message on the inside, write my own or even add a layer with a sentiment to the front as I need it.  I hope you enjoy this card I certainly enjoyed making it.  As always you can find the supplies to create this card and much more on my website at https://craftwithronnie.stampinup.net or by click the shopping button at the top of this blog or the link to the supplies listed below. 

Happy Crafting!!!

Product List

Monday, August 30, 2021

Joseph’s Coat Technique

I have been wanting to give the Joseph’s Coat technique a try.  I saw a video using this technique several years ago and have often thought I would like to try it but was a little intimidated by it.  After doing it I have no idea why it scared me because it really is very easy.  When I was thinking of what to design next with the Butterfly Brilliance stamp set, I could not help but think it would look great using this technique.

Here is what I came up with…


To begin I cut a piece of Basic White cardstock to 4 x 5 ¼”.  I then used my sponge daubers and added little swirls of color to my cardstock.  The ink colors I chose to use were: Bermuda Bay, Highland Heather, Magenta Madness, Rich Razzleberry, Pumpkin Pie and Night of Navy.  Once my cardstock was all covered, I used my Heat Tool to dry my ink really well (or you could leave it set overnight to be sure it is good and dry). 

Next, I stamped the Butterfly Brilliance stamp onto the cardstock using VersaMark ink (NOTE: I did use my Stamparatus so I could stamp twice to be sure I had really good coverage).  I then added Clear Stampin’ Emboss Powder and heat set it using my Heat Tool.  I let the embossing cool just a little before the next step.

I ran a Tuxedo Black Memento Ink Pad over the top of my cardstock until everything was covered.  I then took a small piece of soft cloth and buffed my card top to get the Memento ink off my butterflies.  I just loved the affect, as a matter of fact I liked it so much I used the same technique for my sentiment which was stamped using the Art Gallery stamp set and then I die cut it using the Floral Gallery Dies.  I just popped it up using Mini Dimensionals.  This was attached to the card base which is Rich Razzleberry cardstock that is cut 5 ½ x 8 ½”, scored at 4 ¼”. 

I hope you enjoy this card I certainly enjoyed making it.  As always you can find the supplies to create this card and much more on my website at https://craftwithronnie.stampinup.net or by click the shopping button at the top of this blog or the link to the supplies listed below. 

Happy Crafting!!!

Product List

Saturday, August 28, 2021

Christmas Starburst

I have not made one of these starburst cards in a while, I really don’t know why I haven’t because they are easy and turn out so pretty.  Today’s card features the Tidings of Christmas Designer Series Paper and the Evergreen Elegance Stamp Set.      

Here is what it looks like when finished…


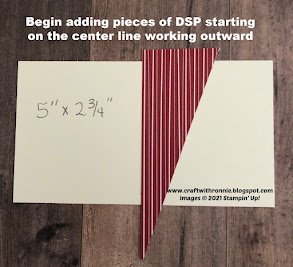
So lets get started with our card.  First you will need to cut 4 pieces of Designer Series Paper that measure 1 ½ x 4”.  Cut your pieces into triangles as shown in the photos below. 


Once you have all your pieces cut you can determine which sides of each piece you want to use (the great part of having double sided paper is you have so many choices).  Next you are going to cut a piece of cardstock (color does not matter so use up scraps) to 2 ¾ x 5”, this is the base for the starburst (see photo below).  You will also want to draw a pencil line down the center of this piece at 2 ½” (this is what you will use to get your pieces lined up to make the starburst).  Now you can start adhering your pieces to your base as shown in the second photo below (don’t worry about the overhang we will address that later.


Once you have all your pieces attached you can flip it over and trim off all the pieces that overhang the edges of your base.  (see photos below)


Once I got to this point, I cut a piece of Basic White cardstock to 4 x 5 ¼” and stamped the sentiment “Merry Christmas” from the Evergreen Elegance stamp set onto the bottom right corner using Real Red ink.  I then attached the starburst layer to that layer.  When everything was attached, I wrapped a piece of Real Red Ribbon around where the starburst layer meets the Basic White layer and attached it in the back.  I mounted the whole thing onto the card base which was Evening Evergreen cardstock that is cut 5 ½ x 8 ½”, scored at 4 ¼”.  To finish off the card I added three little Red Rhinestones. 

The inside of the card is another piece of Basic White cardstock cut to 4 x 5 ¼” and I stamped the sentiment (also from the same stamp set) in Real Red ink.


I hope you enjoy this card I certainly enjoyed making it.  As always you can find the supplies to create this card and much more on my website at https://craftwithronnie.stampinup.net or by click the shopping button at the top of this blog or the link to the supplies listed below. 

Happy Crafting!!!

Product List

Friday, August 27, 2021

A Butterfly Hello

I guess I needed a break from the Christmas cards so today I decided to spend some time playing with the Butterfly Brilliance bundle.  I had some fun with this one using a technique that was new to me but that I love.     

Here is what I came up with…


What I did to get started was I stamped the large Butterfly Brilliance stamp onto a piece of Thick Basic White cardstock using Memento ink and my Stamparatus (the stamparatus guarantees me that when I come back to do later techniques my stamp will be in the perfect location).  I then used the coordinating die from the bundle and cut out all of the butterflies (this will be used on future projects) believe it or not all I was actually looking for was the scrap of the Thick Basic White cardstock left after I cut out the butterflies.

Now to get down to business.  I stamped my butterflies onto a piece of Basic White cardstock that measured 4 ¼ x 4 ½” using Melon Mambo ink.  I then used my die cut negative as a stencil I lined it up with the butterflies and using a Blending Brush I added Blushing Bride ink.  I added the little dots using the small end of the Light Melon Mambo Stampin’ Blend and the small end of both the Melon Mambo and Blushing Bride Stampin’ Write Markers (this gave me different shades and sizes) note here however to save yourself some expense if you don't have the markers already there are many stamp sets within Stampin' Up! that have stamps with these little dots and you can simply stamp them. 

The card base is Blushing Bride cardstock that is cut 5 ½ x 8 ½”, scored at 4 ¼”.  I added a layer of Melon Mambo that measured 5 x 4 ¼” and to that I added my stamped layer.  I stamped the sentiment “A Little hello from me to you” onto a scrap of Blushing Bride cardstock using Melon Mambo ink and fussy cut it.  I added that to a piece of Melon Mambo cardstock that measured ½ x 3” and I popped that up using Dimensionals.  For the final embellishment I took three of the Basic Rhinestone Jewels and colored them with the Melon Mambo Stampin’ Blend and added them to the card front. 

I hope you enjoy this card I certainly enjoyed making it.  As always you can find the supplies to create this card and much more on my website at https://craftwithronnie.stampinup.net or by click the shopping button at the top of this blog or the link to the supplies listed below. 

Happy Crafting!!! 

Product List