Featured Post

FUN WITH TEMPLATES

Today’s card features the Fern & Flora Bundle and the Moonlit Flora Designer Series Paper.  I fell in love with this suite the first tim...

Wednesday, March 24, 2021

W Fold Window Card

I have this awesome upline named Karen with Stampin’ Up! who shares creations with us on a regular basis.  This card was one of those shares.  She had received her original card (the one she used to figure out how to make one) from another demonstrator in Germany (yes this is why I love this company there is constant sharing of ideas across the globe) I am sorry but I can’t remember the lady from Germany’s name.  This card features vellum windows on the inside in which you can place a battery-operated tea light candle for an amazing affect.  I took some liberties and changed up a few things to make this style of card my own. 

Here is what I came up with…


The front of the card


 The inside of the card

So now let me share how I made this card.  The card base is Early Espresso cardstock that is cut to 4 1/4" x 11” and scored at 5 ½”.  The inside of the card is cut from Basic White cardstock that also measures 4 ¼ x 11” however, it is scored at 2 ¾, 5 ½, and 8 ¼”.  It is then folded into a W shape with the 5 ½” score line out and the other two in.  I then cut two ovals from the two centers of the W using the 3rd largest oval from the Layering Ovals dies (save one of these for your sentiment).  Once that was done, I cut two pieces of Vellum cardstock to 2 5/8 x 4” and adhered them to the back side of the ovals (this creates our windows).  At this point you are ready to assemble the base of the card.  Simply adhere the left panel of the W to the front of the card base keeping the edges nice and even.  Then you adhere the right panel of the W to the back of the card base, again be sure to keep everything nice and even.  Now when you close your card the center should close out towards the opening. 

Now it is time for the fun stuff, the decorating (my favorite part).  On the front of the card, I added a strip of Mossy Meadow cardstock that measured 1 ¾ x 5 1/2”.  On top of that I added a piece of the In Good Taste Designer Series Paper (I picked this stacked stone one) that measures 1 ½ x 5 ½”.  I then stamped the tree stump from the Rooted In Nature stamp Set onto Crumb Cake cardstock using Crumb Cake Ink.  I added the sentiment “thinking of you” on to that with Early Espresso ink.  I stamped one of the leaves from that same stamp set onto Mossy Meadow cardstock using Mossy Meadow ink and die cut it using the Natures Roots Dies that coordinate with the Rooted In Nature stamp set.  I fussy cut out my tree stump and added it to my card with dimensionals and then adhered my leaves right behind it. 

For the inside of the card, I die cut the largest of the scalloped ovals out using the Layering Ovals dies from Mossy Meadow cardstock.  Now here is where that oval we saved from earlier comes into play.  I stamped my sentiment “Wishing you a day of love and joy” from the Woven Heirlooms stamp set onto that oval using Mossy Meadow ink.  Next, I stamped the two pine trees and the one single pine tree from the Rooted in Nature stamp set onto Mossy Meadow cardstock using Mossy Meadow ink and then die cut them with the dies in the coordinating Natures Roots dies.  I lined these up along the bottom of my vellum “windows” and adhered them.  For my final touch I stamped the leaves from the stamp set on the bottom right corner of the inside of the card and on the envelope.  Here is a better look at the inside of the card…


I hope you enjoy this card while it was something totally new for me, I certainly enjoyed making it.  As always you can find the supplies to create this card and much more on my website at https://craftwithronnie.stampinup.net or by click the shopping button at the top of this blog or the link to the supplies listed below. 

Happy Crafting!!!

Product List

Monday, March 22, 2021

A Mother’s Day Butterfly

I just received this beautiful Butterfly Brilliance Bundle and I could not wait to make something with it. 

Here is what I came up with…


The card base is Just Jade cardstock that is cut 5 ½ x 8 ½”, scored at 4 ¼”.  I cut two pieces of Designer Series Paper, the first is a piece of In Good Taste DSP (I chose a wood grained paper) that measures 1 ¼ x 5 ¼”, I adhered that on the right side of my card base leaving a ¼” reveal on the top bottom and right side (this piece is just a little wider than I needed but I decided it would be easier to overlap the papers than to try to match them perfectly).  Then I took a piece of the Butterfly Bijour DSP that measures 3 x 5 ¼’ and adhered it to the left side of the card leaving a ¼” reveal on the top, bottom and left side. 

For this project I did not use the coordinating stamp from the bundle instead I chose to use this amazing DSP.  Why is it so amazing, for one thing it has butterflies printed on it that can be cut out with the beautiful Brilliant Wings Dies that come with the bundle for a super quick and easy card.  I cut this pink one along with 5 other butterflies with just one pass through the die cutter (so I have lots of pretty butterflies to adorn many more projects).  I added my butterfly to my card using 3 mini dimensionals (I wanted the wings to be free so they could be curled up just a bit.

Since this set doesn’t include sentiments, I went over to the Timeless Tulips stamp set (because I have always loved the font) and grabbed this Happy Mother’s Day sentiment (I could have just as easily chose the happy birthday, get well soon or even the hello sentiment) and stamped it onto a scrap of Magenta Madness cardstock using Just Jade ink.  I fussy cut it and attached it using three more mini dimensionals. 

To finish off the front of the card I added three of the Rhinestone Basic Jewels and a bit of Wink of Stella on my butterfly to make it glittery (too bad that never shows it photos).  Then I moved onto the inside.  I simply added a piece of Basic White cardstock that measures 4 x 5 ¼” and I fussy cut out one of the adorable little butterflies from another piece of the DSP and adhered it to the corner (of course she needed a little wink of stella as well). 

There are just a few things I would like to make note of.  While I only used the dies on this project there is always a 10% savings on both the stamp set and the dies when you purchase them as a bundle.  Also, the Butterfly Bijour Designer Series Paper is not carrying over into the new 2021 – 2022 annual catalog and is available only while supplies last so be sure to grab it while you can. 

If you are just starting out and want to make a card like this but lack supplies think about how you can alter things.  So, you can fussy cut the butterflies out of the DSP instead of using the die, you can use another coordinating piece of the DSP instead of the wood grain.  Just some ideas for my beginners who are still accumulating supplies.  

I hope you enjoy this card I certainly enjoyed making it.  As always you can find the supplies to create this card and much more on my website at https://craftwithronnie.stampinup.net or by click the shopping button at the top of this blog or the link to the supplies listed below. 

Happy Crafting!!!

Product List


Friday, March 19, 2021

Barnyard Fun

The Hey Chick stamp set used here today was originally released as a Sale-A-Bration item several years ago.  Like many I hung on to mine when it retired because I just loved those crazy chickens.  Well, many folks must have felt the same way because Stampin’ Up! has re-released the set along with some coordinating dies.  So of course, I wanted to have some fun with some of them.  I checked out tons of stuff on You Tube and Pinterest and used a little of this and a little of that and here is what I ended up with…


The card base is Real Red cardstock that is cut 4 ¼ x 11” and scored at 5 ½”.  I used my Simply Scored Scoring Tool to create my score lines to create the peaked roof on the barn.  I laid my card base in the tool with the 11” side against the top.  I marked 3 3/8” and 7 5/8” (twisted and did the same on the other side) then I placed my card base diagonally on my Simply Scored Scoring Tool and scored from the 3 3/8” to the 7 5/8” marks across from one another (see photo).  Once everything was scored, I folded my card in half at the 5 ½” score line and then pressed my two little triangle pieces in to the center of the card.


This is what it will look like once it is folded in.  Remember to reenforce those score lines well with your Bone Folder.


Now comes the fun part, decorating our barnyard.  The first thing we need to do is emboss our barn.  To do this I placed the front half of the card into the Wood Panel Embossing Folder and just tucked the back of the card around the folder so it would go through and embossed.  To create the eves of the barn I used Early Espresso cardstock that measured ¼ x 3 ½” (it is longer than needed but it is easier to cut the excess off than to try to get a perfect size). 

Next, I did all my die cutting.  I cut the circles that create the window frame out of Early Espresso cardstock using the smallest and the third smallest circle dies from the Layering Circles Dies.  I just put the smaller right in the center of the larger one and cut it all at one time.  I then die cut my little sign out of Crumb Cake cardstock and my corn stalk out of Old Olive cardstock, I used Daffodil Delight cardstock for the ears of corn. 

I then started to stamp.  I stamped the chicken with the crazy hair (just the upper body) and the larger chicken onto Basic White cardstock using Memento ink.  I stamped the sentiment “hey, chick!” onto my little sign using Early Espresso ink.  I also stamped the little cracked egg on the inside of the card (I will show that in a later photo) and also on the envelope.  I used my Stampin’ Blends to color in my chickens, the colors I used were, Light Poppy Parade, Light Cherry Cobbler, Dark Daffodil Delight, Dark Calypso Coral and both shades of the Mango Melody. 

I used my 1 ½” circle punch to punch out Daffodil Delight cardstock and used that as the back of my window.  Once it was punched, I adhered the chicken with the crazy hair onto it and trimmed anything that hung over.  I then attached this to the back of the Early Espresso window that I had created and adhered the whole piece to the top center of my barn.  Next, I built my corn stalk.  I adhered the greenery around the ears of corn and then adhered the stalk to the far-left bottom side of my card and then attached the ears of corn.  Then I added my little sign to the far-right bottom side of my card.  Once that was all done, I just centered my bigger chicken and popped her up using Dimensionals.

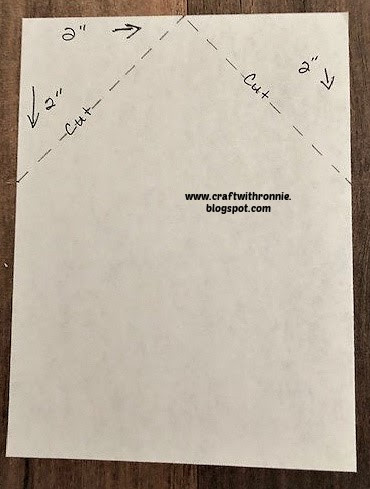
Now it was time to create the inside of my card.  I cut a piece of Basic White cardstock to 4 x 5 ¼”.  I marked the center top at 2” and 2” down on each side and again cut diagonally to create the peek of the roof.  I stamped the little cracked egg on the inside (I also stamped it on my envelope), see photos below…


I hope you enjoy this card I certainly enjoyed making it.  As always you can find the supplies to create this card and much more on my website at https://craftwithronnie.stampinup.net or by click the shopping button at the top of this blog or the link to the supplies listed below. 

Happy Crafting!!! 

Product List