Featured Post

FUN WITH TEMPLATES

Today’s card features the Fern & Flora Bundle and the Moonlit Flora Designer Series Paper.  I fell in love with this suite the first tim...

Friday, July 7, 2017

It is time for some Paradise in my life!!!

As we continue on our journey to the beach all I can think is oh, I am so ready to be there.  LOL  This is the next two page layout in our journey to "No Worries"...


As I said before these pics do not do these pages justice.  I am going to add a pic here of the paper pack itself I am hoping you will be able to see the beautiful papers better in this photo.  
So lets get started building these pages.  

Cutting:

No Worries Paper Packet – Blue with small palm trees 3 x 12” (x2) , Large Palm Print 3 x 12” and 7 x 12” (watch to make sure you cut so palms remain vertical) Woven 4 ¼ x 6 ¼” (x2) and 4 ¼ x 4 ¼”.  Cut two strips of the linen looking paper (the back side of the large palm paper) at ½ x 12”. 

Cardstock: 2 sheets 12 x 12” Flaxen as bases for the two pages. 
.
Cricut Cuts:

Palm Trees (from Flower Market cartridge, #MD6F12D)  Cut one from Bamboo cardstock at 5.722” and one from Glacier cardstock at 4.361”.  The Paradise title (from Flower Market cartridge, #MD6FCCE) is cut from Glacier cardstock at 7.5” wide.  I used some cut patterned sequins to mimic coconuts as well.

The smaller palms were stamped using a rocking method where one half of the stamp was inked using Bamboo ink and the other half using Sea Glass ink onto White Daisy cardstock and then cut out using the thin cut dies in the set.

I stamped the “RELAX!” sentiment using Black Memento ink onto a piece of the woodgrain paper from the paper package and then cut around it kind of like a weathered sign you might find at the beach.  I added a light blue sparkly gem to it (because everything is better with bling).

I put everything together as shown in the picture above and finished by stamping the Life is Meant to be Lived sentiment from the No Worries stamp set using Pacifica ink.

I am really liking these pages and I hope you will enjoy making them as much as I did.  I have included a full list of supplies below and as always everything can be found on my website at www.craftwithronnie.ctmh.com or by clicking the shopping cart at the top of this blog.  Remember, to have fun and make life a beach.  Happy Crafting!!!


Supplies Used:
No Worries paper pack (X7220B)

Cardstock – White Daisy (1385), Bamboo (1273) and Glacier (X5770)

Inks:  Pacifica (Z2892), Bamboo (Z2103) and Sea Glass (Z2813) – REMINDER, both the Bamboo and Sea Glass inks will be retiring at the end of July so be sure to order it now if you want to have them.

Stamp and Die sets:  No Worries Scrapbooking Stamp and Thin Cuts (Z3336)

Cricut Cartridges:  Flower Market (Z3285 for physical cartridge) or (Z3290 for digital collection)

Misc.:  No Worries Sequins (Z3323) and Blue Dots (Z3122)

Wednesday, July 5, 2017

A Scripty Thank You...

I promised some cards as well as scrapbook pages using the No Worries paper pack and here is the first...


I started this card with a White A2 card base and No Worries paper pack.  

Stamp the Thank You sentiment from the Scripty Thank You stamp using Memento Black Ink onto White Daisy cardstock and cut out using the Basic Ovals Thin Cut die.  I then colored mine (that is an individual preference) using the Close to My Heart Watercolor Pencils.  

Cut Blue and White striped paper to 3 ¾ x 5 ½” and center on base.  Cut woven paper 2 ¾ x 4” and center.  Cut Blue paper with small palm trees to 1 ½” x 5 ½”.  Pop the “thank you” up using 3-D Foam Tape and place it in the very center of the card.  

Add a single Blue Enamel Dot to the bottom right corner of the woven patterned paper.  

I have listed the supplies used below.  As always you can find these and more supplies on my website at www.craftwithronnie.ctmh.com or by clicking the shopping cart at the top of this blog.  I hope you enjoy this project, happy crafting!!!

Supplies Used:

White Value Card and Envelope Pack (X254) (great value as you can make 50 cards from one pack)

Papers:  No Worries paper pack (X7220B) and White Daisy Cardstock (1385)

Scripty Thank You (A1206)

Thin Cuts Basic Ovals (Z3328)

Black Memento Ink (899)

Misc.:  Close to My Heart Watercolor Pencils (3505), 3-D Foam Tape (Z2060) and Blue Enamel Dot (Z3122)


Monday, July 3, 2017

Lets See what we can See at the Sea


I have really fallen in love with the new Close to My Heart No Worries paper pack and all the coordinating products.  I love the beach to begin with and now that I am all settled in here in North Carolina I plan to spend many days there so it was the perfect time to start creating some pages and have them all ready to add pics when I get home from one of those ocean getaways I have planned.  

I will be show casing this paper pack throughout the month of July.  I will be creating scrapbook pages and cards alike.  I hope you will follow along with my journey...


I sure wish I was a better photographer because this picture really does not do these pages any kind of justice.  But here is how they were made...

Cutting:

No Worries Paper Packet - Woven 4 ¾ x 12” (x2), Stripe 3 x 12” (x2), Wicker ½ x 12” (x2), Woven 4 x6, Journal Box PML Card, white and diamond 4 ¼ x 6 ¼”, 3 ¼” x 4 ¼”, woodgrain 4 x 6”

Cardstock: Sapphire 4 ½ x 6 ½, 4 ¼ x 6 ¼ and 3 ½ x 4 ½”

Cricut Cuts:

Palm Trees (from Flower Market cartridge, #MD6F12D)  Cut one from Sapphire cardstock at 5.722” and one from White Daisy cardstock at 4.361”. 

The sun is cut from the Flower Market cartridge, #MD6FC9E at 3.569”, I used Honey cardstock which is now retired but any nice yellow would work great.

The surfboard was cut from Bamboo and Sapphire cardstock using the Flower Market cartridge, #MD6F2D0 cut at 3.996”

The Sun & Surf title was cut using Bamboo and Sapphire cardstock from the Artbooking cartridge #M3EF3F cut at 2.061”

The smaller palms were stamped using the No Worries Scrapbooking Stamp and Thin Cut set.  They were stamped using Pacifica and Sea Glass inks onto White Daisy cardstock and then cut out using the thin cut dies in the set.  I also stamped some birds around the sun using the No Worries Cardmaking stamp set and Pacifica Ink.

The sand, starfish, umbrella, drink and chair were all stamped on white daisy cardstock and cut out.  The umbrella and chair were stamped using Pacifica ink, the drink was stamped using Flaxen ink and the starfish and sand were stamped using Bamboo ink, all of these images are included in the No Worries Cardmaking Stamp and Thin Cut set.  They were all cut using the dies included in the stamp set except the sand which I fussy cut. 

I stamped the Now the Real Fun Begins title on the top left side for the first page (this is from the No Worries Scrapbooking stamp set).  I assembled the pages using two 12 x 12 sheets of White Daisy cardstock as my bases.  I added some cute little sequins on the palm trees to represent coconuts. 

I am very pleased with how these pages turned out.  I hope you enjoy making them as much as I did.  A full list of supplies is included below and as always they can be found on my website at www.craftwithronnie.ctmh.com or by clicking the shopping cart at the top of this blog.  Remember, your memory keeping is something that will be cherished for generations to come.  Happy crafting!!!


Supplies Used:
No Worries paper pack (X7220B)

Cardstock – White Daisy (1385), Sapphire (X5775) and any yellow (I used a retired piece I had in my stash but I think Canary (X5772) or Lemon (X5785) would work great)

Inks:  Pacifica (Z2192), Flaxen (Z2842), Bamboo (Z2103) and Sea Glass (Z2813) – REMINDER, Sea Glass will be retiring at the end of July so be sure to order it now if you want to have it on hand, it is a really nice light blue.

Stamp and Die sets:  No Worries Cardmaking Stamp and Thin Cuts (Z3337) and No Worries Scrapbooking Stamp and Thin Cuts (Z3336)

Cricut Cartridges: 

Artbooking (Z3169) – this bundle includes cardstock with the canary in it that would work great for the sun.

Flower Market (Z3285 for physical cartridge) or (Z3290 for digital collection) – this includes the adventure cardstock with the lemon in it which could also be used for the sun.

Misc.:
No Worries Sequins (Z3323), Glue Pen (Z553) - This is a life saver when trying to glue detailed pieces together like the surfboard.  

Saturday, May 13, 2017

Live Beautifully - Cards, Cards, Cards

How about some close ups of some of the cards I have made using this special paper pack that is available during the month of May in honor of National Scrapbooking Month?  I will be showing you at least 10 different cards using this wonderful paper pack during this month.  Get yours now while supplies last.


For this card I adhered the paper featuring Sea Glass to front of a white card base. On top of this I added the Gold Foil Flower paper, a strip of Gold Dot paper through the middle of the card with Gold & White Twine wrapped around it. I added a second layer of the paper featuring Sea Glass , a piece of white card stock and  then a piece of the white with gold dot to make a set of mats that I then adhered to center of card using 3-D Foam Tape. For the final step I embellish card with Thin Cut “Happy Birthday” title cut from Sea Glass card stock.


For this card I adhered the Slate Striped paper to front of card. I then embossed a piece of White Daisy Cardstock with Damask (retired but you could use any folder) Embossing Folder. I stamped the flower and 3 leaves using Sea Glass Ink and cut them out.  I used 3-D foam tape to adhere them to the lower left corner of the card.  Finally I stamped ‘Be your own kind of beautiful’ using Whisper Ink on White Daisy Cardstock, dovetail right hand side, adhere to Slate Stripes and dovetail. Add title to front of card. 

Below I have listed the supplies Used to make these cards.  Supplies can be purchased at www.craftwithronnie.ctmh.com or by clicking the shopping cart at the top of this blog.  As always Happy Crafting!!!

Supplies Used:
Inks:  Sea Glass (Z2813) and Whisper (Z2872)

Papers:  Live Beautiful B&T Paper Packet (CC1212B)
Cardstock:  White Daisy (1385) and Sea Glass (X5789)

Stamp Set:
Live Beautifully (CC1212C)

Thin Cut:
Happy Birthday (Z3304)

Misc.:
3-D Foam Tape
White Twine (2414)                                                                                                               

Retired product used: Damask Embossing Folder (Remember this can be easily replaced with a current embossing folder, there are several in the current catalog)

Tuesday, May 2, 2017

Live Beautiful Layout #3

I am continuing to play with the May 2017 National Scrapbook Month Specials, hop over to my website at www.craftwithronnie.ctmh.com and check out these beautiful papers and amazing deals.  

Here you go, layout #3 using the Live Beautifully paper pack and stamp set which are being offered by Close to My Heart as part of the May 2017 National Scrapbook Month Specials....


I think the use of the thin cut LOVE is just great on this page.  I am also happy with the different look I got when I stamped the roses using pomegranate ink on pixie card stock, a completely different look than stamping them on white.  I also used a marker to color the white shimmer trim pink to match my paper.  I just love that I can chose to do that and make my shimmer trim any color I want.  Remember this paper pack and stamp set that I used here will only be available during the month of May 2017 so be sure to get yours now.  You can order them both from www.craftwithronnie.ctmh.com or by clicking the shopping cart at the top of this blog.  As always - Happy Crafting!!!!


Supplies Used:

Inks:  Pomegranate (Z2854) and New England Ivy (Z2835)

Papers:  Live Beautiful B&T Paper Packet (CC1212B)

Cardstock:  White Daisy (1385), Pixie (Z2844) and Gold Glitter Paper (Z3238)

Stamp Set - Live Beautifully (CC1212C)

Thin Cut: Love (Z3257)

Misc.:
3-D Foam Tape (Z2060)
Gold Shimmer Trim (Z1985)
White Shimmer Trim(Z3024)
Gold Sequins (Z2012)


Sunday, April 30, 2017

Layout #2 - Live Beautifully

Here you go, layout #2 using the Live Beautifully paper pack and stamp set which are being offered by Close to My Heart as part of the May 2017 National Scrapbook Month Specials....


I wish you could see the amazing pink ombre and all the gold accents on these papers, they are really very striking.


I wanted to show how cute these little thin cut hearts are.  They come like these just the outlines of hearts as well as solid hearts which you also see on the layout.

I hope you enjoy this layout.  I have listed the supplies I used below.  You can find all of them at www.craftwithronnie.ctmh.com or by clicking the shopping button at the top of this blog.  Remember the papers and stamp set used here will only be available during the month of May 2017 so be sure to get yours now.  Happy Crafting!!!!


Supplies Used:
Inks:  Memento Black (Z899)

Papers:  Live Beautiful B&T Paper Packet (CC1212B)
Cardstock:  White Daisy (1385), Black (1386), and Pomegranate (X5780)
Gold Glitter Paper (Z3238)

Stamp Set - Live Beautifully (CC1212C)

Thin Cuts:
Hearts (Z3260) – this are the outlines of hearts
Basic Hearts (Z3317) – these are the solid hearts

Misc.:
3-D Foam Tape (Z2060)

Friday, April 28, 2017

Want some more Live Beautifully?

How about a preview of some cards that I will be showing you throughout the month of May?


Stay tuned to see each of these cards individually plus more during May. 

Now for the best part...  I will show you four (2 page layouts) and 20 cards I made with just one package of the Live Beautiful paper pack (well there maybe more than 20 cards because I have already done all this and still have a little paper left) over the next few weeks.  Why not get your paper pack and stamp as soon as they are available on May 1st so you can be ready to go.  Both can be purchased at www.craftwithronnie.ctmh.com or by clicking the shopping cart at the top of this blog.  Happy Crafting!!!

Papers:  Live Beautiful B&T Paper Packet (CC1212B) - available 5-1-2017

Stamp Set - Live Beautifully (CC1212C) - available 5-1-2017


Wednesday, April 26, 2017

Live Beautifully

So for my first post about Close to My Hearts "Live Beautifully" National Scrapbook month Special for the month of May 2017 I created a scrapbook page that I think came out great.  I love this paper pack as well as the stamp set.  I tried to use different techniques and just have some fun.


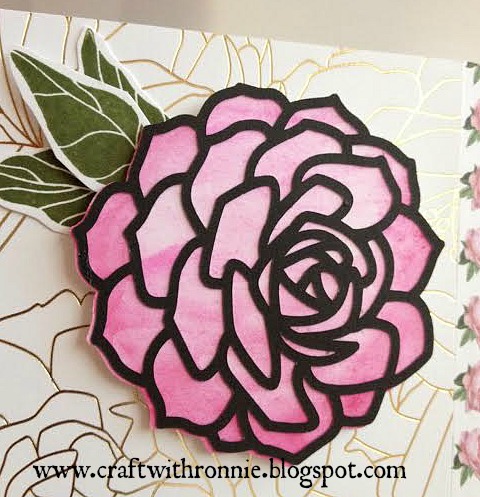
I tried a whole new technique on this rose and I am thrilled with the outcome.  Wish you could see just how beautiful this rose really is.  I used the  Close to My Heart Flower Market Cricut cartridge to make the rose (which is two layers).  I then took the bottom layer which I cut from White Daisy cardstock and I painted it using the Close to My Heart watercolor paints.  It gave the rose this unique stained glass look that I am just in love with.  I will certainly be doing some more stuff using these amazing watercolor paints that is for sure.  


And of course I used my trusty daubers to ink the edges of my titles.  I always love the depth and interest inking gives to my projects. 

I hope you enjoy this layout and will follow along as I bring you more projects using the Close to My Heart Live Beautifully papers and stamp set over the next month.  I have listed all the supplies I used below (remember the papers and stamp will not be available for purchase before May 1st and will only be available while supplies last during the month of May 2017 only so get yours right away).  You can find all the supplies at www.craftwithronnie.ctmh.com or by clicking the shopping cart at the top of this blog.   Happy Crafting!!


Supplies Used:
Inks:  Memento Black (Z899), Pomegranate Ink (Z2653) and New England Ivy Ink (Z2135)

Papers:  Live Beautiful B&T Paper Packet (CC1212B)
Cardstock:  White Daisy (1385), Black (1386), and Pomegranate (X5780)

Stamp Set - Live Beautifully (CC1212C)
Misc.:
3-D Foam Tape (Z2060)
Water Color Paints (3132)
Daubers  (Z726)


Monday, October 17, 2016

Nothing says Christmas like a Poinsettia right?

I just love the holidays, all the beautiful decorations and sparkle but one of my favorite things to decorate with is Poinsettia's, to me they just say Christmas.  I not only love to use them in my holiday decor I also use them in a lot of my holiday crafting to include cards and tags.  I especially like this card because of that.  I used the new Close to My Heart Flower Market Cartridge to make this Poinsettia.  I did however alter it a little, the one on the cartridge is much more three dimensional (beautiful but hard to use on the front of a card) so I used one of the pieces and simply cut it in different sizes and layered it for a nice affect.  I did shape the flower petals and leaves a little with my flower shaping tool just to give them a little more depth.  Here is the finished project...


I started by making an A2 card base by cutting a piece of craft paper to 5 1/2 x 8 1/2" and then folding it into a 4 1/4 x 5 1/2" card.  I added a piece of the birch bark paper from the Oh Deer paper packet that measures 4 x 5 1/4".  I then put my flower together (in this picture I had put in a bitty sparkle in the center but ended up removing it because it was too small and adding in a 4 mm sparkle instead.  As I said previously I cut the flower from the Close to My Heart Flower Market cartridge.  I cut one set of petals from Fern cardstock that measure 2 1/4", one set of petals from Cranberry cardstock at each 2 1/4", 2" and 1 3/4" (just shape a little bit and stack together).  I stamped Merry Christmas in the top right corner and added a strip of bronze glitter paper that is 1 x 4" and a strip of the star patterned paper from the Oh Deer paper packet that is 3/4 x 4".  

I hope you enjoy this card.  I have listed all the supplies at the bottom of this blog and most can be purchased on my OBA at www.craftwithronnie.ctmh.com or by clicking the shopping cart at the top of this blog.  Happy Crafting!!!

Supply List:  
Papers:  Oh Deer Paper Packet (X7214B) 
Cardstock: Craft (Z1375), Cranberry (1272), Fern (X5777)
Misc:  Clear Sparkles (Z3274)
Merry Christmas Stamp Set (M1148)
(Bronze glitter paper is from my stash but CTMH does have other colors available)

Friday, October 14, 2016

Glittered Reindeer how wonderful!!!

I really love the holidays and one of the things I love most about them is that you get the opportunity to use glitter and bling everywhere and that is something I love to do.  So today I was cleaning my craft room and discovered an old reindeer punch I have not used in ages.  I got to thinking about the Oh Deer paper packet and what I could do with that punch.  Well I had a scrap of silver glitter paper and a piece of gold glitter paper from another project laying on the corner of my work table and that was all it took.  Here is what I came up with...


While blue is not a traditional Christmas color I am really loving this Sea Glass cardstock and the Oh Deer paper packet that use it so beautifully.  For this card I made the base using the Sea Glass cardstock and I just cut it to 4 1/4 x 11" and scored it in half and folded it to make an A2 card base that measures 4 1/4 x 5 1/2".  I cut a piece of the Oh Deer paper to 4 x 5 1/4, added a strip of gold glitter paper that is 1 1/2 x 4" and a strip of Sea Glass that is 1 x 4" and is stamped with Merry Christmas from the Merry Christmas stamp set using Memento ink.  Finally, I punched out a reindeer from the silver glitter paper and used 3-D foam tape to give it dimension.  So simple yet it looks very elegant.  

Below is a list of the supplies I used for this project.  As always most of them can be purchased from my OBA at www.craftwithronnie.ctmh.com or by clicking the shopping cart at the top of this blog.  Happy Crafting!!!!

Supplies Used:
Paper Packet: Oh Deer (X7214B)
Cardstock:  Sea Glass (X5789) , Gold Glitter (Z3238), Silver Glitter (Z2329)
Ink: Black Memento (Z899)
Stamp Set:  Merry Christmas (D1694)
3-D Foam Tape (Z2060)
Misc: Deer punch (you can use any punch or cut something using your cricut, just be creative)