Featured Post

FUN WITH TEMPLATES

Today’s card features the Fern & Flora Bundle and the Moonlit Flora Designer Series Paper.  I fell in love with this suite the first tim...

Sunday, April 30, 2017

Layout #2 - Live Beautifully

Here you go, layout #2 using the Live Beautifully paper pack and stamp set which are being offered by Close to My Heart as part of the May 2017 National Scrapbook Month Specials....


I wish you could see the amazing pink ombre and all the gold accents on these papers, they are really very striking.


I wanted to show how cute these little thin cut hearts are.  They come like these just the outlines of hearts as well as solid hearts which you also see on the layout.

I hope you enjoy this layout.  I have listed the supplies I used below.  You can find all of them at www.craftwithronnie.ctmh.com or by clicking the shopping button at the top of this blog.  Remember the papers and stamp set used here will only be available during the month of May 2017 so be sure to get yours now.  Happy Crafting!!!!


Supplies Used:
Inks:  Memento Black (Z899)

Papers:  Live Beautiful B&T Paper Packet (CC1212B)
Cardstock:  White Daisy (1385), Black (1386), and Pomegranate (X5780)
Gold Glitter Paper (Z3238)

Stamp Set - Live Beautifully (CC1212C)

Thin Cuts:
Hearts (Z3260) – this are the outlines of hearts
Basic Hearts (Z3317) – these are the solid hearts

Misc.:
3-D Foam Tape (Z2060)

Friday, April 28, 2017

Want some more Live Beautifully?

How about a preview of some cards that I will be showing you throughout the month of May?


Stay tuned to see each of these cards individually plus more during May. 

Now for the best part...  I will show you four (2 page layouts) and 20 cards I made with just one package of the Live Beautiful paper pack (well there maybe more than 20 cards because I have already done all this and still have a little paper left) over the next few weeks.  Why not get your paper pack and stamp as soon as they are available on May 1st so you can be ready to go.  Both can be purchased at www.craftwithronnie.ctmh.com or by clicking the shopping cart at the top of this blog.  Happy Crafting!!!

Papers:  Live Beautiful B&T Paper Packet (CC1212B) - available 5-1-2017

Stamp Set - Live Beautifully (CC1212C) - available 5-1-2017


Wednesday, April 26, 2017

Live Beautifully

So for my first post about Close to My Hearts "Live Beautifully" National Scrapbook month Special for the month of May 2017 I created a scrapbook page that I think came out great.  I love this paper pack as well as the stamp set.  I tried to use different techniques and just have some fun.


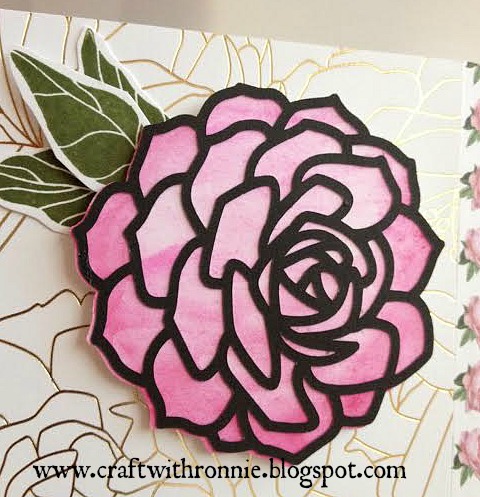
I tried a whole new technique on this rose and I am thrilled with the outcome.  Wish you could see just how beautiful this rose really is.  I used the  Close to My Heart Flower Market Cricut cartridge to make the rose (which is two layers).  I then took the bottom layer which I cut from White Daisy cardstock and I painted it using the Close to My Heart watercolor paints.  It gave the rose this unique stained glass look that I am just in love with.  I will certainly be doing some more stuff using these amazing watercolor paints that is for sure.  


And of course I used my trusty daubers to ink the edges of my titles.  I always love the depth and interest inking gives to my projects. 

I hope you enjoy this layout and will follow along as I bring you more projects using the Close to My Heart Live Beautifully papers and stamp set over the next month.  I have listed all the supplies I used below (remember the papers and stamp will not be available for purchase before May 1st and will only be available while supplies last during the month of May 2017 only so get yours right away).  You can find all the supplies at www.craftwithronnie.ctmh.com or by clicking the shopping cart at the top of this blog.   Happy Crafting!!


Supplies Used:
Inks:  Memento Black (Z899), Pomegranate Ink (Z2653) and New England Ivy Ink (Z2135)

Papers:  Live Beautiful B&T Paper Packet (CC1212B)
Cardstock:  White Daisy (1385), Black (1386), and Pomegranate (X5780)

Stamp Set - Live Beautifully (CC1212C)
Misc.:
3-D Foam Tape (Z2060)
Water Color Paints (3132)
Daubers  (Z726)


Monday, October 17, 2016

Nothing says Christmas like a Poinsettia right?

I just love the holidays, all the beautiful decorations and sparkle but one of my favorite things to decorate with is Poinsettia's, to me they just say Christmas.  I not only love to use them in my holiday decor I also use them in a lot of my holiday crafting to include cards and tags.  I especially like this card because of that.  I used the new Close to My Heart Flower Market Cartridge to make this Poinsettia.  I did however alter it a little, the one on the cartridge is much more three dimensional (beautiful but hard to use on the front of a card) so I used one of the pieces and simply cut it in different sizes and layered it for a nice affect.  I did shape the flower petals and leaves a little with my flower shaping tool just to give them a little more depth.  Here is the finished project...


I started by making an A2 card base by cutting a piece of craft paper to 5 1/2 x 8 1/2" and then folding it into a 4 1/4 x 5 1/2" card.  I added a piece of the birch bark paper from the Oh Deer paper packet that measures 4 x 5 1/4".  I then put my flower together (in this picture I had put in a bitty sparkle in the center but ended up removing it because it was too small and adding in a 4 mm sparkle instead.  As I said previously I cut the flower from the Close to My Heart Flower Market cartridge.  I cut one set of petals from Fern cardstock that measure 2 1/4", one set of petals from Cranberry cardstock at each 2 1/4", 2" and 1 3/4" (just shape a little bit and stack together).  I stamped Merry Christmas in the top right corner and added a strip of bronze glitter paper that is 1 x 4" and a strip of the star patterned paper from the Oh Deer paper packet that is 3/4 x 4".  

I hope you enjoy this card.  I have listed all the supplies at the bottom of this blog and most can be purchased on my OBA at www.craftwithronnie.ctmh.com or by clicking the shopping cart at the top of this blog.  Happy Crafting!!!

Supply List:  
Papers:  Oh Deer Paper Packet (X7214B) 
Cardstock: Craft (Z1375), Cranberry (1272), Fern (X5777)
Misc:  Clear Sparkles (Z3274)
Merry Christmas Stamp Set (M1148)
(Bronze glitter paper is from my stash but CTMH does have other colors available)

Friday, October 14, 2016

Glittered Reindeer how wonderful!!!

I really love the holidays and one of the things I love most about them is that you get the opportunity to use glitter and bling everywhere and that is something I love to do.  So today I was cleaning my craft room and discovered an old reindeer punch I have not used in ages.  I got to thinking about the Oh Deer paper packet and what I could do with that punch.  Well I had a scrap of silver glitter paper and a piece of gold glitter paper from another project laying on the corner of my work table and that was all it took.  Here is what I came up with...


While blue is not a traditional Christmas color I am really loving this Sea Glass cardstock and the Oh Deer paper packet that use it so beautifully.  For this card I made the base using the Sea Glass cardstock and I just cut it to 4 1/4 x 11" and scored it in half and folded it to make an A2 card base that measures 4 1/4 x 5 1/2".  I cut a piece of the Oh Deer paper to 4 x 5 1/4, added a strip of gold glitter paper that is 1 1/2 x 4" and a strip of Sea Glass that is 1 x 4" and is stamped with Merry Christmas from the Merry Christmas stamp set using Memento ink.  Finally, I punched out a reindeer from the silver glitter paper and used 3-D foam tape to give it dimension.  So simple yet it looks very elegant.  

Below is a list of the supplies I used for this project.  As always most of them can be purchased from my OBA at www.craftwithronnie.ctmh.com or by clicking the shopping cart at the top of this blog.  Happy Crafting!!!!

Supplies Used:
Paper Packet: Oh Deer (X7214B)
Cardstock:  Sea Glass (X5789) , Gold Glitter (Z3238), Silver Glitter (Z2329)
Ink: Black Memento (Z899)
Stamp Set:  Merry Christmas (D1694)
3-D Foam Tape (Z2060)
Misc: Deer punch (you can use any punch or cut something using your cricut, just be creative)

Wednesday, October 12, 2016

How about a little "City Sidewalks" for Christmas

So I am just starting to play around with the new City Sidewalks paper packet and it is pretty cute.  Here is a picture of it.


So I also decided it would be fun to use it to make my next card and here it is.  This is another of those rather simple cards that I really enjoy making and sharing during the holidays.


This card was very quick and easy.  I started with a pre-cut white card base that is 4 1/4 x 5 1/2".  I stamped the pine trees from the Nature's Wish stamp set (this is a great stamp set for masculine cards including father's day, birthdays, etc.) using the new Willow ink.  I then stamped the sentiment onto a piece of white daisy cardstock that was 2 1/2 x 2 1/2" using Peackock ink (the sentiment is from the Very Merry stamp set).  I mounted that onto a piece of peacock cardstock that measured 2 3/4 x 2 3/4".  The strip on the left is 2 x 5 1/2" and from the City Sidewalks paper packet.

Below is a list of supplies I used to make this card.  They can be purchased from my OBA at www.craftwithronnie.ctmh.com or by clicking the shopping cart at the top of this blog.  As always, happy crafting!!!

Supplies Used:
Cardstock:  White Daisy (1385), Peacock (X5776)
Paper Packet:  City Sidewalks (X7213B)
Ink:  Willow (Z2807) Peacock (Z2849)
Stamp Sets:  Very Merry (D1694), Nature's Wish (D1703) 


Tuesday, October 11, 2016

Slowed down by Hurricane Matthew but not stopped!!!

Hello all my crafty friends.  I have to tell you I have discovered that while I can dress for church via lantern light I can not craft by it.  LOL.  Well, all is good here in Pinehurst, North Carolina, we did lose power for a few days but that is nothing compared to what so many others have been through.  I decided that I would use today to get back into my craft room and have some fun.  So I am continuing to work with the beautiful Oh Deer paper packet and there is another of my makes.


So this is a pretty straight forward card.  I made a card base using kraft cardstock that is an A-2 (4 1/4 x 5 1/2).  I then cut the white daisy to 4 x 5 1/4" and stamped the little stars using cashmere ink on both corners.  The circles are 2 3/4" (white daisy) and 3 1/4" (sea glass) and this shape can be found on several of the Close to My Heart Cricut cartridges.  I stamped the sentiment with the new Sea Glass ink (I just love this color).  The strips of paper are from the Oh Deer paper packet and cut 1 x 3" and 1 x 3 1/2".  I punched one star out of the gold glitter paper using a punch I have in my craftroom.  

Below is a list of the supplies I used to make this card and as always most of them can be purchased from my OBA at www.craftwithronnie.ctmh.com or by clicking on the shopping cart at the top of this blog.  Happy Crafting!!!

Supplies Used:

Cardstock:  Kraft (Z1375), White Daisy (1385), Sea Glass (X5789) and Gold Glitter (Z3238)
Ink:  Sea Glass (Z2813), Cashmere (Z2785)
Paper Packet:  Oh Deer (X7214B)
Stamp Set: All is Bright (A1190)
Misc:  star punch and glue dots

Friday, October 7, 2016

Snowflakes keep falling!!


I admit it I love these snowflake thin cuts.  I also love anything I can make that sparkles so glitter paper and embossing powder are two of my favorite things.  What did Burl Ives sing??  Silver and Gold, Silver and Gold these are two of my favorite things.  I am really ready to get going on my Christmas crafting.  Christmas is one of my favorite times of the year so it is natural that I love making Christmas paper projects.  


This card once again features the Oh Deer Paper Packet (you are going to be seeing a lot of that paper on my blog because I love, love, love it!!!  This card is another simple one using basic techniques like the use of embossing powder to raise those sentiments up and make them special.  I have also used several of the mini stamps (at $2.95 they are such a great investment).  I also used the Sea Glass Cardstock here again because it is such a perfect match for this paper.  I did put more emphasis on the silver in this card and could have even used the Ranger Silver Super Fine Embossing Powder but I do think the combination of the silver and gold is what makes this work.  

Here are a list of the supplies I used on this card.  They are available on my OBA at www.craftwithronnie.ctmh.com or you can click the shopping button at the top of this blog.  As always, Have a wonderful day and Happy Crafting!!!

Supplies:  

Oh Deer Paper Packet (X7214B)
Silver Glitter Paper (Z3239)
Sea Glass Cardstock (X5789)
Snowflake Thin Cuts (Z4003)
Merry Christmas stamp (M1148)
Ranger Princess Gold Embossing Powder (Z2066)
VersaMark Ink (Z891)
Craft Heater (555)

Wednesday, October 5, 2016

Oh Deer I couldn't wait


I just could not wait to show case one of the cards I will be teaching during my upcoming Christmas Card Club Workshop (we will be making 4 each of 6 different cards, or maybe 3 each of 8 different cards since there are sooo many that I just want to make, LOL).  


This was another great and simple card.  I used some gold metallic paper from my stash but I think the card would be even more beautiful with some gold glitter paper (I did use the silver glitter paper for the small star which was punched from a punch I have in my stash).  I love the gold, silver and white stars on the Oh Deer paper and it coordinates so perfectly with the new Sea Glass Cardstock.  I was concerned about the snowflake cutting since it was so intricate but the new thin cuts are amazing and cut through it like it was butter.  

Below is a list of the supplies I used on this project (most can be located on my OBA at www.craftwithronnie.ctmh.com  or by clicking the shopping button at the top of this blog)  As always have a wonderful day and Happy Crafting!!!

Supply List - 
Oh Deer Paper Packet (X7214B)
Glitter paper (gold or silver)  silver (Z3239) gold (3238) - I used a gold metallic on this card
White Value Pack Cards and Envelopes (X254)
Snowflake Thin Cut (Z4003)
Mini Joy stamp (M1154)
Sea Glass Cardstock (X5789)  (as you can see I am using a lot of this cardstock this year, love this color)
Black Memento Ink (Z899)


Saturday, October 1, 2016

National Card Making Day

Well hello and happy National Card Making Day.  Now I really don't need a day dedicated to card making to give me the excuse to spend the day doing what I love to do but it worked today so I am just going to be happy about that.  Here are two very simple cards I made using this months Stamp of the Month.  Don't forget this $17.95 stamp set can be yours for just $5 with a qualifying $50 purchase during the month of October.  This set is a great way to get started on those Christmas Cards and scrapbook pages we want to get done.

So here is the stamp set.  The star and stocking can be cut using the Close to My Heart Art Philosophy Cartridge (it has retired but many of my customers already own it) or you can cut all of them out by hand (I did this one one project because it was faster and easier than getting out my cricut and it was no problem).


This first card was simple.  I cut a piece of Pacifica Cardstock to 4 x 5 1/4" and stamped the star and sentiment using VersaMark ink and then embossed using the Ranger Princess Gold embossing powder.  I love how the gold pops off this shade of blue.  Very simple yet elegant at the same time.  I mounted the whole thing on a White pre-cut A-2 (4 1/4 x 5 1/2") card base.


For this second card I did the same thing but used the new Sea Glass cardstock (isn't that beautiful) and I changed up the sentiment.  Such simple yet elegant cards, you could even add a nice white or gold ribbon if you wanted.  

Here is a list of supplies I used to make these cards.  As always you can find these supplies and more on my OBA at www.craftwithronnie.ctmh.com or by clicking the shop button at the top of this blog.  Happy Crafting!!!!


Supply List:

White Value Pack of Cards and Envelopes (X254)
VersaMark Ink Pad (Z891)
Ranger Princess Gold Embossing Powder (Z2066)
Craft Heater (to activate the embossing powder) (Z555)
Pacifica Cardstock (X5759) 
Sea Glass Cardstock (X5789)
Yuletide Joy Stamp Set (S1610) (remember it is just $5 with a $50 qualifying purchase)