Featured Post

FUN WITH TEMPLATES

Today’s card features the Fern & Flora Bundle and the Moonlit Flora Designer Series Paper.  I fell in love with this suite the first tim...

Saturday, May 31, 2014

June Specials to be announced

Hello all my crafty friends.  Close to My Heart turns 30 in June and there will be some great special deals available for everyone.  I will be posting all those tomorrow so don't miss it.  But right now I want to remind everyone that it is easy to get started making cards and scrapbook pages.  This card was made using a simple mini stamp.  There are currently 16 of these mini stamps available for just $2.95 each so they are the perfect way to get started stamping.


This is a simple project using the lollydoodle paper pack, one of the mini stamps and some              markers.  It looks great and was fast and easy to make.  Happy Crafting!!!                                            


Wednesday, May 21, 2014

Father's Day or Masculine Birthday Card

I always struggle with masculine cards so I am really trying to create more of them so I become more at ease when making them.  Here are a couple I did, first I was planning for Father's Day and then I realized this card would also be great for a birthday so here they are:


And here is how they are made:

Cut Kraft cardstock to 9x6” and fold in half to make a card that measures 4 ½ x 6”.  

Cut Timberline paper to 4 ½ x 6” and stamp with the tools from the You’re the Best stamp set alternating with Cocoa and Chocolate ink and mount to front of card.

Cut Balloon Ride paper to 1 x 4 ¼” and stamp with sentiment of choice (I made one with You’re the Best and one with Joyful Birthday) using Twilight ink, then dove tail paper.

Cut Twilight cardstock to 1 ¾ x 4” and mount sentiment stamped on Balloon Ride paper to it.  Wrap twine around this a few times and tie.  Add a Durable Triangle Stud and then mount this whole piece onto the front of the card using 3-D Foam Tape

Supplies Used:
Timberline Paper Packet (X7182B) (this included the B&T and the Twilight cardstock used in the project, also the base of the card could be made using the Chocolate cardstock included in this paper pack)
Balloon Ride Paper Packet (X7180B)
Craft Cardstock (Z1375) and Twilight Cardstock (X5666)
Cocoa Ink (Z2114), Chocolate Ink (Z2111), Twilight Ink (Z2160)
You’re the Best Stamp Set (C1571)
Durables Triangle Studs (Z1928)
3-D Foam Tape (Z1151)
Baker’s Twine – Neutral Metallic Asst.  (Z1921)

Tri-Shutter Card with the beautiful Ariana Paper Pack


Select three patterned papers and two solid colors to use.  I chose to use the beautiful Adriana Paper Pack from Close to My Heart, along with their solid cardstock in Hollyhock and Colonial White.  I cut the card base from the Hollyhock to 5 ½ x 12”, score at 2”, 4”, 8” and 10”.  Go 1 ½” into card base and cut from 2” to 10” and then move card over to 4” in and cut from 2” to 10” again.  Now fold card up and down and up and down on each of the score marks.  Push the middle score lines in the opposite direction.  The card can then be finished by adding your choice of patterned papers cut 3/16 inch smaller than the card base. 

Now I used my Close to My Heart Art Philosophy Cricut cartridge and cut several butterflies (page 55) out of the same paper I was adorning the inside of the card with and cut a tag for the sentiment (pg 62) as well as a blank tag for a message inside of the card from Colonial White cardstock.  I stamped the sentiment tag with the Frame Flair stamp set and the Joyful Birthday stamp set using Lagoon and Hollyhock inks.  As a final embellishment I added a pink acrylic rose from the Ivy Lane Assortment pack. 

And here is what the card looks like opened up and all finished.


Supplies Used: 
Paper:  Ariana paper packet (X7179B)
Cardstock: Hollyhock (1246) and Colonia White (1388)
Inks: Hollyhock (Z2128) and Lagoon (Z2195)
Stamp Sets: Frame Flair (D1546) and Joyful Birthday (B1419)
Ivy Lane Assortment (Z3001)
Cricut Art Philosophy Collection (Z1686)

All the supplies for this project can be purchased from my website at www.craftingwithronnie.blogspot.com   or by clicking the shopping cart at the top of this blog.  Happy Crafting!!!

Tuesday, May 20, 2014

Another Masculine Card Using Skylark Paper Pack

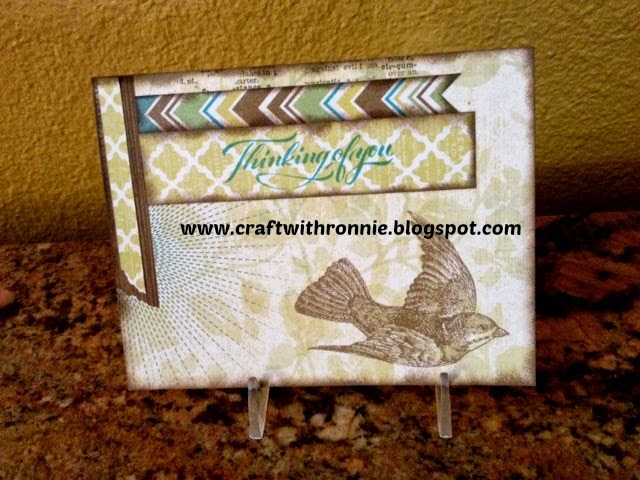
Masculine Birthday Card Using the Skylark Paper Pack
To continue on with a previous post concerning making of masculine cards I still had three quarters of a sheet of the Skylark B&T paper and I wanted to do something else with it. 


So I cut a 4 ¼ x 5 ½ piece from the bottom left side that included the starburst and flying bird.  I then inked all the edges using Chocolate ink and my sponge dauber.  I cut a strip of the scrap Skylark paper to ¼ x 2 ¾” and ripped it and adhered it onto the printed ribbon on the left of the page.  I then cut the little decorative strip (called the zip strip) that comes on all the Close to My Heart B&T papers to 4” and cut a little flag end on the right side.  I then inked all the edges with the Chocolate ink using the dauber.  I cut another piece of the scrap B&T paper to 1 x 4 ¼” and inked the edges of it as well.  I then stamped my sentiment (I used Thinking of You but it could be Happy Birthday, Get Well or anyone of a number of sentiments) using Lagoon Ink. 
I assembled the card as shown in the above photo, it was quick, easy and not a frilly, girly card.

Supplies Used:
4 ¼ x 5 ½ Colonial White Card base and Envelope (X1410)
Skylark Paper (X7177B)
Inks – Chocolate (Z2111) and Lagoon  (Z2195)
Stamp Sets – Sincere Expressions (A1146)
Dauber (Z726)

All the supplies used in this project are available from my website at www.craftwithronnie.ctmh.com   or by clicking the shopping cart at the top of this blog.  Happy Crafting!!


Tuesday, May 6, 2014

Masculine Cards

I find that masculine cards are always the hardest cards for me to create.  Most supplies just don't scream male or masculine.  However, this new Skylark paper pack is very versatile and I have challenged myself to try to make at least four cards during the month of May that can be used for male birthdays, graduations or of course Father's Day.  Here is card one...............


I started with a sheet of the B&T papers that had the birds etc on it (the whole base of his card, ribbons, printing and bird are already printed on the paper) I cut the top left corner of the 12 x 12 sheet to 4 1/4 x 5 1/2 and mounted it onto a colonial white card base the same size.  I used my trusty dauber and daubed the edges of the card with lagoon ink to add dimension.  I then cut a strip of the same B&T paper (a scrap spot) to 1 x 2 1/2" and used the flip side (love these two sided papers) and a piece of the kraft cardstock (included in the paper pack) to 1 1/4 x 3 1/2".  I cut each of these two to look like a flag and then used the dauber on them as well.  I then stamped the vine using stamp set Love This (this is a go to stamp set for me, I use it all the time) using Lagoon ink again and finally I stamped Happy Birthday again with Lagoon ink using the Joyful Birthday stamp Set (you could stamp it with any sentiment, congratulations, get well, happy father's day).

As I said this card is very versatile and it was super quick and easy and I see the potential for three more cards from the scraps of just this one sheet of B&T paper, so I hope you will check back here to see what else I can come up with.  Happy Crafting!!!!!!!!!!!!!

Supplies Used:
X7177B - Skylark Paper Packet
X1410 - Colonial White Cards and Envelopes Value Pack
Z2195 - Lagoon Ink Pad
Z726 - Sponge Daubers
B1439 - Love This stamp set
B1419 - Joyful Birthday stamp set

All supplies can be purchased from my website at www.craftwithronnie.ctmh.com or by clicking on the shopping cart at the beginning of this blog.


Sunday, May 4, 2014

May Specials make Special Cards

So I challenged myself to make some cute cards using this months specials.  I used the Free to be Me paper pack and this months Stamp of the Month to create these cards (I have plenty of supplies to make at least 15 more cards also).  Here are some photo's of the cards I created.


This first picture shows the three cards I made using examples I got from the Close to My Heart Corporation.  They are just beautiful!!


I love the blue and green combined here and the feather vellum is a great addition.  This one I just thought up, the paper is so pretty it makes creating simple.


More vellum here, I love these bright gold polka dots and the arrows are great too.  One of my favorite sayings as well.


This one was just plain fun.  Who doesn't want a card that says they are the apple of your eye?


Love the bright colors here.  Orange and red and a little lagoon blue.


Of all the cards I made this was my favorite.  Love the little folded over corner (just add a little scrap behind to add some additional interest) and the colors are so vibrant.

These cards were a lot of fun to make.  I hope to make a bunch more out of these great papers and what a deal at just $5 for the paper pack.  This months stamp of the month set is perfect for the card maker, so many great sentiments to choose from.

All these supplies are available from my website at  www.craftwithronnie.ctmh.com   or just click on the shopping cart at the top of this blog.  Happy Crafting!!!!

Sunday, April 20, 2014

Happy Easter

Wow, Easter makes me think spring and I am really ready for it this year.  I decided today would be a great day to play with a spring card.  So here it is.  Lots of flowers and bright colors to wash away the winter blahs and welcome Spring.


You can fill these cute little cards with anything (full instructions were posted on my Feb 7th post),  I have made them with panda's, flowers, owls, the sky is the limit.  They are really not very hard but super impressive.  Give one a whirl, I think you will love the results.  Happy Easter and happy crafting!!!

Tuesday, April 15, 2014

Mother's Day Easel Card

I have really been wanting to try an easel card so I decided that would be perfect for a Mother's Day Card.


Base is made from White Daisy cardstock cut to 4 ½ x 12”, scored at 6 and 9”
Cut the following: 
White Daisy to 4 ½ x 6”
Cotton Candy to 4 x 5 ½’, 1 ½ x 3”, 2 ½ x 1 ½”, 3 ½ x 2”
Ivy Lane to 3 5/8 x 5 1/8”
Stamp sentiment onto 2 ½ x 1 ½” piece of Cotton Candy using Black ink (round the corners if desired)
Stamp image onto scrap of White Daisy using black ink and then cut out and mount this onto 1 ½ x 3” Cotton Candy using 3-D foam tape.  Mount this in the upper left corner of card and the sentiment should then be mounted in the lower right corner using 3-D Foam tape.  Now mount card face to bottom 3” of card base (do not adhere above the score line or card will not be able to stand as an easel card)
Stamp second sentiment onto 3 ½ x 2” Cotton Candy (round corners if desired) and mount into center of inside of the card using 3-D Foam tape (this will act as holder for the easel card when opened).

Supplies Used:
Cardstock:  White Daisy (1388), Cotton Candy (X5760)
Paperpack: Ivy Lane (X7178B)
Black Ink (Z2105)
Stamp Set: Mother’s Day (C1577)
3-D Foam Tape (Z1151)

Corner rounder (Z1912)

Friday, April 11, 2014

Exploding Ring Box

For those of you who have been following me you know I made my mother-in-law an Exploding Box card for her 80th birthday that was three layers and over the top.  I had shown it to a friend who was very impressed with it.  That friend has just commissioned me for my most important order to date "her wedding invitations".  I am currently working on those but in the mean time she contacted me and asked if I could make here a box or some kind of card that she could use to hold a "ring pop" so she could "pop the question" to her best friend and ask her to be her Maid of Honor.  The verbiage and colors are hers and the rest is mine since she gave me complete artistic license (thank goodness she trusted me because to be honest at first I was stumped), but this came out great.  

I need to lay down the ground work.  This looks harder than it is (yes it is time consuming but not hard).  The trick..... the Close to My Heart Artiste Cricut Cartridge (see my blog for how you can get it free during the month of April) or you can order it from my website.  The box itself was made using the 3D Object on page 48 cut to 2", the roses are cut from Accent 2 page 54 cut at 1 3/4" and the leaves are from the 3D Object on page 54 also cut at 1 1/2".  

Here it is completed.................


Ok so this is the box all closed up.  Pretty isn't it?


Here it is opened, the card reads "ANGELA now it's my turn to "pop" the question.  Will you be my Maid of Honor?"  The ring pop is supported by a round foam circle with a slit cut in it to hold the ring.


Here is the inside with the lid sitting next to it.  This could be adapted for many uses and could hold all kinds of special items.  


I hope you enjoyed this post and I hope it inspires you to try something "OUT OF THE BOX" ... LOL  Craft on!!

Monday, March 31, 2014

Easter Card using Ariana paper pack


This months challenge was to create using the Ariana paper pack.  I thought this Ariana paper pack was perfect for a pretty Easter card so her is what I came up with.


Cut cotton candy cardstock to 5 ½ x 4 ¼ and  2 3/8  x 3 3/4”

Cut Ariana paper to 2 1/8 x 3 ½”

Cut Daisy White cardstock to 4 x 10 ½” score at 2 5/8 and 5 ¼” and fold

Cut circles using the either the Artiste Cricut Cartridge– Daisy White at 2 ¼” (real dial), Pear at 2 ¾” (real dial) and the Crystal blue at 3 ¼” (there are several options for dolly type cuts on the Artiste cartridge, I happened to use a spellbinders die for this one).

Mount score Daisy White cardstock onto Cotton Candy base.  Mount smaller piece of Cotton Candy cardstock onto the front of the card.  Mount the Ariana paper onto the Cotton Candy.  Stamp the Daisy White Circle with Sentiment and place second sentiment on interior (using Crystal Blue ink) of card along with flowers (stamped in Crystal Blue and/or Cotton Candy).


Stamp two additional flowers onto a scrap of Daisy White using Cotton Candy and Crystal Blue ink and cut out and add Bitty Sparkles to the center of the flowers and mount these on your sentiment circle.


Adhere ¼ of the blue circle to the left side of the front of the card being careful not to allow adhesive to go past the score line.  Mount the Daisy White circle with your sentiment to the Pear circle and then mount these to the top of the Crystal Blue circle using 3-D foam tape to add dimension.
 
Finally, don’t forget to stamp your envelope to give your project a finished look.


Supplies Used:
Cardstocks/Paper:  Daisy White (1385), Pear (X5764), Crystal Blue (1292), Cotton Candy (X5760), Ariana paper pack (X7179B)
Inks: Crystal Blue(Z2117), Cotton Candy (Z2193)
Stamp Sets: Greatest Love (B1444), Petite Perks Delicate Wings (free with $25 purchase)
Bitty Sparkles(Z1263)
3-D Foam Tape (Z1151)

All these supplies can be purchase from my website at www.craftwithronnie.ctmh.com or by clicking on the shopping cart at the beginning of this blog.  During the month April anyone who makes a purchase of $25 or more will receive the Delicate Wings Petite Perks stamp set free from me.  Simply place an order on my website and I will mail you the stamp set.  Happy crafting!!!