Featured Post

FUN WITH TEMPLATES

Today’s card features the Fern & Flora Bundle and the Moonlit Flora Designer Series Paper.  I fell in love with this suite the first tim...

Saturday, April 18, 2020

Ornate Style Bundle and Fluid 100 Watercolor Paper


Today’s card uses both the stamp set and the dies from the new Ornate Style Bundle.  I water colored again but today I chose to do it on Fluid 100 Watercolor paper so you can see the different affect you can achieve simply by changing up one or two products.  I found that I achieve a richer deeper color with watercolor paper which I like but then I also love the soft look you can achieve with the Shimmery White cardstock.  I think both are beautiful and depending on what you want for a final outcome you will love either one you chose to use.


The card base is Daffodil Delight cardstock cut to 5 ½ x 8 ½” and scored at 4 ¼”.  The next layer is cut from Whisper White cardstock using the second largest of the Ornate Layers Dies and it is popped up off the center of the card using Dimensionals.  I then cut a piece of the Fluid 100 Watercolor Paper using the second largest of the Stitched Nested Labels Dies (I love these and use them often).  I then stamped my image from the Ornate Style Stamp Set using Versamark ink and embossed it with the white Stampin’ Emboss Powder set with my Heat Tool.

To color the flowers, I used the same technique I used on my previous post and used ink pads and the Aqua Painters to color in my flowers.  I did also add a little So Saffron in and around my image to fill in the blank areas and give the image additional depth.  The ink colors I used on this card were, So Saffron, Mint Macaron, Crushed Curry, Pear Pizzazz, Garden Green, Rococo Rose, Melon Mambo and believe it or not a little Gray Granite to add shadowing to my daisy. 

Once I finished water coloring my image, I added that layer to the top of my ornate die layer again using Dimensionals.  And for a final little bit of interest I added three of the Rhinestone Basic Jewels.

I hope you enjoy this card; it really was a lot of fun to make.  I will list the supplies I used below and you can find the supplies for this card and many more on my website at www.craftwithronnie.stampinup.net or by clicking the shopping button at the top of this blog.

Happy Crafting!!!

Friday, April 17, 2020

Water Coloring With Ornate Style

I decided today I would create a card that highlighted the new Ornate Garden Suite.  I also wanted to use a technique in which I use ink from my ink pads along with my Aqua Painters to water color paint my image.


The card base is Old Olive cardstock cut to 5 ½ x 8 ½” and scored at 4 ¼”.  I then added a layer of the coordinating Designer Series Paper that measured 4 x 5 ¼”, I just love this paper and the beautiful gold accents on it.  Then I used my Stitched Rectangles dies to cut out two rectangles.  The first was cut using the second from the largest die and it was cut out of Vellum cardstock, I centered this one on the card and popped it up using Dimensionals.  I then used the third largest of the dies and cut it out of Shimmery White cardstock (this paper holds up to the water I want to use with the aqua painters plus it has a slight shimmer that works great with this technique).  I stamped my image from the Ornate Style Stamp Set onto the shimmery white cardstock using Versa Mark ink and then heat embossed using the White Stampin’ Emboss Powder and my Heat Tool.

I started my water coloring at this point.  So, to get started I took one of my clear blocks and just tapped it down into my Old Olive ink pad (this is how I will apply each of the colors).  I then started painting the leaves, at first I went very light over all the leaves and then went back in with more of the ink (and less water) to add the darker shading where shadows would fall (think about which parts of the leaves fall under say the flower or which petals of a flower fall under another petal, this helps with shading).  I then moved onto my daisies which I painted with Daffodil Delight ink and shaded with Mango Melody ink and the centers were colored with Early Espresso.  The dahlias were painted using Bermuda Bay and the small flowers were painted using Highland Heather.  The key to this process is to be patient and not get to heavy handed with the ink or the water.

I then mounted this piece onto the center of the card and added a few of the Gilded Gems (also part of this suite).  I really love this card and I find water coloring to be extremely relaxing and like everyone else during these trying times a little relaxing is a good thing for me.

I hope you enjoy this card.  I will list the supplies I used below and you can find the supplies for this card and many more on my website at www.craftwithronnie.stampinup.net or by clicking the shopping button at the top of this blog.

Happy Crafting!!!

Supplies Used:


Wednesday, April 15, 2020

Squares and Circles Oh My


One of the things I really like to work with is dies, they can add interest to a card in many ways.  Likewise, so can embossing folders, so today I am continuing my series of cards that use a basic layout and can be recreated using any number of stamp sets that you may have on hand.  I used four different stamp sets and four different embossing folders to create this set of cards.  Additionally, I employed my wonderful Triple Banner punch to create perfect banners for each card.  I hope you enjoy them. 

 Card 1 - Dressed to Impress Stamp Set and Tufted 3D Embossing Folder

Gather Together Stamp Set (will be available again later in the year) and Subtle 3D Embossing Folder

 Best Catch Stamp Set and Absolutely Argyle 3D Embossing Folder

Sailing Home Stamp Set and the Stone 3D Embossing Folder (folder was a sale-a-bration item, currently waiting to see if it will be returning in the new annual catalog, sure hope so)

Each card starts with a base layer that measures 5 ½ x 8 ½” and is scored at 4 ¼” (yep that is a piece of cardstock cut right in half).  Next I created a layer for each card that is a coordinating color and that measures 4 x 5 1/4”.  I added two banners strips to each card for the vertical cards these measured 1 ¼ x 5” and 1 x 4 ¾” (here is where that triple banner punch comes in handy, it makes perfectly even banners each time).  

For the horizontal cards the banners measure 1 ½ x 3 ¾” and 1 x 3 ½” (I did change them out on card #3 making the DSP layer 1 ½ x 3 ½” and the cardstock banner 1 x 3 ¾”, just to keep things interesting).  I then cut four squares out of Whisper White cardstock using the largest square from the Stitched Shape dies (I love this die set because it includes 4 each squares, circles and ovals and works great with the other layering dies).  I selected my stamp sets and started stamping away, I loved adding multiple stamps onto the square.  I colored three in using Stampin’ Blends but for the fourth (the fall themed one) I just stamped using my regular inks and then pulled some of the ink color into the center of the pumpkins using my Wink of Stella pen. 

For the sentiments I used circles several different sizes were used and some were mounted onto another larger circle mat.  I used the Stitched Shapes dies and the Layering Circle dies to achieve this affect. 

I have listed the stamp set and embossing folder used under each card.  I would also like to note that the stamp set used in Card #2 is not currently available but it will be returning this fall in the new holiday catalog. 

I hope you enjoy this layout and these cards.  I will list the supplies below but remember you can use anything you have on hand.  If you need to add to your crafting supplies so you can stay busy during this time when we find ourselves with more time for things like cards head over to my website at https://craftwithronnie.stampinup.net or by clicking the shopping button at the top of this blog. 

Happy Crafting!!!

Some of the Supplies Used:


Monday, April 13, 2020

Hand Stamped Backgrounds


Today I am continuing my series of cards that use a basic layout and can be recreated using any number of stamp sets that you may have on hand.  I used four different stamp sets to create these cards including making my own Designer Series Paper (DSP) using nothing but another of the stamps from each of the stamp sets that I used to create the focal point of the cards.  I hope you enjoy them. 

Rooted in Nature Stamp Set 

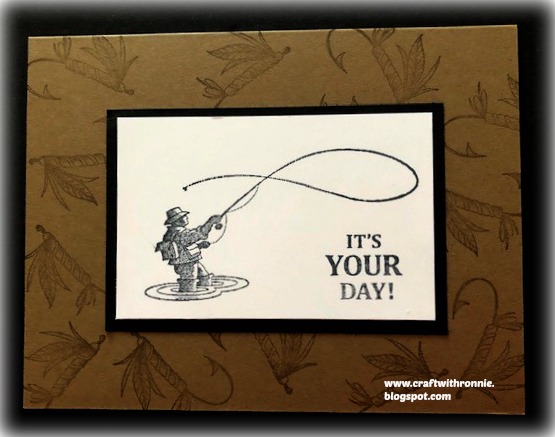
Best Catch Stamp Set

Painted Poppies Stamp Set

Power of Hope Stamp Set (retired)


Each central image was stamped using nothing but Tuxedo Black Memento ink and stamping onto a piece of Whisper White cardstock that measured 3 x 4” and was then layered onto a piece of Basic Black cardstock that measured 3 ½ x 4 ½”(here’s that use of the black again, black and white with a pop of color makes for great cards).   Two images were stamped vertically while the other two were stamped horizontally.

All of the card bases are 5 ½ x 8 ½” and scored at 4 ¼” and scored at 5 ½”.  I selected an image from each stamp set that I wanted to use to make my own DSP look.  For card 1 I used the leaves from the Rooted in Nature set and using old olive ink I stamped off on scratch paper and then onto the Old Olive cardstock being sure to make the pattern random.  For card 2 I stamped the fly from Best Catch, this time I stamped it using Soft Suede ink on Soft Suede cardstock (this one did not require stamping off).  For card 3 I used one of the poppies from the Painted Poppies stamp set, for this one I stamped using Tuxedo Black Memento ink right onto the Poppy Parade cardstock.  For the final card I chose to use the Japanese lantern from the Power of Hope set (this is retired now, it was a freebie during Sale-A-Bration, but again I have some customers who did get this set and I want them to see what they can do with it), for this one I stamped the image using Real Red ink (that I again stamped off on scrap paper) onto Poppy Parade cardstock. 

I used a variety of different sentiments on them and even left one without a sentiment, sometimes less is more. 

I hope you enjoy this layout and these cards.  I will list the supplies below but remember you can use anything you have on hand.  If you need to add to your crafting supplies so you can stay busy during this time when we find ourselves with more time for things like cards head over to my website at https://craftwithronnie.stampinup.net or by clicking the shopping button at the top of this blog. 

Happy Crafting!!!

Some of the Supplies Used: