Featured Post

FUN WITH TEMPLATES

Today’s card features the Fern & Flora Bundle and the Moonlit Flora Designer Series Paper.  I fell in love with this suite the first tim...

Saturday, October 18, 2014

Snowhaven Fun

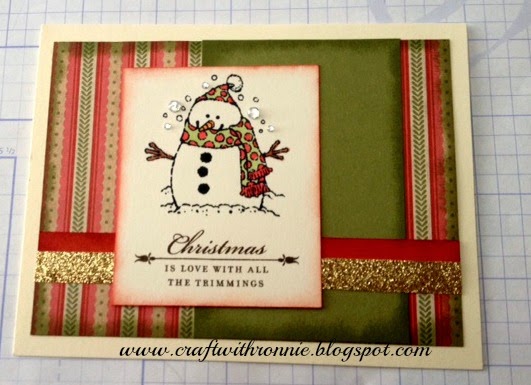
We made a card similar to this during convention this year but I wanted to tweak it so it used the background and texture (B&T) paper to it's best advantage and I didn't waste any (I try to plan my cards to get the most out of my 12 x 12 papers).


So here is my recipe for this beautiful card.  I would also like to point out you can make over 6 of these beautiful cards (with tons of paper left over for other projects) out of one paper pack.  Love it when I can do that!!  All the supplies to make this card can be found on my website at www.craftwithronnie.ctmh.com or by clicking on the shopping cart at the top of this blog.  Happy Crafting!!!

White Card base and envelope (X254)

Snowhaven Paper Packet (X7188) - I used one one of the three B&T papers
¾ x 4 ¼ ” and 4 x 5 ¼ ”

Glacier cardstock (included in Snowhaven Paper Pack)
4 ¼ x 3 ¼” and 1 x 4 ¼”

Cranberry cardstock (included in Snowhaven Paper Pack)
4 x 3”

Daisy White cardstock (included in Snowhaven Paper Pack)
2 1/2 x 2 1/2"

Best Christmas stamp set (D1613) – sentiment in black and snowflakes in glacier

Bitty Sparkles (Z1263)


Ink – Black (Z2105) and Glacier (Z2641)

Corner rounder (Z1912)

Wednesday, October 15, 2014

Christmas Break

I decided I needed a little break from Christmas cards today so I wanted something fun, colorful and spring like.  What better than a beautiful flower card?  I just love this stamp it is called Quick Cards - Japanese Blossom.  Close to my Heart has a whole series of these simple inexpensive single stamps that are just $6.95 each.  I think I am going to pull all mine out next week and play around with making some cute card sets to give as Christmas gifts.  So here is the card...


And here is the recipe to make it.  You can find these supplies on my website at www.craftwithronnie.ctmh.com or by clicking on the shopping cart at the top of this blog.  Happy Crafting!!!


White card base and envelope (X254)

Quick Cards – Japanese Blossom (A1155)

Memento Tuxedo Black ink (because it doesn't bleed when I use my markers

Misc. markers or color pencils (I used my Spectrum Noir's) 

Daisy White cardstock (1385) cut to 4 x 5 ¼” and 2 ¾ x 2 ¾”

Thistle cardstock (X5769) cut to 3 x 3”

Seaside B&T (X7192B) cut to 3 ½ x 4”

Kraft cardstock (Z1375) cut to 4 ¼ x 5 ½”

Thistle Diagonal Striped Ribbon (Z1990)

Thistle Ink (Z2640)

Monday, October 13, 2014

Getting in the Holiday Spirt


My mother-in-law just loves Cardinals and this card was so quick and easy.  I started with the To You and Yours stamp set, I ordered it because I loved the cardinal but also because it had some great holly leaves and berries and some cute sentiments.


Next I selected my paper colors, I decided on Ruby and Olive.  Add some white and you have some great holiday colors.  I stamped the cardinal on a piece of White Daisy cardstock that was cut to 3 x 3" using Black Memento ink (because I wanted to color in the image with my markers and it doesn't bleed).  I used several of my Spectrum Noir markers (whatever markers are your favorite is fine) and began blending the colors.  When I was finished I mounted that piece onto a piece of Ruby cardstock that measured 3 1/4 x 3 1/4" and that was then mounted onto a piece of Olive cardstock that measured 3 1/2 x 3 1/2".  Next I took a piece of the Daisy White cardstock that measured 1 3/4 x 5" and ran it through the Damask embossing folder.  The entire project was then mounted onto a card base made from a piece of Ruby cardstock that measured 5 1/2 x 8 1/2" folded to make a 4 1/4 x 5 1/2" card.   


For the inside of the card I used a piece of white bond paper that measured 4 x 5 1/4, stamped the holy leaves and berries in the bottom left corner (did the same on the envelope) and colored them in using my markers.  Finally, I stamped the Love and joy to you and yours sentiment from the stamp set with Ruby ink.  I am very happy with the results and it really was quite easy.  All the supplies to make this card can be purchased from my website at www.craftwithronnie.ctmh.com or by clicking on the shopping cart at the top of this blog.  Happy Crafting!!!

Supplies Used:

Stamp set "To You and Yours" (B1403)
Damask Embossing Folder (Z1927)
Ruby Ink (Z2170)
Ruby cardstock (X5927)
Olive cardstock (1245)
White Daisy cardstock (1385)


Sunday, October 5, 2014

Flakey Friends

Well another day at 100 degrees, but I still managed to find the necessary inspiration to make another Christmas Card.  This one was inspired by one I saw on Pinterest which was made by Allisa Chilton.  I did take the liberty of changing somethings around and making it my own.  I have to say I love the three adorable little snowmen in this stamp set.


I used my Artiste Cartridge to make all the circle cuts (made it so easy).  I started with black cardstock which I cut to 5 1/2 x 8 1/2" and folded to make an A2 card (4 1/4 x 5 1/2").  I then cut Indian Corn Blue (isn't it an amazing blue) to 4 x 5 1/4" and ran it through my Cuttlebug using a swiss dot embossing folder.  Next I cut two black circles, one at 3 1/2" and one a 2 1/4", two Indian Corn Blue circles, one at 3 1/4" and one a 2", and finally two Daisy White Circles at 3" and 1 3/4" all using the circle on page 48 of the Artiste Cartridge (love all the things I can cut with this cartridge, over 700 images and tons of 3-D items).  I then stamped the smallest Daisy White circle with the snowflakes from the Flakey Friends stamp set using Indian Corn Blue Ink.  I cut 1/2" off each of the three large circles and then stamped the cute snowman.  I don't have the new Shin Han markers from Close to my Heart yet (the ladies are all raving about how great they work) but I do have my trusty Spectrum Noirs so I used OR 1 for the nose, EB5 for the arms and BT9 for the scarf and hat.  I added Clear Assortment Sparkles because you have to have bling.  An finally some white ribbon from my stash and there you have it.  I am very happy with the results.  A list of all the Close to my Heart supplies used is provided below and can be purchased from my website at www.craftwithronnie.ctmh,com or by clicking the shopping cart at the top of this blog.  Happy Crafting!!!

Supplies Used:

Cardstock: Indian Corn Blue (1284), Black (1386), Daisy White (1385)
Ink:  Indian Corn Blue (Z2130) and Memento Black
Stamp:  Flakey Friends (C1506)
Clear Assortment Sparkles (Z1752)
Artiste Cricut Cartridge (Z1790)


Friday, October 3, 2014

Snowhaven Christmas Card Workshop on the Go

Ok so I made some more cards today to sell at a craft fair and through my blog.  Again sets of one each of five cards.  These were created by using the Snowhaven Card Workshop on the Go.  It included the paper, the hearts and the stamps I need for three of the cards and then the other two were created with the leftover paper and a few other stamp sets I have in my stash.

Here are all the cards grouped together:


And here they are individually (the first three are the ones created from the kit:


The following card was created using left over paper and the snowflake stamps from the Best Christmas stamp set and the Snowman is from Flakey Friends.


This next card was made with leftover paper and the Best Christmas stamp.


All the supplies you need to create these cards can be found on my website at www.craftwithronnie.ctmh.com or by clicking the shopping cart at the top of this blog.  I hope you  enjoyed and Happy Crafting!!!!


Thursday, October 2, 2014

Christmas Cards

I has been hard to get in the spirit of making Christmas cards this week since it has been in the 80's and 90's here on the central coast of California but I did get some done.  Here is a look at a set of cards I prepared for sale at a local craft show using a retired card workshop and some bits and pieces from my stash.  I made a set of 5 different cards and I am pretty happy with how they turned out (got six sets finished so far).


Here they are all together and now here they are one by one:


Thursday, September 25, 2014

Pathfinding Paper Pack

I am still loving this paper packet for fall.  Here is a recreation of a card I made once before but now it has a fun fall theme.


This card was made using one of the cute little M stamps that are just $2.95 each and the paper from the Pathfinding paper pack.  I added ribbon from my stash and colored in the stamp with my Spectrum Noir markers.  Fun, easy and perfect for the fall.  All the supplies (except the markers) can be purchased from my website at www.craftwithronnie.ctmh.com or by clicking on the shopping cart at the top of this blog.  Happy Crafting!!!


Wednesday, September 24, 2014

Artfully Sent Cartridge

I have been away for a few weeks.  Had the family in for a long overdue visit.  I now feel refreshed and ready to make some cards.  The only problem I ran into was that my Close to my Heart Artfully Sent Cricut cartridge that I have been awaiting showed up the second day of the two week visit.  Since my craft room is also the guest room I had to be patient and wait to crack it open.  But now everyone is gone and today I played.  These are not great photo's but I wanted to get a card or two done with the cartridge so here goes.


This first card is really cute, the haunted house is completely cut out while still attached to the background so the yellow layer shows through the windows and doors, really cute.  


The outside of this card is a mixed bag.  The spider and web are from the artfully sent cartridge, the Eek is from the Artiste Cartridge and the pumpkin is from the Artbooking cartridge, oh and the ghost is a left over piece from the inside of the card that was done with the Artfully sent cartridge.


Here is the inside, it is hard to see but this card is a pop-out, the ghosts and moon are cut and the background color (white here) shows through, the tree is another layer and then the house and fence are also a layer and they are attached to a step out on the card.  I love the 3-D affect.

This cartridge makes over 400 cards, check out the video and additional information on my website at www.craftwithronnie.ctmh.com   or just click on the shopping cart at the top of the blog and it will take you there.

Happy Crafting!!!!

Sunday, September 7, 2014

Gearing up for Christmas

I know, the kids just went back to school and it is just September.  So why think about Christmas cards and holiday projects now?  Because if you are like me somehow the holidays always sneak up on you.  Each year I swear no more midnight baking or candy making or card addressing and each year that is just what I end up doing all over again.  So this year I am challenging myself to be done with the cards (including the family letter and addressing them), the gift purchasing and wrapping by December 1st so I can actually enjoy the holidays.  I actually started planning Christmas cards and projects several months ago and will be hosting a mega workshop in October where we are going to make 24 Christmas cards in one day (4 each of 6 designs).  One of the things I plan to do is make some beautiful boxed card sets for gifts for my family and friends.  You know everyone needs cards and people my mothers age have everything they need and can use but cards are something that she loves to receive, so each year she asks for them.  This year I am going to try some different ideas out here and I hope you will give me some feedback so I know which way to go with the cards.  But I digress, so here is one of the Christmas cards I created and I love the clean simple lines, let me know what you think (oh, and this is super simple to make).


Ok so I started with a card base cut from ruby card stock to 5 1/2 x 8  1/2" and folded to the standard A2 size of 4 1/4 x 5 1/2".  I then cut a piece of daisy white card stock to 4 x 5 1/4" and embossed it with the Damask embossing folder.  I cut a piece of the ruby card stock to 2 x 4 1/4" and punched the scallops along the bottom using one of my punches in my stash.  I then cut a pieces of daisy white card stock one at 1 1/2 x 4 1/4" on which I stamped the sentiment (from the Holiday Tags stamp set) in the bottom right corner with topiary ink.  I added a bow and ribbon (more stuff from my stash) around the white daisy card stock before attaching it to the ruby base.  The next piece of daisy white card stock was cut to 2 1/4 x 3 1/4" and it was stamped with an evergreen tree (from the Always Grateful stamp set).  For the trees I did a technique where I started with the trees in the background and to create that look I inked my stamp and stamped off on scrap paper and then stamped on my card stock (giving it that ghost image).  I did that three times across the back and then I stamped the trees in the foreground using normal stamping (I did however stamp off the card stock both on the sides and at the bottom to give the trees the look of differing sizes.  This was mounted onto a piece of ruby card stock that was cut to 2 1/2 x 3 1/2".  Now everything was assembled, note here though, when attaching embossed items or items that have ribbon wrapped around them you need to use a strong adhesive so the pieces don't pull apart (I used score tape).  I hope you like this simple yet elegant card, it is fun and easy to make and would be a great one for mass production.  

Below is a list of supplies used to create this card, they can be purchased on my website at www.craftwithronnie.ctmh.com or by clicking the shopping cart at the top of this blog.  Happy Crafting!!!

Supplies:  White daisy card stock (1385), ruby card stock (X5927), topiary ink (X5635), Damask embossing folder (Z1927), Always Grateful stamp set (C1559), and Holiday Tags stamp set (D1560)

Friday, September 5, 2014

Feeling crafty

Well here we are another beautiful morning in Central California.  Fog is burning off and it looks like it is going to be a gorgeous day.  I had one of those super productive days yesterday and it looks like today is going to be the same.  I was wide awake at 5:30 a.m. so I have already made some cards and cleaned the oven and it isn't even 8 a.m.  Well here are some of my fun makes, I am doing my best to try new techniques whenever possible, so here are two that I think worked out well.


I had already posted a picture of the first card I did like this but the tree was stamped with olive ink.  In this one I got brave and decided to try something new for me.  I started by loading up a dauber with honey ink and daubing randomly on the stamp, then I went in with autumn terracotta, next was olive and finally just a touch of chocolate (for the base of the tree).  I think it looks great, I was really happy with the result.  I will be honest though the first one didn't look so great.  I made the mistake of too much olive and chocolate and it was to dark.  I found if I depended more on the honey (rich yellow) and the autumn terracotta (beautiful fall orange) I got a better look.  The tree and sentiment are from the Always Grateful (C1559) stamp set and I use them all the time, the set has a great evergreen for Christmas as well.  I will definitely be using this technique some more.  

The next technique was something I saw on You Tube when I was looking for some new ideas for embossing folders and velum and I hit the jackpot, using them together.  I love the look, it was very rich and I got a beautiful result.  I do still need to add a sentiment to them but I found words don't do well stamped directly onto vellum so I am going to do them on some coordinating card stock and add them to the cards.  


These were so much fun.  I embossed the vellum first (I found I needed embossing folders with a large void area to color in) and then I colored them in using my Close to My Heart inks.  To achieve a watercolor affect on the velum I took one of my acrylic blocks and just swiped it across the ink pad to pick up some of the ink.  I then dipped my blending pen (which I had purchased from Close to my Heart without knowing anything about how to use one, LOL) into that ink and colored directly onto the vellum, adding more ink as necessary.  I think they are beautiful.  Next time I would like to play around with acetate and see what I can do with that.  I hope you liked these new techniques, I had a great time and I learned to give something new a try and who knows what you might create.

Until next time Happy Crafting!!!