Featured Post

FUN WITH TEMPLATES

Today’s card features the Fern & Flora Bundle and the Moonlit Flora Designer Series Paper.  I fell in love with this suite the first tim...

Monday, September 25, 2023

Simple and Classy

Today’s card features the One Horse Open Sleigh Designer Series Paper with a little embossing and some bling.  It is hard to believe that a single piece of Designer Series Paper that only measures 2 ½ x 4” can make this kind of impact on a card.

Here is what the card I made using that little piece of DSP…


The card base is Boho Blue cardstock cut to 5 ½ x 8 ½” and scored at 4 ¼”.  I added a layer of Basic White cardstock that measures 4 x 5 ¼” that I embossed using one of the Basics 3D Embossing Folders (I love this set of folders and this one is quickly becoming my go to embossing folder).  Then I cut my One Horse Open Sleigh DSP to 2 ½ x 4” (there are tons of papers in this pack that would look stunning using this same layout) and mounted it onto a piece of Night of Navy cardstock that measured 2 5/8 x 4 1/8”.  I wrapped a piece of White Baker’s Twine around the bottom of this layer and tied a simple bow.  I added this to my card using Dimensionals.  Then to finish off the front of the card I added three of the Rhinestone Basic Jewels. 

For the inside of my card, I cut a piece of Basic White cardstock to 4 x 5 ¼” and stamped the sentiment “You’re in my heart and prayers” (I felt this could be used for many different situations, from illness, to loss, to someone who just needs to hear you care) onto it using Boho Blue Ink, this stamp is from the new So Sincere Stamp Set and I have to say it has some really nice sentiments in it.  I also added one of the trees from the Horse & Sleigh Stamp Set that coordinates with this DSP.  I stamped it once in Boho Blue Ink and then stamped it a second time without re-inking the stamp.  I did the same thing on the envelope. 

The thing to remember is you don't have to buy everything to make this card.   Perhaps you have some DSP you have been holding onto because you hate to end up with just a few cards using it.  This layout is a great way to make that DSP go a long way.  Or maybe you use a stamp set you already have or an ink or cardstock you have in your stash.  Change up the twine and use ribbon.  It really is about making what you have work.  I hope you enjoy this card I certainly enjoyed making it.  As always you can find the supplies to create this card and more on my website at https://www.stampinup.com?demoid=2206796 or by clicking the shopping button at the top of this blog or the link to the supplies listed below.

Happy Crafting!!!

Product List

Sunday, September 24, 2023

NC Demos September 2023 Blog Hop


Welcome to the NC Demos Blog Hop! We are so glad you are here! You might have already stopped by Kristine Vicente's post and know this month’s theme, but if you are just popping in this month’s theme is Two of a Kind.  I love this idea because it reminds us that it is often more about a good layout that a specific product. 

Here is what I came up with…


For card #1 I started with a Moody Mauve card base that was cut to 5 ½ x 8 ½” and scored at 4 ¼”.   I cut another piece of the Moody Mauve this time to 4 x 5 ¼” and I embossed it using the new Distressed Tile 3D Embossing Folder and adhered it to the card base.  Next, I cut a piece of the beautiful All About Autumn Designer Series Paper to 2 1/8 x 4 ¾” and adhered it to a piece of Copper Clay cardstock that measured 2 3/8 x 5”.  I adhered this layer about ½” from the left side of my card. 

To embellish my card, I stamped the sentiment “I’m thankful” onto a scrap of Moody Mauve cardstock using Moody Mauve ink and then die cut it using one of the dies from the Autumn Leaves Dies.  I used those same dies and cut two leaves one from Copper Clay cardstock and one from the Rose Gold Specialty Paper.  I took a piece of the Natural Ribbon that was about 4” long and cut it in half.  Then I tied a knot in the center of it and began to shred the ribbon (there is a little piece that is left that is the edge of the ribbon just cut it off).  I used Tear & Tape to add the ribbon to my card because I wanted a strong adhesive to keep it in place.  I used Dimensionals and add my sentiment just overlapping the ribbon by a bit to hide the knot.  The two little leaves were just adhered tucked up under the sentiment and three little 2023 – 2025 In Color Dots (in Moody Mauve) finish it off.


For card #2 I used all the same measurements as about and just made a few adjustments.  I replaced the Moody Mauve cardstock with Boho Blue cardstock.  I used one of the Basics 3D Embossing Folders on this one and chose to use the debossed side.  The mat for the DSP was cut from Garden Green cardstock and the Designer Series Paper I chose to use was Winter Meadows.  My sentiment is from the Magical Meadows Bundle and was stamped on Boho Blue cardstock using Boho Blue Ink.  The die is from the Something Fancy Dies.  I attached some Parakeet Party Metallic Woven Ribbon to the back of the sentiment and adhered it to the card using Dimensionals.  Then using more dies from the bundle, I die cut one of the blueberry branches out of Garden Green cardstock added the berry dies cut from Blueberry Bushel and tucked it up under the sentiment.  I added a couple of die cut pieces that were cut from the Distressed Gold Specialty Paper (I used scraps and then cut them apart to make them the size I wanted).  Three more of the 2023 – 2025 In Color Dots (this time in Boho Blue) and the card is done. 

I hope you enjoy these cards as much as I enjoyed making them.  Thank you for letting me share my project. Please stop by and see Laurie Meier's post. I know it will be great!

Happy Crafting!!!

Ronnie


THIS MONTH’S BLOG HOP LIST

Toni Campana 
Tina Lesson
Kristine Vicente
Ronnie Johnson 
Laurie Meier
Kelly Taranto - The Late Night Stamper
Tracie Evans Langley, the Sassy Stamper


Product List (Card 1)
Product List (Card 2)

Saturday, September 23, 2023

A Fruitful Blessing

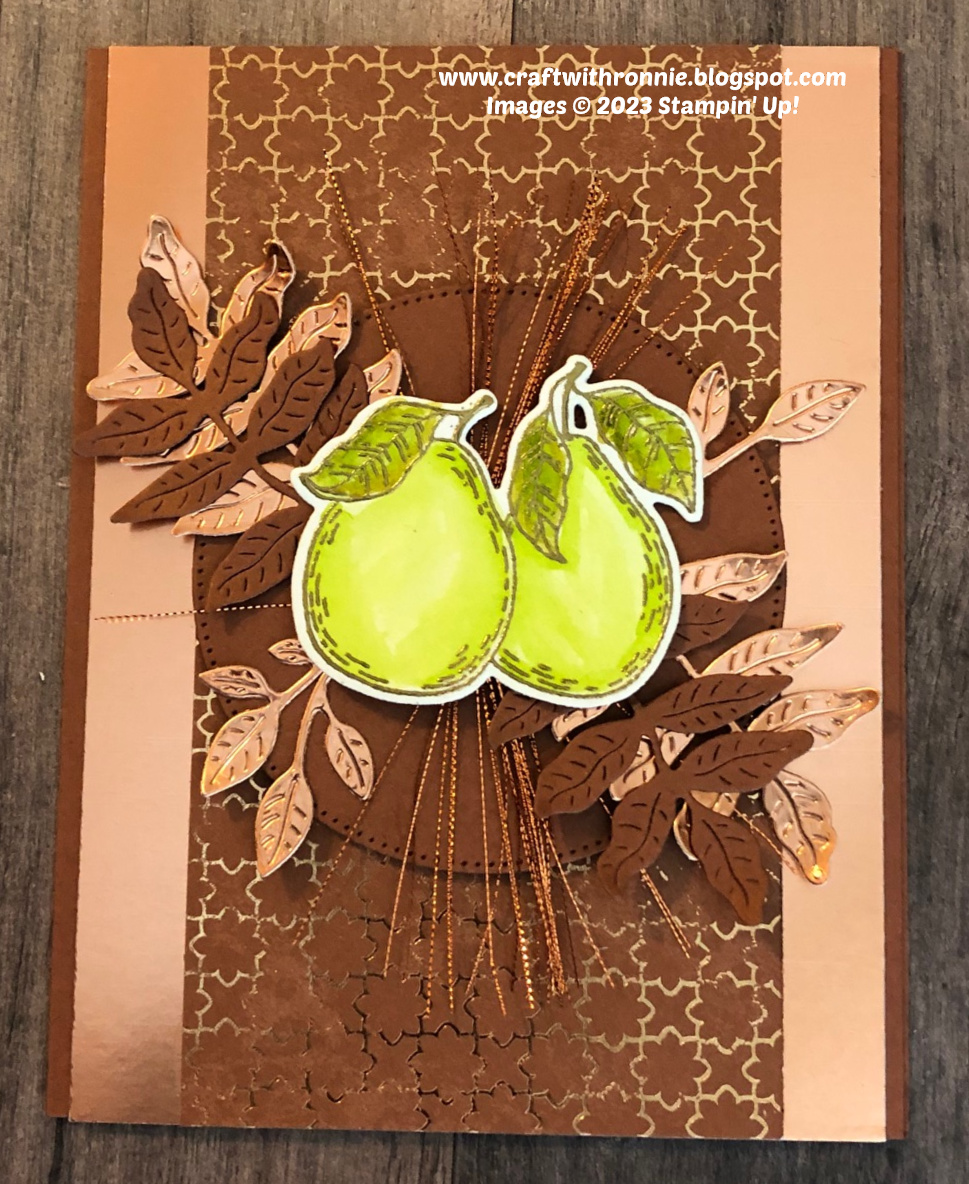
Today’s card features the Fruitful Blessings Bundle and the All About Autum Designer Series Paper.  I am in love with fall colors and this DSP sure delivers.  Not only does it have some beautiful fall papers it has lots of gorgeous foils as well, like the one I used in today’s card. 

Here is what I came up with…


The card base is Copper Clay cardstock cut to 5 ½ x 8 ½” and scored at 4 ¼”.  Then I added a layer of Copper Foil Specialty Paper (I didn’t realize it when I grabbed it but this paper is retired, however you could easily use the 2023 – 2025 In Color Luster Shimmer Paper, I think the copper clay one would look great on this card or even gold foil) that was cut to 4 x 5 ½”.  I added a strip of the Designer Series Paper that measured 3 x 5 ½” to the center of that. 

To build my focal point I cut the largest of the stitched circle dies from the Stylish Shapes Dies out of Copper Clay cardstock and adhered it to the center of the card with Dimensionals.  Next came my ribbon, you may be asking where is that ribbon in the catalog?  Well it is the Copper Ribbon (it comes as part of a 2 pack ribbon pack) and I just cut it in half, tied the two halves together in the center and started to separate the strands (there is a piece left from each side that is not pretty so I just cut it off.  I attached this to my circle using Tear & Tape (I needed something strong to hold it in place) and fanned out the strands.  Then I added two sets of the leaves from the Fruitful Blessings dies that were cut from the Copper Foil and two that were cut from Copper Clay cardstock.  I added three of the small stems from the same die set that were also cut from the Copper Foil. 

To finish off my card I stamped the pears onto a scrap of Basic White cardstock using VersMark Ink and added Gold Stampin’ Emboss Powder and heat embossed them.  I then die cut them using the dies from the bundle and started to color them.  I colored them using Wild Wheat, Granny Apple Green and Old Olive Stampin’ Blends.  When I was done with coloring I added them right to the top center of the circle using Dimensionals.

I hope you enjoy this card I certainly enjoyed making it.  As always you can find the supplies to create this card and more on my website at https://www.stampinup.com?demoid=2206796 or by clicking the shopping button at the top of this blog or the link to the supplies listed below.

Happy Crafting!!!

Product List