Featured Post

MEANDERING MEADOWS DIAGONAL FRONT FLAP CARD

Today’s card features the beautiful Meandering Meadows 6 x 6” Designer Series Paper.   I love the beautiful watercolor scenes on this paper ...

Monday, June 20, 2022

Bottled Happiness Shaker Card

Today I wanted to feature the Bottled Happiness Bundle which I used to make a shaker card.  I love how this bundle works so well together and the cute little Effervescent Elements are the perfect addition to give you that shake.

So here is what I came up with…

The card base is Tahitian Tide cardstock that is cut to 5 ½ x 8 ½” and scored at 4 ¼”.  I then added a layer of the Tahitian Tide colored DSP from the 2022 – 2024 In Color Designer Series Paper that measured 4 x 5 ¼”.   Next, I die cut a piece of Basic White cardstock that measured approximately 3 ¼ x 4 ¾” using the Scalloped Contour Dies.  I centered my bottle punch at the bottom of this layer (be sure to push it up as far as it will go) and punched out the bottle shape.  I used the two stamps from the stamp set that are a bouquet of flowers and stamped them with Tahitian Tide and Parakeet Party Ink (be sure to do this over scrap paper as you are going to have an area that the bottle has already been punched out. 

Next, I took one of the Vintage Bottle Shaker Domes and wrapped a piece of the 2022 – 2024 In Color Bakers Twine around it.  I then flipped over my white layer and after removing the adhesive backing on the bottle, I added it to my layer.  I then filled the bottle with Effervescent Elements (note here, I made two of these and found that filling the bottle about ¾ of the way worked best to get that shaker sound you are looking for).  Once it was filled, I cut a piece of Vellum to 1 ½ x 3” and after removing the adhesive backing, I added the vellum (which I also added glue to before layering) press firmly to be sure all your little effervescent elements stay inside.  This layer gets added to the card using Dimensionals and the Bakers Twine gets tied in a bow. 

For the inside I cut a layer of Basic White cardstock that measured 4 x 5 ¼” and simply stamped the sentiment “Overflowing with happiness” from the stamp set using Tahitian Tide Ink.  I also added a little strip of the Designer Series Paper to the bottom of the insert that measures ¾ x 4”. 


I hope you enjoy this card I certainly enjoyed making it.  As always you can find the supplies to create this card and much more on my website at https://craftwithronnie.stampinup.net or by click the shopping button at the top of this blog or the link to the supplies listed below. 

Happy Crafting!!!


Thursday, June 9, 2022

Another Fun Fold

I decided to share another fun fold card today that uses the Symbols of Fortune Specialty Designer Series Paper.  This paper was priced at $15 but it is retiring on June 30th so it is currently on sale for $7.50 yes that is right 50% off while supplies last.  I have shown this fun fold before but today I did not add any kind of sentiment.  I decided this would be a great card to add to my stash so I can grab it and add any sentiment when I need a card quick.   

So here it is…

The card base is Gray Granite cardstock that is cut to 4 ¼ x 8 ¼” and scored at 5 ½”.  I also cut an additional piece of the Gray Granite to 2 ¼ x 4 ¼” (these two together come from a half sheet of cardstock if you cut it in half at the 4 ¼” mark on the 8 ½” side).  Next, I cut my Basic Black layers and they are 4 1/8 x 2 5/8” (cut two this size), and 4 1/8 x 5 3/8”.  Once those are cut you can go ahead and cut the Designer Series Paper to 2 ½ x 4” (cut two, I chose two different papers for this).  Start by mounting your Basic Black layers.  The largest is for the inside of the card and one of the other two is for the top of the card.  The second 4 1/8 x 2 5/8” piece is mounted on the 2 ¼ x 4 ¼” piece of Gray Granite.  Now just attach your Designer Series Paper to each of these.  Add a piece of Basic White cardstock that measures 4 x 5 ¼” to the inside of the card and adhere the matted piece to the center front (remember just add adhesive to the top so that the card opens. 

For my final addition I added some of the flowers that I die cut from the Symbols of Fortune Specialty Designer Series Paper using the Good Fortune Dies (NOTE:  these flowers can be easily fussy cut if you don’t have the dies) and popped them up on the front of my card with Dimensionals. 

I hope you enjoy this card I certainly enjoyed making it.  As always you can find the supplies to create this card and much more on my website at https://craftwithronnie.stampinup.net or by click the shopping button at the top of this blog or the link to the supplies listed below. 

Happy Crafting!!!

Product List

Wednesday, June 8, 2022

Bottom Flap Card

Today I wanted to feature a retiring product that is currently discounted by 50%, yes that is right this beautiful Designer Series Specialty Paper was $15 but can now be purchased for $7.50 (until June 30th while supplies last so don’t miss out).  I also wanted to show card I saw Mary Knabe from Stampin’ Peace create using this paper.   

So here is my take on that card…


The card base is a little interesting but it was created using Soft Succulent cardstock that is cut to 4 1/4" 'x 11", score at 5 1/2" on long side.  You then place the card base in the vertical position and cut at 2 3/4 from top all the all the way to the score line.  Then you turn the card base to horizontal position and cut on score line from top down to the 2 3/4" cut line.  (Mary has a nice video showing this if you need help that she posted on February 19, 2022 on her blog on Stampin’ Peace.

Next, we will create the inner card, this was made using a piece of Basic Black Cardstock that measured 5 1/4" x 8" and scored at 4" on long side.  For the inside of the card, I used a piece of Basic White cardstock that measured 5" x 3 3/4".  For the front flap I cut two mats of Basic Black that measured 1 ¼” x 5 ¼” and added DSP that measured 1” x 5” to each one.  I added one on the outside of the flap and the second on the inside of the flap (I thought the one on the inside gave the card a more finished look.   I cut my DSP to 5" x 3 3/4" and added it to my black layer.  Here is what the inside looks like…

For my sentiment I chose the sentiment “Sending Caring Thoughts” from the Bamboo Beauty stamp set and I stamped it on a scrap of Basic White cardstock using Tuxedo Black Memento Ink and die cut it with the Stylish Shapes Dies.  I added a Basic Black mat under the sentiment again using the Stylish Shapes dies and popped it up on the card using Dimensionals.  NOTE:  you could use any sentiment you have and a punch or die of any type that the sentiment fits on. 

I hope you enjoy this card I certainly enjoyed making it.  As always you can find the supplies to create this card and much more on my website at https://craftwithronnie.stampinup.net or by click the shopping button at the top of this blog or the link to the supplies listed below. 

Happy Crafting!!! 

Product List

Tuesday, June 7, 2022

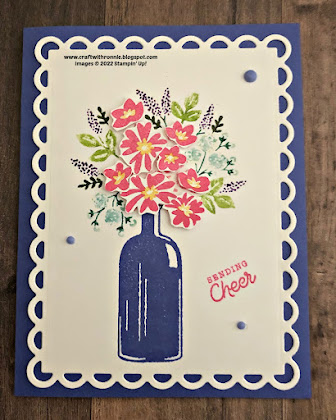
Sending Cheer

Today I wanted to create a little different card using the Bottled Happiness Bundle.  I decided today’s bottle should hold a bouquet of flowers.

So here is what I came up with…


The card base is Orchid Oasis (one of the new in-colors) cardstock that is cut to 5 ½ x 8 ½” and scored at 4 ¼”.  I then die cut a piece of Basic White cardstock to 4 x 5 ¼” and die cut it using the Scalloped Contours Dies (I use these dies a lot).  I stamped my bottle on this piece using the Orchid Oasis ink.  I then used some of the new Masking Paper to mask my bottle (this is simple just stamp the image on the masking paper and cut it out and place it over the image you stamped for the card).  This allowed me to stamp the flowers and not worry about them going over the neck of the bottle.  

To stamp my flowers, I used Stamp and Write markers (unlike the Stampin’ Blend Markers these are water based not alcohol based so you can use them directly on the stamp) to color the stamp in different colors.  I used Shaded Spruce, Mossy Meadow, Granny Apple Green Gorgeous Grape and Pool Party to color them (note, once you have all the markers on the stamp just Huff some warm breath onto it to moisten everything for a better image).  I will point out here that I listed the Many Marvelous Markers below as a single item.  That is because I made the choice to use markers from all four of the color families.  Had I stuck to one color family I could have purchased a package of markers for that color family and the cost would be much less.  I actually purchased them all as a single set with the case by having a party and reaching $450 in sales so I got my set for 1/2 price.  

I then stamped the image onto a piece of scrap Basic White using Polished Pink and Crushed Curry ink and fussy cut the larger flowers so I could pop them up using Mini Dimensionals.  For the final addition I did add the sentiment “Sending Cheer” from the stamp set and three of the 2022 – 2024 In Color Matte Dots. 

I hope you enjoy this card I certainly enjoyed making it.  As always you can find the supplies to create this card and much more on my website at https://craftwithronnie.stampinup.net or by click the shopping button at the top of this blog or the link to the supplies listed below. 

Happy Crafting!!!

Product List

Monday, June 6, 2022

SPOTLIGHTING

Today I wanted to feature a neat technique I have not used in some time.  This technique is called Spotlighting and it works great with this Abigail Rose Designer Series Paper.  So here is what it looks like…


The card base is Soft Suede cardstock that is cut to 5 ½ x 8 ½” and scored at 4 ¼”.  I added a layer of Crumb Cake cardstock that measured 4 x 5 ¼”.  I cut a piece of the Abigail Rose DSP to 3 ¾ x 5” and decided what part of it I wanted to highlight.  Once that decision was made, I used my Stylish Shapes Dies and cut a circle out of the paper that I wanted highlighted.  I also cut a circle the next size larger out of Soft Suede cardstock and mounted the DSP onto it.  I colored my image with Daffodil Delight, Flirty Flamingo and Polished Pink Stampin’ Blends.  I attached this over the hole that was left when I die cut the circle from the DSP making sure to light the flowers back up the way they came out.  I added this using Dimensionals.  I stamped my sentiment “HAPPY BIRTHDAY” from the Cottage Rose stamp set onto a scrap of Crumb Cake cardstock using Soft Suede Ink and die cut it using the Stylish Shapes Dies.  I also cut the next largest flag die out of Soft Suede cardstock and attached the sentiment to that.  I added Dimensionals and put it on the center bottom of the card.  For the final addition I added three of the Rhinestone Basic Jewels that I had colored using my Polished Pink Stampin’ Blend (Hint: you can make these rhinestones match anything by just coloring them with the appropriate Stampin’ Blend marker). 

I hope you enjoy this card I certainly enjoyed making it.  As always you can find the supplies to create this card and much more on my website at https://craftwithronnie.stampinup.net or by click the shopping button at the top of this blog or the link to the supplies listed below. 

Happy Crafting!!! 

Product List

Saturday, June 4, 2022

Hues of Happiness

Today I wanted to feature the Hues of Happiness suite of products.  Specifically, I used the Hues of Happiness Designer Series Paper and the Happiness Abounds Bundle of stamps and dies.  What is great about this suite is that the dies from the bundle also cut out flowers and leaves from 4 of the 12 sheets of Designer Series Paper which is always an awesome thing.  I went back to a design I previously showed on my blog (July 25, 2019) using another group of products.  I do encourage you to check it out as it has some great photos of cutting guides for this card.

So here is what I came up with…


The card base is Gorgeous Grape cardstock that is cut to 5 ½ x 8 ½” and scored at 4 ¼”.  I then took a piece of Basic White cardstock that measured 4 x 5” and I placed a light pencil mark at ¾ and 2 ¾” on both the top and bottom and then connected the ¾ with the 2 ¾” on the opposite side and I cut them as shown in the second photo.


I stamped my sentiment on the bottom right of the piece to the right, it is from the stamp set included in the Happiness Abounds Bundle and I used Gorgeous Grape Ink.  Then I took strips of Fresh Freesia cardstock that measured ½ x 5” and glued them along the sides (cutting off excess) as shown below (this pic is from that previous card from July 25, 2019). 

I then adhered a piece of the Designer Series Paper that measured 2 ¼ x 4” behind the two sides and adhered that to the card base.  Once that is all done it is a simple matter of attaching some of the flowers and leaves, I cut out of the Designer Series Paper using the dies from the bundle and popping them up using Dimensionals. 

I hope you enjoy this card I certainly enjoyed making it.  As always you can find the supplies to create this card and much more on my website at https://craftwithronnie.stampinup.net or by click the shopping button at the top of this blog or the link to the supplies listed below. 

Happy Crafting!!! 

Product List