Featured Post

Season of Green & Gold Project Sheet

Hello there fellow crafters, I found so much inspiration for these products from all over the crafting community so I wanted to see what I c...

Friday, January 27, 2023

He is RISEN

I have been highlighting cards created with products that you can earn for free during Sale-A-Bration over the past few weeks.  Well today I decided to showcase a card that was created using a new stamp set from the January – April Mini catalog who’s purchase helped me to earn some of those freebies.  This card was created from a single stamp set called Rejoice in Him and in my opinion created the perfect simple Easter Card.   

Here is what I came up with…


The card base is Old Olive cut to 5 ½ x 8 1/2” and scored at 4 ¼”.  To this I added a piece of Designer Series Paper (I chose a simple pattern) from the Design a Daydream Designer Series Paper (this paper can be earned hosting a gathering) but any Designer Series Paper of your choice would work, it was cut to 4 x 5 ¼” and adhered directly onto the card base.  Next I stamped my image of Jesus onto a piece of Basic White cardstock using Tuxedo Black Memento Ink.  I also stamped my sentiment from the stamp set onto Basic White cardstock this time stamping with Old Olive ink.  Each of those were cut out using the Layering Circles Dies.  I also cut two additional circles from Old Olive cardstock using the next larger scalloped circle from the die set.  Using scraps of Basic White cardstock I stamped two of the palm fronds using Old Olive ink and while it was still damp I used my Wink of Stella to pull some of the old olive ink into the glitter from the Wink of Stella giving the fronds a green tint and shimmer (impossible to catch in a photo but trust me the affect is great). 

I colored Jesus using Stampin’ Blends, specifically I used light gray granite, ivory and used my color lifter to blend the colors.  Once that was done I added this circle to the scalloped circle and attached it to the top left of the card using Dimensionals.  I then fussy cut my two palm fronds and tucked them up under that circle as shown in the photo.  I also added my sentiment to it’s circle base and popped it up on the bottom right corner using Dimensionals.

For the inside of the card I cut a piece of Basic White cardstock to 4 x 5 ¼” and stamped the sentiment “Celebrate His Love” to the center top of it using Old Olive Ink.  I also added a strip of the same DSP from the front of the card at the bottom of the card insert, it measured ¾ x 4”.

I hope you enjoy this card I certainly enjoyed making it.  As always you can find the supplies to create this card and much more on my website at https://craftwithronnie.stampinup.net or by click the shopping button at the top of this blog or the link to the supplies listed below.

Happy Crafting!!!

Product List

Tuesday, January 24, 2023

Thank You Dainty Flowers

I wanted to showcase another card made with the Dainty Flowers Designer Series Paper which can be earned for free during Sale-A-Bration, from now through February 28th while supplies last.  I have made a number of projects using this paper and because it is such a beautiful paper the card ideas just keep coming.  Today I added two of my favorites along with the paper, the Stylish Shapes Dies from the annual catalog (a to to die set for me) and the Dainty Delight Stamp Set from the new January – April Mini Catalog (there are some nice sentiments in this set and some amazing dies in the bundle). 

Here is what I came up with…

The card base is Crushed Curry cardstock cut to 5 ½ x 8 1/2” and scored at 4 ¼”.  I then cut a piece of the Designer Series Paper (I chose the blue and white checked piece 2 x 5 ¼” and attached it to the left side of the card base leaving a ¼” reveal on the top, bottom and left side.  Next, I cut out a piece of the Designer Series to 3 ½ x 4 ¾” and mounted it onto a piece of Starry Sky cardstock that measured 3 ¾ x 5”.  I popped that up onto the center of the card using Dimensionals. 

Next, I die cut a piece of Crushed Curry cardstock using one of the flag dies from the Stylish Shapes Dies on which I stamped the sentiment “Thank you for your kindness” from the Dainty Delight Stamps using Starry Sky Ink.  I attached it to the front of my card and finished the card off with five of the Brushed Brass Butterflies. 

I hope you enjoy this card I certainly enjoyed making it.  As always you can find the supplies to create this card and much more on my website at https://craftwithronnie.stampinup.net or by click the shopping button at the top of this blog or the link to the supplies listed below.

Happy Crafting!!!

Product List

Saturday, January 21, 2023

Two-Tone Flora Bundle Meets Fine Shimmer Paper

Today’s card features the new Two-Tone Flora Bundle and Fine Shimmer Paper from the January – April 2023 Mini Catalog.  Now one thing that is unfortunately is that no matter how I photograph this card you just can’t see the beautiful shimmer on the Fresh Freesia layer.  I knew the minute I saw this bundle I had to have it and I was so right, it is amazing to work with and so easy to use. 

Here is what I came up with…


The card base is Fresh Freesia cardstock cut to 4 ¼ x 11” and scored at 5 ½”.  I then cut a layer that measures 4 x 5 ½” from one of the Fresh Freesia Fine Shimmer papers.  I attached that layer to the center of my card base (it is about 1/8” narrower than the card base on each the left and right sides).  I then cut a piece of Basic White cardstock to 4 ¼ x 5 ½” and die cut the beautiful intricate floral pattern on the card front using one of the dies from the Two-Tone Flora Bundle.  

To finish the front the card I stamped (using the stamp set in the bundle) the details part of three of the flowers (image #1 below) onto Basic White with Fresh Freesia Ink and then stamped over those with the rest of the flower (image #2 below), for this I inked the stamp with Fresh Freesia Ink and stamped off once before adding it to the first image.  I also stamped three sets of leaves from the set onto the cardstock using Pear Pizzazz ink and then die cut all the flowers and leaves using the coordinating dies from the bundle.  I added these to the front of the card using Dimensionals.

For the inside of the card, I cut a piece of Basic White cardstock to 4 x 5 ¼” and added one of the flowers and one set of leaves.  I did the same for the envelope so everything coordinated really well. 

I hope you enjoy this card I certainly enjoyed making it.  As always you can find the supplies to create this card and much more on my website at https://craftwithronnie.stampinup.net or by click the shopping button at the top of this blog or the link to the supplies listed below.

Happy Crafting!!!

Product List

Friday, January 20, 2023

Dainty Flowers Card Folder Box and Coordinating Cards

I wanted to showcase one of the products you can earn for free with qualifying purchases during Sale-A-Bration from now through the end of February (while supplies last).  This beautiful Dainty Daisy 12 x 12" Designer Series Paper was perfect for the project I had in mind.  A few months ago my upline Karen Titus showed us how to make one of these folders.  I did alter my directions a bit to make it mine but the concept is still the same, it just holds 6 cards instead of 3.  

I fell in love with this paper when I saw it and I actually got two packs of it because I have a ton of one sheet wonder cards in mind to use it on.  Who doesn't love free and who doesn't love a product that can yield tons of cards fast and easy.  

Here is my project, a card folder box with 6 coordinating cards inside.


The front and back covers are the same (see photo above).  The photo below shows the folder open...


Here are the six coordinating cards I made to go with the card folder box ...


To receive your free PDF file containing the instructions for the Card Folder Box and six coordinating cards simply place a $50 or more order (pre-tax and shipping) between now and the 28th of February 2023 through my website at:  https://craftwithronnie.stampinup.net and use host code:  ZTZ37YD9 or click on the shopping button on the top of this blog and shop away.  When I receive notification of your order I will email you the PDF (be sure to include your email in your profile when ordering).  To purchase the PDF for $10 simply email me at www.craftwithronnie@gmail.com (payment excepted through Paypal or Venmo only).  


Thursday, January 19, 2023

Dainty Flowers Simple and Easy

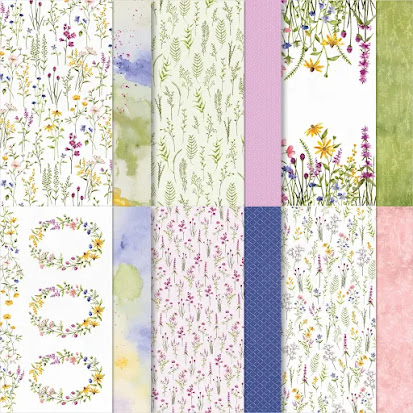
Today’s card is another one made from a free product I earned during Sale-A-Bration (remember you can also enjoy earning free products with purchase from now through February, while supplies last).  The free product featured in today’s card is the Dainty Flower Designer Series Paper.  This pack of paper includes 12 sheets, 2 each of 6 double sided designs that are 12 x 12” and beautiful.  Watch for more great projects made with this paper as I loved it so much I got two of the packs to play with.

Here is what I came up with today…


And here is the paper pack that can be earned with a qualifying $50 purchase, as you can see the papers are really beautiful.  


The card base is Orchid Oasis cut to 5 ½ x 8 1/2” and scored at 4 ¼”.  I cut a piece of the Designer Series Paper (love this one with the oval of flowers on it) to 3 ¾ x 5” and I mounted that onto a piece of Rich Razzleberry cardstock that measured 4 x 5 ¼”.  Once those two pieces were attached to one another I wrapped them with White Twine (twice) and tied a bow.  I added this to my card base. 

Next, I cut a piece of Rich Razzleberry cardstock to ¾ x 2 ½” and stamped my sentiment “celebrate you” from the Dainty Delight Stamp Set onto it using VersaMark ink and then heat embossed it with White Stampin’ Emboss Powder.  I cut one side with the Lovely Labels Pick a Punch and popped it up on the card with Dimensionals.  For my final embellishment I added three Iridescent Rhinestone Basic Jewels. 

I hope you enjoy this card I certainly enjoyed making it.  As always you can find the supplies to create this card and much more on my website at https://craftwithronnie.stampinup.net or by click the shopping button at the top of this blog or the link to the supplies listed below.

Happy Crafting!!!

Product List