Featured Post

MEANDERING MEADOWS DIAGONAL FRONT FLAP CARD

Today’s card features the beautiful Meandering Meadows 6 x 6” Designer Series Paper.   I love the beautiful watercolor scenes on this paper ...

Monday, March 31, 2014

Easter Card using Ariana paper pack


This months challenge was to create using the Ariana paper pack.  I thought this Ariana paper pack was perfect for a pretty Easter card so her is what I came up with.


Cut cotton candy cardstock to 5 ½ x 4 ¼ and  2 3/8  x 3 3/4”

Cut Ariana paper to 2 1/8 x 3 ½”

Cut Daisy White cardstock to 4 x 10 ½” score at 2 5/8 and 5 ¼” and fold

Cut circles using the either the Artiste Cricut Cartridge– Daisy White at 2 ¼” (real dial), Pear at 2 ¾” (real dial) and the Crystal blue at 3 ¼” (there are several options for dolly type cuts on the Artiste cartridge, I happened to use a spellbinders die for this one).

Mount score Daisy White cardstock onto Cotton Candy base.  Mount smaller piece of Cotton Candy cardstock onto the front of the card.  Mount the Ariana paper onto the Cotton Candy.  Stamp the Daisy White Circle with Sentiment and place second sentiment on interior (using Crystal Blue ink) of card along with flowers (stamped in Crystal Blue and/or Cotton Candy).


Stamp two additional flowers onto a scrap of Daisy White using Cotton Candy and Crystal Blue ink and cut out and add Bitty Sparkles to the center of the flowers and mount these on your sentiment circle.


Adhere ¼ of the blue circle to the left side of the front of the card being careful not to allow adhesive to go past the score line.  Mount the Daisy White circle with your sentiment to the Pear circle and then mount these to the top of the Crystal Blue circle using 3-D foam tape to add dimension.
 
Finally, don’t forget to stamp your envelope to give your project a finished look.


Supplies Used:
Cardstocks/Paper:  Daisy White (1385), Pear (X5764), Crystal Blue (1292), Cotton Candy (X5760), Ariana paper pack (X7179B)
Inks: Crystal Blue(Z2117), Cotton Candy (Z2193)
Stamp Sets: Greatest Love (B1444), Petite Perks Delicate Wings (free with $25 purchase)
Bitty Sparkles(Z1263)
3-D Foam Tape (Z1151)

All these supplies can be purchase from my website at www.craftwithronnie.ctmh.com or by clicking on the shopping cart at the beginning of this blog.  During the month April anyone who makes a purchase of $25 or more will receive the Delicate Wings Petite Perks stamp set free from me.  Simply place an order on my website and I will mail you the stamp set.  Happy crafting!!!


Wednesday, March 19, 2014

Skylark Paper Pack and Fabulous You Stamp Set

I love both the paper and the stamp set used on this card.


Colonial White card base (5 ½ x 4 ¼)

Lagoon cardstock which is included in the Skylark paper pack (2 each) cut to 1 ¾ x 3 ¾” embossed using the quatrefoil folder.  Skylark paper cut to 1 5/8 x 3 ¾”.  Mount these three across card stock as shown in photo.

Colonial White cardstock cut to 2 ¾ x 2 ¾”, distressed with a sponge dauber using Lagoon ink, then stamped with Fabulous You using Saddle ink.

Cut Craft cardstock which is included in the skylark paper pack to 3 x 3” and mounted the stamped image onto that.  Cut an additional piece of the craft cardstock to 1 ¼ x 5 ½”, distress with a sponge dauber using Lagoon ink, then stamp sentiment of choice (I used the one from the Fabulous You but you could use a happy birthday, get well, any sentiment would work) using Lagoon ink.  Add Triangle Stud.
Mount sentiment onto card, then add the mounted stamped image (I raised this using 3-D Foam Tape) to add additional interest.  I also added a little color to the stamped image using colored pencils and a blending pen.

Finally, stamp envelope with small bird using Delicate Wings Petite Perks (free from me with a $25 purchase during the months of March/April).


Supplies Used:
Paper/Cardstock – Colonial White Cards and Envelopes (X1410), Colonial White cardstock (1388), Skylark paper pack (X7177B)
Inks -  Lagoon (Z2195), Saddle (Z2171)
Stamps  - Fabulous You – Seasons and Nature (C1533)
Misc. –  Sponge Dauber (Z726), Blending Pen (3174), Watercolor Pencils (3505), Quatrefoil Embossing Folder (Z1926), Triangle Studs (Z1938), 3-D Foam Tape (Z1151)


I hope you enjoyed this card, it is fun and easy to do and you could make quite a few from one paper pack and by changing sentiments you could use them for lots of different events.  All the supplies used can be purchased from my website at www.craftwithronnie.ctmh.com or by clicking the shopping cart at the beginning of this blog.  

During the months of March and April anyone who makes a purchase of $25 or more will receive the Delicate Wings Petite Perks stamp set free from me.  Simply place an order on my website and I will mail you the stamp set.  Have fun and keep crafting!!!

Friday, March 14, 2014

Ivy Lane and March Stamp of the Month Card

This Ivy Lane paper pack makes me think of Spring and for many of us we are ready to see spring now.  It was one of those cards that almost made itself.


Base is a 5 ½ x 4 ¼” Colonial Card and Envelope

Ivy Lane paper is trimmed to 2 x 4 (this will be the back side of the paper) and 2 ¾ x 4” (this will be the front side of the paper).  Cut a length of the ½” trim paper (found on each B&T sheet) from the Ivy Lane paper pack cut to 4”.

Using a sponge dauber, distress the outside three sides of both pieces of Ivy Lane paper using Chocolate ink.

Mount  papers as shown in photo.

Stamp hearts from the March Stamp of the Month – Happy Place onto scraps of Cotton Candy cardstock using Chocolate ink and cut out.  Place the hearts on the left side of the card using 3-D Foam Tape to add dimension.  Add a Flamingo Dot to the center of each heart for added interest. 

Stamp envelope with the same heart from the stamp set for a unifying look.

Supplies Used:
Papers/Cardstock: Cards and Envelopes from the Colonial White Value Pack (X1410), Ivy Lane Paper Packet (X7178B)
Stamp Sets - Happy Place Stamp Set (S1403) or with a $50 purchase during the month of March (S1403A) – This stamp set is only available during the month of March 2014
Ink - Chocolate Ink (Z2111)
Misc. - Sponge Dauber  (Z726), Flamingo Dots (Z1934), 3-D Foam Tape (Z1151)


All these supplies can be purchase from my website at www.craftwithronnie.ctmh.com or by clicking on the shopping cart at the beginning of this blog.  Happy crafting!!!

Monday, March 10, 2014

CAS Sympathy Card

Sympathy cards are one of those things, you hate to make them but when you need one you really need one. Unlike a birthday card where you can say, oh that's right I need to pick Aunt Sue up a card she has a birthday coming up in two weeks, the need for a sympathy card is generally a surprise.  I prefer mine to be CAS cards (Clean and Simple) not too over the top but elegant at the same time.

I started with a card base made from Ruby cardstock  that was cut to 4 1/2 x 6 1/4.  I then cut additional card stock as follows:

Daisy White cardstock cut to 3 3/4 x 1 1/2 which I then stamped using the Swirls Around stamp set and Black Ink

Black cardstock cut to 4 x 1 3/4

Daisy White cardstocke cut to 4 1/2 x 2 1/4 which I then embossed, I tried both the Dot and Chevron folders, liked both of them you could use either.

I punched a butterfly from scraps of the Ruby cardstock and added three Bitty Sparkles down the center.  I then pushed up the wings on each side and attached the butterfly using Liquid Glass.

I stamped the sentiment on the bottom right corner using Words of Comfort stamp set in black ink.

I layered the pieces as shown and added 3-D Foam tape between the black layer and the embossed layer to add dimension.


I stamped the inside of the card using a sentiment from the Card Chatter - Sympathy stamp set and black ink.


I was pleased with the outcome.


Supplies used:

Ruby cardstock (X5927)
Black cardstock (1386)
Daisy White cardstock(1385)
Embossing folders - Chevron (Z1925) or Dot (Z1924)
EK Success Butterfly punch
Swirls Around Stamp set (D1551)
Words of Comfort Stamp set (C1524)
Card Chatter - Sympathy Stamp set (D1476)
Bity Sparkles (Z1263)
Black Ink Pad (Z2105)
3-D Foam Tape (Z1151)
Liquid Glass (Z769)

I hope you will give this project a try, it is very simple and yet it makes elegant cards.  You could use this layout for pretty much any card you wanted.  All supplies can be purchased on my website at www.craftwithronnie.ctmh.com or by clicking on the shopping cart at the beginning of this blog.  Happy crafting!!!

Thursday, March 6, 2014

Exploding Box Card

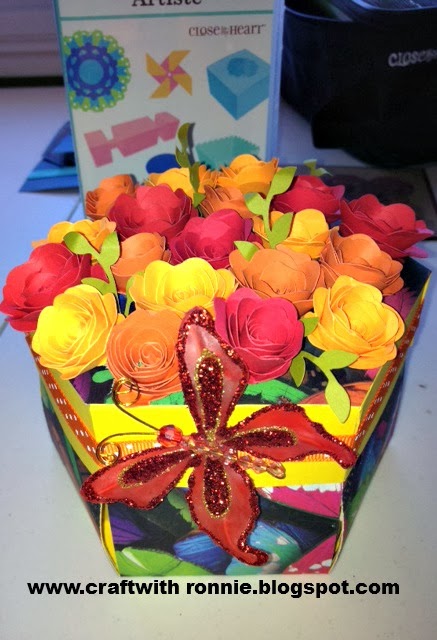
By popular demand I am posting these pictures of my exploding box card I made for my wonderful Mother-In-Law.  The box was cut using the 3D Object on page 48 of the Close to My Heart Artiste cartridge.  I cut one at 4", one at 3" and one at 2".  I then cut the lid as well at 4".  I put each size inside the previous one and turned them so they would be slightly off set.  I then used the same cartridge and made all the roses (page 54 accent 2) and the leaves (page 54 Shift 3D object).  I finished the box off by adding beautiful paper squares and butterflies.  I am very happy with how it come out.  It was easy with the Artiste cartridge.  Visit my website by clicking the shopping cart about and see all the great stuff that comes with the Cartridge, including stamps and chipboard pieces.  I love mine and use it all the time.


Here it is all closed up and ready to explode!!

Here it is exploded.  How much fun it that?

HAPPY CRAFTING!!!!